INSTALLATION - BOTTOM MOTHERBOARD
The new
bottom
assembly for voices 1-4 comes partially-assembled & fully calibrated.
If you are only installing a 4-voice expansion please skip to the section
Top Motherboard Installation.
1 Remove the top tray assembly to access the bottom motherboard
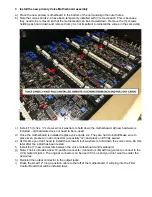
a) Remove the (6) connectors between the upper voice tray and mainboard. The connectors can be
discarded as new connectors are included in the kit.
b) Remove the 5-position connector on the right side of the voice motherboard.
c) Remove (3) screws from the bottom of the OB-X that are holding the (3) 1
½” standoffs to the left
side of the upper voice tray.
Alternately, remove the (3) 6-32 nuts from the top side of the unit and
leave the standoffs in place for now.
d) Remove the upper tray assembly.
You should now be staring at the bottom tray assembly:


