AbodeFit Zen Molight Far Скачать руководство пользователя страница 9

EN

9


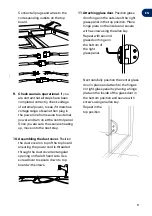
Connect all plugs and wires to the 
corresponding outlets on the top 
board.

9.  Check sauna is operational. If you 

are certain that all steps have been 
completed correctly, check voltage 
of external power, to see if it matches 
voltage range of sauna then plug in 
the power line from sauna to external 
power and turn on at the control panel. 
Once you are sure the sauna is heating 
up, move onto the next step.

10. Assembling the dust cover. Position 

the dust cover on top of the top board 
ensuring the power cord is threaded 
through the dust cover rectangular 
opening on the left hand side. Use 
screwdriver to secure down to top 
board with screws.

11. Attaching glass door. Position glass 

door hinge on the outside of the right 
glass panel in the top position. Place 
hinge plate on the inside and secure 
with a screw using the allen key.


Repeat with second  
glass door hinge on  
the bottom of  
the right  
glass panel.


Next carefully position the center glass 
door in place and attach to the hinges 
on right glass panel by placing a hinge 
plate on the inside of the glass door in 
the bottom position and secure with 
screws using an allen key. 


Repeat in the  
top position.

Содержание Zen Molight Far

Страница 1: ...Zen Molight Far Infrared Sauna 2 Person USER MANUAL...

Страница 2: ...ty precautions and keep for future reference WARNING Keep young children away from this Zen Molight Far Infrared Sauna at all times Please contact AbodeFit Health s warranty provider Vitality 4 Life d...

Страница 3: ...fety Precautions 4 Parts and Features 6 Installing your Zen Molight Far Infrared Sauna 7 Operating your Zen Molight Far Infrared Sauna 11 Cleaning and Maintenance 12 Troubleshooting 13 Warranty 14 EN...

Страница 4: ...mia can occur when the internal temperature of your body reaches a level several degrees above normal body temperature of 37 C 98 6 F The symptoms of hyperthermia include an increase in the internal t...

Страница 5: ...rain Do not open the cover to the control system as there are high tension fittings that can be dangerous Only authorised and approved dealer technicians should make any needed or necessary repairs An...

Страница 6: ...door 8 Door handle 9 Glass door hinge 10 Front board 11 Top board 12 Temperature sensor 13 Speaker 14 Ventilation 15 Back board 16 Far infrared panel heater 17 Right board 18 Bench 19 Bench support 2...

Страница 7: ...the same line One person should hold the back board in place while another person does the next step Put the wires of back board into the cabinet to avoid pressing the wires during installation 3 Ass...

Страница 8: ...ith screws on either side through the slats using a screwdriver 7 Assembling bench support bench Assemble bench support first Slide the bench support vertically into place by ensuring the groove on th...

Страница 9: ...board ensuring the power cord is threaded through the dust cover rectangular opening on the left hand side Use screwdriver to secure down to top board with screws 11 Attaching glass door Position gla...

Страница 10: ...e you position one metal door handle brackets with another washer on the inside of the door in the top handle position With the allen key insert a screw through the hole in the metal handle bracket th...

Страница 11: ...from 85 7 108 5 USB Function Press this button to start USB function 6 Music Selection Press the forward and back track keys at the same time for 2 seconds to activate FM mode Press back track button...

Страница 12: ...n be switched by pressing the temperature button and at the same time then pressing the Light button to switch between Fahrenheit and Celcius Cleaning and Maintenance Do not use liquid or aerosol clea...

Страница 13: ...ils on the last page Light bulb is not working The light bulb has burnt out Light bulb wiring is loose The electrical control panel is faulty Replace the light bulb Tighten light bulb connectors Conta...

Страница 14: ...warranty coverage 7 Typical turn around times to address warranty claims can be between 10 14 business days plus shipping depending on location and type of damage or warranty claim 8 In no event shall...

Страница 15: ...EN 15...

Страница 16: ...y 4 Life United States E support vitality4life com W www vitality4life com Vitality 4 Life France E support vitality4life fr W www vitality4life fr Vitality 4 Life Deutschland E support vitality4life...

Отзывы: