


EN
8
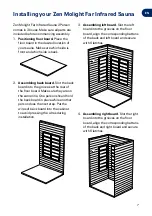
5. Assembling front board.
With one person
holding the right
side and another
person holding the
left side carefully lift
the front board up
and slide into
place in side
locks on the left
and then right
board.
Note: Take care
of the glass door
to avoid damage.
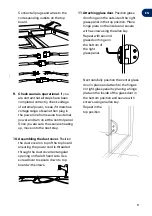
6. Assembling
floor far-infrared
panel heater.
Position floor
far-infrared panel
heater in place
on top of the floor
board, infront of
where the bench
will be installed and
plug it in to the connection that’s
attached to the back board.
Secure it to the
floor board with
screws on either
side through the
slats using a
screwdriver.
7. Assembling bench support & bench.
Assemble bench support first. Slide
the bench support vertically into place
by ensuring the groove on the left side
slots into the screw on the left board
then secure it down.
Repeat on the
right side. Plug
together black
power cords.
Next slide bench
horizontally into
place on
correspnding
batterns above
the support.
Secure on all
4 sides with
screws using a
screwdriver
8. Assembling the top board. One
person to step inside the sauna while
the other raises the
top board high
enough to fit
between the
surrounding
boards. Person
inside the sauna
to carefully slide
top board into
place. Use a
screwdriver to
secure with screws.
Содержание Zen Molight Far
Страница 1: ...Zen Molight Far Infrared Sauna 2 Person USER MANUAL...
Страница 15: ...EN 15...


