45
Zenith Automatic Transfer Switch | new.abb.com/low-voltage
Electrical Testing of the Switch
(Source 1 = Utility, Source
2 = Generator)
To verify the electrical system and proper automatic operation
of the switch, perform the following steps:
Checking Source 1 (Preferred Source)
1. Check to make sure the switch is connected to
Source 1 position.
2. Turn the Contact Switch to INHIBIT. This prevents the
switch from transferring or sending a start signal to the
Source 2 generator unintentionally.
3. Verify that the switch rating is the same as the system
voltage from Source 1 supply power. The equipment rating
label on the fascia lists the voltage.
4. Close the Source 1 input circuit breaker.
5. Confirm that the MX350 controller is sensing Source
1 voltage. The S1 LED should be illuminated. Electrical
parameters (including phase rotation) can be viewed on the
MX350 Graphical Control Panel on the \Value\Summary
and Diag\Phasor screens. Verify that the system voltage is
correct for the rating of the switch.
Checking Source 2 (Non-Preferred or Alternate Source)
6. Close the Source 2 input circuit breaker.
7. Manually start Source 2 via controls on the generator itself.
Note that with the Control Switch in INHIBIT position, the
generator cannot be started by the MX350 controller.
8. Confirm that the MX350 controller is sensing Source
2 voltage. The S2 LED should be illuminated. Electrical
parameters (including phase rotation) can be viewed on
the Graphical Control Panel on the \Value\Summary and \
Diag\ Phasor screens.
9. Verify that the phase rotation of Source 1 is the same as
the phase rotation of Source 2.
10. Manually shut down the generator via controls on the
generator itself.
Checking the Switch’s Ability to Transfer
11. Turn the Control Switch to AUTO position. This allows the
MX350 controller to send a start signal to the generator.
12. Perform a System Test. The options available are (a) Fast
Test (test with load without time delays), (b) Xfer Load and
(c) No Xfer (test without load, generator start only). The
test(s) can be initiated by the green TEST button on the
Graphical Control Panel.
13. After completing electrical tests, close and lock
the enclosure. Electrical testing of the switch is further
discussed in the manual MX350 Automatic Transfer Control
System (Publication Number 1601-9071-A1).
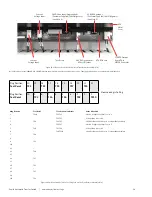
Figure S6-10: MX350 Control Switch location
Figure S6-11: MX350 Graphical User Interface
Ease of Use
• Graphical Interface
• Self-description
Graphical Display
• Large Metering Values
• Wide Viewing Angle
LED Indication
• Time Delay Indication
• Alarm Indication
• Transfer Inhibit Indication
• Source Available & Connected Indication
Soft Key Navigation
• Graphical Module Control
Integrated Functionality
• Metering Control
• Event Recorder
Mounting Options
• DIN Rail
• Through Door
Front Port Access
• USB for Laptop Connection
Front Panel Control
• Intergrated Device Control
• Dedicated Control Keys


