background image

Endura APA592

pH / Redox (ORP) transmitter

4 Electrical Installation

26

OI/APA592–EN Rev. E

4 Electrical Installation

4.1 Cable Glands and Plugs

4.1.1 APA592–PH for Intrinsically Safe, Type n and Non-incendive Installations

Non-Ex d transmitters are supplied with a nylon conduit plug and cable gland. The cable gland is sized to
provide a tight seal around the sensor cable. 

If a customer-supplied cable gland and plug is used, the cable diameter for the cable gland used must
comply with the requirements for IP/NEMA 4X protection. This must be checked during installation.

4.1.2 APA592–PH Ex d / Explosion-proof Models without Cable Gland

APA592–PH Ex d / explosion-proof rated transmitters are supplied with a standard 316 stainless steel rated
plug. 

Hazardous area 316 stainless steel 

1

/

2

 in. NPT or M20 cable glands must be ordered as an accessory

based on the hazardous area installation requirements.

Warning.

Observe all local instructions and regulations governing electrical installation. Ensure the power 
supply and / or bus connections are switched off before making connections.

Use a maximum of 12 SWG (10 AWG) wire for connection of this transmitter.

Ensure connection to protective earth.

Do not apply power until fully installed.

The transmitter is not fitted with a switch and does not have an overvoltage protection device, 
lightning protection or voltage separation capacity therefore these must be provided on the plant 
side. 

Power supplies and signals are routed in the same line and must be implemented as SELV or 
PELV circuits according to requirements (standard version). In the ignition-proof version, the 
guidelines regarding the ignition-proof requirements must be adhered to.

Ensure the existing power supply corresponds with the specifications on the name plate and the 
technical specifications – see Section 10, page 90.

Use only signal cable wires with tinned or wire end sleeves.

Note.

For ATEX installations, an approved ATEX Ex d cable gland must be used according to 

IEC/EN 60079-1. For FM and CSA installations, an approved Ex d cable gland must be used.

Содержание Endura APA592

Страница 1: ...ition for both 2 and 3 wire RTD inputs for common inputs such as Pt100 Pt1000 and 3k Balco APA592 transmitters are communication ready field devices with microprocessor controlled electronics For bidirectional communication an FSK signal is superimposed on the 4 to 20 mA output signal via the HART protocol The graphical user interface DTM can be used to configure poll and test transmitters on a PC...

Страница 2: ...tter are available for free download from www abb com analytical See links and reference numbers below or scan this code Description Search for or click on Data Sheet Endura APA592 pH RRedox ORP transmitter DS APA592 EN Addendum RoHS Directive 2011 65 EU RoHS II ADD MEASUREMENT 001 EN ...

Страница 3: ...vice and Repairs 10 1 14 Potential Safety Hazards 10 2 Use in Areas Requiring Ignition Protection 11 2 1 Approvals 11 2 1 1 CE Mark 11 2 1 2 Ignition Protection 11 2 2 Ground 11 2 3 Interconnection 11 2 4 Configuration 11 2 5 Hazardous Area Relevant Information 12 2 5 1 APA592 pH A1 Intrinsic Safety 12 2 5 2 APA592 pH A2 Flameproof Protection 13 2 5 3 APA592 pH A3 Type n Non sparking 13 2 5 4 APA5...

Страница 4: ...34 4 8 3 Electrical Connection in Hazardous Area 35 4 8 4 Installation in Hazardous Areas 36 5 Start up and Operation 40 5 1 Navigating Menus and Parameters 40 5 2 Security Levels and Password Access 41 5 2 1 Security Permissions 42 5 2 2 Default Passwords 42 5 3 Configuration Menus Overview 43 6 Configuration 45 6 1 Configuration Options 45 6 2 Configuration DIP Switch 46 7 Operator Pages and Men...

Страница 5: ...86 9 4 HART Common Practice Commands 88 10 Specification 90 11 Spares and Accessories 95 Appendix A 97 A 1 Permits and Certification 97 A 2 Temperature Compensation 97 A 3 Nernstian Temperature Compensation 98 A 3 1 Solution Coefficient 99 Appendix B Installation Drawings 100 B 1 Drawing P0908 100 B 2 Drawing P0909 101 B 3 Drawing P0910 102 B 4 Drawing P0911 103 Fig B 4 Notes 104 ...

Страница 6: ...ny liability Operators must strictly observe the national regulations applicable in their countries with regards to installation functional tests repairs and maintenance of electrical devices 1 2 1 Operating Safety Information Before switching on ensure that the specified environmental conditions in the Specifications section page 90 are complied with and that the power supply voltage corresponds ...

Страница 7: ...rical protection of the transmitter The secure isolation of contact dangerous electrical circuits is guaranteed only when the connected devices fulfil the requirements of the applicable electrical codes or DIN VDE 0106 T 101 basic requirements for secure isolation VDE may not be applicable for NAM For secure isolation route the process supply lines separately from electrical circuits or additional...

Страница 8: ...nformation This symbol when noted on a product enclosure or barrier indicates that a risk of electrical shock and or electrocution exists and indicates that only individuals qualified to work with hazardous voltages should open the enclosure or remove the barrier This symbol indicates that the marked item can be hot and should not be touched without care This symbol indicates the presence of devic...

Страница 9: ...this symbol indicates that the product contains toxic or hazardous substances or elements The number inside the symbol indicates the environmental protection use period in years Electrical equipment marked with this symbol may not be disposed of in European public disposal systems after 12 August 2005 In conformity with European local and national regulations EU Directive 2002 96 EC European elect...

Страница 10: ...lity Do not use municipal garbage Only privately used products may be disposed of in municipal garbage according to the WEEE directive 2002 96 EC Proper disposal prevents negative effects on people and the environment and supports the reuse of valuable raw materials If it is not possible to dispose of old equipment correctly ABB Service will accept and dispose of returns for a fee Note The followi...

Страница 11: ...t documents All claims for damages must be claimed against the shipper and before the installation 1 9 Restriction of Hazardous Substances RoHS 1 10 Safety Precautions Please read the entire manual before unpacking setting up or operating this instrument Pay particular attention to all warning and caution statements Failure to do so could result in serious injury to the operator or damage to the e...

Страница 12: ... compliance of the instrument If you have any problems with installation starting or using the instrument please contact the company that sold it to you If this is not possible or if the results of this approach are not satisfactory please contact the manufacturer s Customer Service 1 14 Potential Safety Hazards The following potential safety hazards are associated with operating the system Electr...

Страница 13: ...ust be grounded by connecting it to an equipotential bonding system it must be grounded at a single location only 2 3 Interconnection If APA592 pH transmitters are operated in an intrinsically safe circuit proof of interconnection may be required during the installation In general intrinsically safe circuits require proof of interconnection 2 4 Configuration APA592 pH transmitters can be installed...

Страница 14: ...age Ui 30 V Maximum input current Ii 160 mA Maximum power Pi 0 8 W Internal inductance Li 0 5 mH Internal capacitance Ci 5 nF Table 2 1 Intrinsic Safety Input Parameters Output Parameters Open circuit voltage maximum Uo 11 8 V Short circuit current maximum Io 5 mA Maximum output power Po 15 mW Allowed inductance total La 1 H Allowed capacitance total Ca 1 45 µF Table 2 2 Intrinsic Safety Output Pa...

Страница 15: ... D Ex tD A21 IP66 T135 ºC 20 ºC Tamb 60 ºC 2 5 3 APA592 pH A3 Type n Non sparking ATEX IECEx approved for use in zone 2 22 Ex nA Zone 2 LCIE 11 ATEX 1005 X IECEx LCI 11 0048X Designation Device design II 3 G Ex nA IIC T4 Housing design II 3 D Ex tD A22 IP66 T135 ºC 20 ºC Tamb 60ºC ABB statement of conformity in accordance with ATEX directive Note Both flameproof and dust ratings are combined when ...

Страница 16: ... Maximum voltage Ui 30 V Maximum input current Ii 160 mA Maximum power Pi 0 8 W Internal inductance Li 0 5 mH Internal capacitance Ci 5 nF Table 2 4 Intrinsic Safety Input Parameters Output Parameters Open circuit voltage maximum Uo 11 8 V Short circuit current maximum Io 5 mA Maximum output power Po 15 mW Allowed inductance total La 1 H Allowed capacitance total Ca 1 45 µF Table 2 5 Intrinsic Saf...

Страница 17: ...A page 103 for allowable sensors Agency Approvals FM Class I Div 2 Groups A B C D Class II III Div 2 Group F G T4 Ta 60 ºC CSA Class I Div 2 Groups A B C D Class II Div 2 Groups F G Class III Div 2 T4 Table 2 7 Non incendive Input Parameters Maximum voltage Ui 30 V Maximum input current current controlled by transmitter Internal inductance Li 0 5 mH Internal capacitance Ci 5 nF Table 2 8 Non incen...

Страница 18: ...um output power Po 15 mW Allowed inductance total La 1 H Allowed capacitance total Ca 1 45 µF Table 2 9 Non incendive Field Wiring FM and CSA Output Parameters Notes Parameters apply to entire system inclusive of cables Each specified electrical parameter must be applied individually and in combination Do not exceed the maximum values when applying the electrical parameters individually or in comb...

Страница 19: ...rn the 2 security screws located beneath the covers on front and rear of the housing body until they prevent both covers from being rotated unscrewed therefore preventing removal of the covers 3 2 Non hazardous Area installation Fig 3 2 shows a general purpose non hazardous installation and is for reference only Fig 3 1 Transmitter Cover Security Screws Fig 3 2 Installation in Non Hazardous Area F...

Страница 20: ...itter with consideration to ambient conditions 2 Locate the transmitter in a position where the temperature and humidity specifications are not exceeded and ensure the transmitter is protected from direct sunlight rain snow and hail 3 Ensure the transmitter operating temperature is within the range 20 to 60 C 4 to 140 F 4 Select a location away from strong electrical and magnetic fields ...

Страница 21: ...cluding Mounting Bracket Dimensions in mm in Fig 3 3 Transmitter only Dimensions Transmitter Label see Fig 3 6 page 22 1 2 in NPT or M20 common for all connections M8 depth 10 mm 0 39 in 46 5 1 83 150 5 91 91 3 58 60 5 2 38 29 4 1 16 105 4 15 46 5 1 83 65 5 2 58 103 4 06 112 4 4 168 6 6 HazLoc Label where fitted see Section 3 4 5 page 23 ...

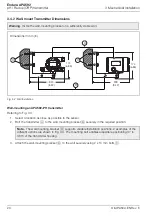
Страница 22: ... B securely in the required position 3 Attach the wall mounting bracket B to the wall securely using 2 x 10 mm bolts C Warning Install the wall mounting bracket on a sufficiently stable wall Dimensions in mm in Fig 3 4 Wall Installation Note The wall mounting bracket B supports variable installation positions 2 examples of the different options are shown in Fig 3 4 The mounting bolt enables adjust...

Страница 23: ...smitter B to the pipe mounting bracket C securely in the required position 3 Attach the pipe mounting bracket C to the pipe securely using the U bolt nuts and washers included Dimensions in mm in Fig 3 5 Pipe Installation Note The pipe mounting bracket C supports variable installation positions Two examples of the different options are shown in Fig 3 5 The transmitter mounting bolt enables adjusta...

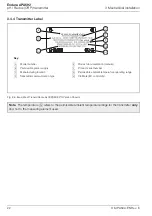
Страница 24: ...rature G refers to the permissible ambient temperature range for the transmitter only and not to the measuring element used APA592 PHx0AxHBxTxM APA592 EN x Key A Model number B Permissible power supply C Manufacturing location D Transmitter communication type E Product documentation manual F Product serial number G Permissible ambient temperature operating range H CE Mark EC conformity ...

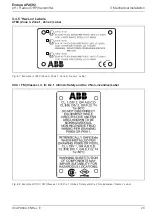
Страница 25: ...azLoc Labels ATEX Zone 0 Zone 1 Zone 2 Label CSA FM Classes I II III Div 1 Intrinsic Safety and Div 2 Non incendive Label Fig 3 7 Example of ATEX Zone 0 Zone 1 Zone 2 HazLoc Label Fig 3 8 Example of CSA FM Classes I II III Div 1 Intrinsic Safety and Div 2 Nonincendive HazLoc Label 0344 i i nA d ...

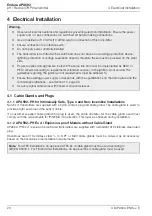
Страница 26: ...RP transmitter 3 Mechanical Installation 24 OI APA592 EN Rev E CSA FM Classes I II and III Div 1 explosion and ignition proof Label Fig 3 9 Example of CSA FM Classes I II and III Div 1 explosion and ignition proof HazLoc Label ...

Страница 27: ... C one at a time 3 Pull the cartridge C carefully but firmly out of the transmitter B keeping it straight to avoid bending the 6 pin connector D 4 Align one of the 4 plug positions E on the rear of the cartridge C with the 6 pin connector D to ensure the cartridge LCD display is readable when mounted 5 Refit the cartridge C in the new position by pushing it carefully but firmly into the transmitte...

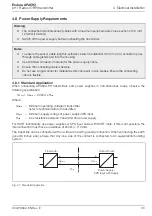
Страница 28: ...ctions and regulations governing electrical installation Ensure the power supply and or bus connections are switched off before making connections Use a maximum of 12 SWG 10 AWG wire for connection of this transmitter Ensure connection to protective earth Do not apply power until fully installed The transmitter is not fitted with a switch and does not have an overvoltage protection device lightnin...

Страница 29: ...nd D M20 nylon conduit plug E 1 2 in NPT 316 stainless steel Ex d explosion proof cable gland F 1 2 in NPT 316 stainless steel Ex d explosion proof conduit plug G M20 316 stainless steel Ex d explosion proof cable gland H M20 316 stainless steel Ex d explosion proof conduit plug Table 4 1 Cable Glands and Plugs Descriptions A B C D E F G H 55 4 2 18 14 2 0 56 43 2 1 70 20 3 0 80 38 6 1 52 36 1 1 4...

Страница 30: ...minal 3 if required Fig 4 2 Power Supply Connections at Transmitter Terminals Note HART Communication Communication with the transmitter is supported by the HART protocol The communication signal is modulated on both wires for the power supply line and decoded The electrical connection is provided at the and terminals of the transmitter or by the power supply cable installed on site GND 3 1 2 1 2 ...

Страница 31: ...4 Insert each sensor cable wire under the open terminals and secure by tightening the terminal captive screws Fig 4 3 APA592 PH Sensor Connections at Transmitter Terminals Caution The connection terminals accept cables up to a maximum peripheral wire cross section of 2 5 mm2 12 SWG 10 AWG If possible use coaxial cable do not use a rigid conductor material as this can result in wire breaks Ensure t...

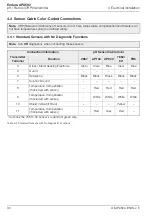
Страница 32: ... Connection Information pH Sensor Cable Color Transmitter Terminal Function 2867 AP100 AP300 7650 60 TB5 4 Glass Metal Sensing Electrode Clear Clear Blue Clear Blue 5 Guard 6 Reference Black Black Black Black Black 7 Solution Ground 8 Temperature Compensator If included with sensor Red Red Red Red 9 Temperature Compensator If included with sensor White White White White 10 Shield Shield if fitted ...

Страница 33: ...ction AP200 TBX5 Non ABB 4 Glass Metal Sensing Electrode Clear Blue Refer to sensor s manual for wiring colors and their functions 5 Guard Red Yellow 6 Reference Blue Black 7 Solution Ground Green Yellow Green 8 Temperature Compensator If included with sensor Green Red 9 Temperature Compensator If included with sensor White White 10 Shield Dark Green 11 Temperature Compensator If included with sen...

Страница 34: ...ion box mounted either directly on it or in close proximity The extension cable is connected to the sensor inside the junction box Maximum distance between the sensor and transmitter is 30 m 100 ft without preamplifier 4 7 Quick disconnect Cable Connection For sensors that use a quick disconnect style connector the extension cable is connected directly to the transmitter The connection to the sens...

Страница 35: ...g system Warning The connection terminals accept cables with a maximum peripheral wire cross section of 2 5 mm2 12 SWG 10 AWG Switch off the power supply before connecting the transmitter Notes To ensure the sensor cable length is sufficient allow an additional 100 mm 4 in of cable to pass through cable glands and into the housing Use stranded conductor material for the power supply cable Ensure t...

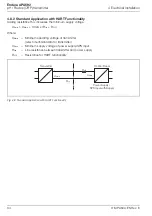
Страница 36: ... UMmin 0 02A x RLtg R250 Where UMmin Minimum operating voltage of transmitter refer to technical data for transmitter USmin Minimum supply voltage of power supply SPS input RLtg Line resistance between transmitter and power supply R250 Resistance for HART functionality Fig 4 8 Standard Application with HART Functionality Transmitter Power Supply SPS Input with Supply UMmin USmin RLtg R250 Control ...

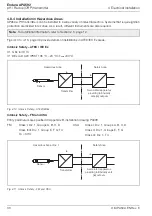
Страница 37: ...c safety the electrical limit values must be used as the basis for the prototype test certificates of the transmitters including the capacitance and inductance values of the wires Proof of intrinsic safety is granted if the conditions in Table 4 4 are fulfilled Caution Refer to Section 2 page 11 and Section 10 page 90 for hazardous area risk requirements APA592 PH Intrinsically Safe Transmitter Po...

Страница 38: ... ia D A20 IP66 T135 ºC 20 ºC Tamb 60 ºC Intrinsic Safety FM and CSA Entity parameters are specified in Appendix B installation drawing P0908 Note For additional information refer to Section 2 5 page 12 Fig 4 10 Intrinsic Safety ATEX IECEx FM Class I Div 1 Groups A B C D Class II III Div 1 Group E F G T4 Ta 60ºC CSA Class I Div 1 Groups A B C D Class II Div 1 Groups E F G Class III Div 1 T4 Fig 4 1...

Страница 39: ...tallation drawing P0909 Fig 4 12 Type n Non sparking ATEX IECEx FM Class I Div 2 Groups A B C D Class II III Div 2 Group F G T4 Ta 60ºC CSA Class I Div 2 Groups A B C D Class II Div 2 Groups F G Class III Div 2 T4 Fig 4 13 Non Incendive using non incendive field wiring FM and CSA Safety Area Power Supply Hazardous Area Sensor Transmitter Hazardous Area Hazardous Area Div 2 Safety Area Sensor Assoc...

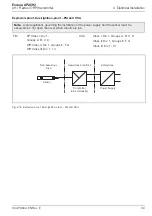
Страница 40: ...used FM Class I Div 2 Groups A B C D Class II III Div 2 Group F G T4 Ta 60 ºC CSA Class I Div 2 Groups A B C D Class II Div 2 Groups F G Class III Div 2 T4 Fig 4 14 Non Incendive using Div 2 field wiring FM and CSA Note Local regulations governing the installation of the power supply and the sensor must be observed Do not open the cover when circuits are live Fig 4 15 Flameproof ATEX Safety Area P...

Страница 41: ...y and the sensor must be observed Do not open the cover when circuits are live FM XP Class I Div 1 Groups A B C D DIP Class II Div 1 Groups E F G DIP Class III Div 1 T4 CSA Class I Div 1 Groups A B C D Class II Div 1 Groups E F G Class III Div 1 T4 Fig 4 16 Explosion proof Dust ignition proof FM and CSA Safety Area Power Supply Non hazardous Area Sensor Transmitter in Ex d Housing Hazardous Area D...

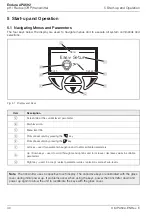
Страница 42: ... Prompt executed by pressing the key F Left key used for parameter navigation and to enter editable parameters G Up Down keys used to scroll through menu options and to increase decrease values in editable parameters H Right key used to accept select parameter values selections and exit sub levels Note The transmitter uses a capacitive touch display The capacitive keys are calibrated with the glas...

Страница 43: ...er passwords for these levels can be enabled via the Service level Access to the Service level is password dependent The Enter Password screen is always displayed for Service level access It is also displayed for Standard and Advanced level access when the corresponding passwords are enabled The Enter Password screen is not displayed when accessing Read Only level Enter Password To select password...

Страница 44: ...d with factory set default passwords for access to the Standard Advanced and Service levels Passwords cannot be modified Access Level Read Write Read only Read only None All levels and sub levels Standard Calibrate Input Output Display Diagnostics Easy Setup Device Setup Communication Service Advanced Easy Setup Calibrate Device Setup Input Output Display Diagnostics Communication Service Service ...

Страница 45: ... page 52 Ion Concentration see Section 7 2 3 page 53 Display Overview Section and Function Easy Setup The Easy Setup menu is used to set up the system quickly and contains a series of options for users with Advanced level access permission Users with Read Only and Standard access have read only permissions and cannot make selections from this menu Calibrate Used to calibrate the transmitter Device...

Страница 46: ... in loop mode and view the diagnosis simulation status Communication Used to configure the transmitter s HART communication support Service Note Service level parameters are reserved for ABB factory trained personnel contact the Company for support Display Overview Section and Function Table 5 2 Operating Menus Overview Continued 5 Menu Exit Select Display 6 123 Menu Exit Select Diagnostics 7 Menu...

Страница 47: ...HART Multiplexer Configuration via EDD technology Configuration can also be performed with EDD master applications such as Siemens Simatic PDM that is approved for use with EDD Configuration using a handheld terminal Note Complete configuration of the transmitter is available through the HMI However not all Device DTM functions for example such as Diagnosis Masking are accessible via the transmitt...

Страница 48: ...ion up 4 Refit the cartridge C by pushing it carefully but firmly into the transmitter Keep the cartridge C straight to avoid bending the 6 pin connector D 5 Refit the cartridge cover A by screwing it until the O ring is slightly compressed onto the transmitter B For protection in Ex d explosion proof installations turn the 2 security screws see Fig 3 1 page 17 until they prevent both covers from ...

Страница 49: ...l mode autoscroll each Operator page in sequence every 15 seconds to view current alarms via the Diagnostics menu Operator Page Access Level The Access Level is used to select access to configuration menus at Read Only Standard Advanced and Service levels To access these menus scroll to the required level and press If a password has been enabled the Enter Password screen is displayed see Section 5...

Страница 50: ...nus including Operator Pages is shown in Table 7 1 page 49 Notes It is not possible to configure the system or to modify data within the Operator Pages The Operator Page number is displayed on each page Fig 7 2 Operator Page Example 2 Operator Menu Back Select Diagnostics Operator Page 1 Operator Page 2 Operator Page 3 Operator Page 4 Autoscroll 1 APA592PH Process pH F PV Tmp 7 01 77 0 Process Val...

Страница 51: ...to Section 8 1 page 72 for a list of diagnostic messages Operator Page 1 Large primary value on the first line Operator Page 2 Large primary value on the first line and a primary value percentage range bar graph Operator Page 3 Primary value plus associated unit on the first line and a temperature value and associated unit on the second line Data displayed on the second line is set via the Display...

Страница 52: ...age 67 Autoscroll By selecting Autoscroll each Operator Page is displayed in sequence for 15 seconds Auto scrolling can be stopped by selecting one of the Operator Pages from the Operator Menu Signals View Displays a list of active signals Use the and keys to scroll through active signals Display Example Title and Function Table 7 1 Overview of Operator Menus Continued 4 APA592PH Process pH F mA P...

Страница 53: ...e Analyzer Type pH Sensor Type Isopotential Pt Asymmetric Pt Sensor Diag Reference Imp Limit Temp Sensor Temp unit Temp Comp Type Manual Temp pH Soln Coeff Temp Sensor Type Run TC Recognition TC Recognition Stat Device Info Device Type Device Serial No Software Version Hardware Version HART Tag HART Descriptor Long Tag Write Protection HW write prot SW write prot PV Hi Lo Rng Val Damping Alarm Cur...

Страница 54: ...r Temp unit Temp Comp Type Manual Temp mV Soln Coeff Temp Sensor Type Run TC Recognition TC Recognition Stat Device Info Device Type Device Serial No Software Version Hardware Version HART Tag HART Descriptor Long Tag Write Protection HW write prot SW write prot PV Hi Lo Rng Val Damping Alarm Current Linearity Function gen table Operator pg 3 ln 2 Operator pg 4 ln 2 Operator pg 4 ln 3 Contrast Lan...

Страница 55: ... Mag End Mv Sensor Diag Reference Imp Limit Temp Sensor Temp unit Temp Comp Type Manual Temp mV Soln Coeff Temp Sensor Type Run TC Recognition TC Recognition Stat Device Info Device Type Device Serial No Software Version Hardware Version HART Tag HART Descriptor Long Tag Write Protection HW write prot SW write prot PV Hi Lo Rng Val Damping Alarm Current Linearity Operator pg 3 ln 2 Operator pg 4 l...

Страница 56: ...H Asymmetric Pt Asymmetric Potential Adjustable range 2000 to 2000 mV Default 0 mV Enabled when pH Sensor Type Custom PH Valence Ion valence selection 3 2 1 1 2 or 3 The valence determines the millivolt change per decade of concentration Ion Conc Magnitudes The number of magnitudes ranging from 1 to 3 that defines the ion concentration output Ion Conc End Mag The ion concentration state functions ...

Страница 57: ...er at power up or when executing the Run TC Recognition routine is run see page 64 Auto Solution Auto Solution temperature compensation can be selected when a temperature sensor is connected and is recognized by the device This selection provides the ability to include a solution coefficient in the Nernst equation see Appendix A 3 page 98 Manual Temp The value in this parameter is used for tempera...

Страница 58: ...ype Enabled when Buffer Type is not User Def Buffer 2 Value Enables selection of the Buffer 2 value based on Buffer Type Enabled when Buffer Type is not User Def User def Soln 1 Enables entry of a user defined Buffer Table 1 with up to 5 temperature and pH values Enabled when Buffer Type User Def User def Soln 2 Enables entry of a user defined Buffer Table 2 with up to 5 temperature and pH values ...

Страница 59: ... Edit PV Temp Cal Enables manual adjustment of the sensor PV slope and offset and sensor temperature slope and offset Note This function may not be suitable for many applications but it provides quick easy access to these calibration values for troubleshooting All PV Slope Edits the PV Slope value as a percentage PV Offset Edits the PV Offset value Temp Slope Edits the Temp Slope value as a percen...

Страница 60: ...on option and apply an input Wait for the message Continue When Stable to be displayed then press the key to continue 2 Enter the new PV value using the and keys then press the key to continue 3 At the calibration results screen s check the new values Press the key to exit the screen or if a calibration failure message is displayed reset the PV value see steps 1 and 2 Table 7 2 1 Point Manual Cali...

Страница 61: ...t the required temperature Press the key to proceed 3 Edit the 1st buffer value by pressing the key and use the and keys to select the required value Press the key to proceed 4 Apply Buffer 1 input watch for PV stability wait for the message Continue When Stable to be displayed then press the key to continue 5 Edit the 2nd buffer value by pressing the key and use the and keys to select the require...

Страница 62: ...creen or if a calibration failure message is displayed reset the buffer values see steps 2 to 6 8 If the Hold Output screen was selected at step 1 an option to release the output is provided at the Release Output screen Press the key to retain the Hold Output state or the key release the Hold Output state Step Procedure Screen Table 7 3 2 Point Manual Calibration Continued ...

Страница 63: ... prompt to immerse the sensor in buffer1 and shows the type of buffer and buffer 1 value Press the key to proceed 3 The next screen shows live PV and temperature values The progress bar indicates sampling and stability checking for PV and Temperature 4 The next screen displays a prompt to immerse the sensor in buffer 2 and shows the type of buffer and buffer 2 value Press the key to proceed 5 The ...

Страница 64: ...step 1 an option to release the output is provided at the Release Output screen Press the key to retain the Hold Output state or the key release the Hold Output state Step Procedure Screen 1 At the Temperature Cal parameter wait for the message Continue When Stable to be displayed then press the key to continue 2 Enter the new temperature using the and keys to select the new value then press the k...

Страница 65: ...ntial Adjustable range 2000 to 2000 mV Default 0 mV Enabled when pH Sensor Type Custom Valence Ion valence selection of either 3 2 1 1 2 or 3 The valence determines the millivolt change per decade of concentration Ion Conc Magnitudes The number of magnitudes ranging from 1 to 3 that defines the ion concentration output End Mag The ion concentration state functions by associating an end millivolt v...

Страница 66: ...erature sensor is connected and is recognized by the device This selection provides the ability to include a solution coefficient in the Nernst equation see Appendix A 3 page 98 Manual Temp The value in this parameter is used for temperature compensation during Manual temperature compensation mode Adjustable range 20 to 150 C 4 to 302 F Default 25 C 77 F Enabled when Temp Comp Type Manual pH Soln ...

Страница 67: ...the alphanumeric character set Long Tag Use to specify a longer HART description for the device entered from the alphanumeric character set maximum 32 characters Write Protection Displays hardware software write protection status Note Configurations can be protected by enabling the configuration DIP switch see Section 6 2 page 46 HW write prot Displays the current state of the Hardware Write Prote...

Страница 68: ... transmitter All Damping Minimum value 0 0 s maximum value 99 9 s All Alarm Current Level of current loop output under alarm conditions High corresponds to alarm current level of 21 5 mA Low corresponds to alarm current level of 3 8 mA All Linearity Options comprise Function generator see below Linear output All Function gen table Enabled when Linearity Function generator Range comprises X1 Y1 to ...

Страница 69: ...perator Page 3 temperature sensor input ref impedance PV current All Operator pg 4 ln 2 Selects the type of data displayed on line 2 of Operator Page 4 Options as Operator pg 3 ln 2 above Operator pg 4 ln 3 Selects the type of data displayed on line 3 of Operator Page 4 Options as Operator pg 3 ln 2 above Contrast Displays the current contrast level default 50 and enables the contrast to be change...

Страница 70: ...Default 110 Slope alarm lim lo 40 to 100 Default 60 Offset alarm Lim 0 to 10000 mV Default 180 mV Loop Test The current output of the transmitter can be adjusted between 3 8 and 21 5 mA This feature is useful to verify that the transmitter output matches the current in the control room Enabled when HART Poll Addr 0 see page 69 Diagnosis Status Used to determine if diagnostics simulation is active ...

Страница 71: ... causes loss of HART communication All HART Tag A configurable 8 character HART tag used for identification Burst Mode Burst Mode is a HART feature used to continuously transmit one of three Universal HART command response packages on the HART bus without the need for commands being sent by the Master This can be used to provide the quickest possible output from the device Status Enables Disables ...

Страница 72: ...ssword protection to the Advanced Access level The factory default is disabled Disable password Function key lock Locks the keys on the keypad Factory default is unlocked No To lock the keypad select Yes To unlock the keypad first enable the keypad by holding down the key for 5 seconds then access the Function key lock menu and select No Factory Default Resets all parameters to their factory defau...

Страница 73: ...messages and corrective actions See Table 8 2 page 72 for details of all diagnostics Fig 8 1 Example of Diagnostic Alert Icon and Name Description Failure Transmitter functionality lost due to malfunction in the Instrument itself its peripherals or due to operating conditions Maintenance Required Transmitter functionality fully available but maintenance required soon to avoid functional restrictio...

Страница 74: ...available Diagnostic Message Sub error Message Possible Cause s Related Condition Corrective Action Configuration Changed The device configuration has been changed by a write or set command or by an operation via device HMI INSTALLATION This condition is not displayed on the HMI This is just an indication to the HART master It is visible only on the EDD and DTM Ensure that the copy of the device c...

Страница 75: ...adBack failure The output circuit could be broken or not correctly calibrated ELECTRONICS Perform an Output Trimming If the error persists replace electronics F116 023 Memory Failure Electronic memory corrupted ELECTRONICS Replace electronics Contact factory M023 036 Sensor electronics voltage warning Sensor electronics related malfunction ELECTRONICS Check sensor wiring If problem persists contac...

Страница 76: ...eference electrode impedance is higher than the user set limit SENSOR Verify sensor wiring Verify sensor wiring is free of nicks cuts breaks and or open connections Verify configuration settings are correct Ensure diagnostics is set to OFF if the sensor does not have a solution ground connection Verify reference electrode is clean Remove any foreign material Verify sensor responds to pH buffers M0...

Страница 77: ...iagnosis option PROCESS Verify sensor wiring Verify sensor wiring is free of nicks cuts breaks and or open connections Verify configuration settings are correct Ensure diagnostics is set to OFF if the sensor does not have a solution ground connection M084 038 Ground loops present or shorted sensor cable Sensor wiring problems improper configuration of sensor diagnosis option PROCESS Verify sensor ...

Страница 78: ...e sensor offset limit SENSOR Clean sensor and repeat a buffer and or process calibration If sensor is functioning properly order a spare sensor to replace the existing sensor when failure occurs Replace existing sensor if sensor is not functioning properly Verify sensor wiring is free of nicks cuts breaks shorts and or open connections If wiring is damaged replace wiring and or sensor and recalibr...

Страница 79: ...open connections If wiring is damaged replace wiring and or sensor and recalibrate S068 043 High sensor efficiency slope Problem with the sensor improper calibration incorrect configuration of user defined high sensor efficiency limit SENSOR Verify the proper buffer values were used for calibration Repeat calibration with correct buffer values Clean sensor and repeat a buffer and or process calibr...

Страница 80: ...ronics error ELECTRONICS Check temperature sensor connections If a temperature sensor is not connected switch temperature compensation to Manual mode If the problem persists contact factory S076 010 PV out of range limits The analog output for the Primary Variable is beyond its scaling limit and no longer represents the true applied process PROCESS Adjust the working range if possible S078 004 PV ...

Страница 81: ...ens Diagnosis screens can be viewed using the DTM or the EDD graphical user interface they cannot be viewed on the transmitter s display 8 2 1 Diagnosis Overview Screen An overview of active inactive diagnostic conditions can be viewed on the diagnosis Overview screen see Fig 8 2 Fig 8 2 Diagnosis Overview Screen ...

Страница 82: ... diagnostics can be masked using the DTM or the EDD This feature is not accessible via the transmitter s display and a masked diagnosis is not reported when it occurs The list of maskable diagnoses is available on the DTM and EDD graphical user interface only The diagnosis Masking screen is shown in Fig 8 3 Fig 8 3 Diagnosis Masking Screen ...

Страница 83: ...ed Diagnosis mode all active diagnoses are suppressed and only the simulated diagnosis is reported Diagnosis simulation status can be viewed on the HMI using Diagnostics Diagnosis Status menu see Section 7 3 6 page 68 The status is either Simulated or Actual diagnosis simulation cannot be set or cleared from the HMI Caution Diagnosis simulation cannot be performed via the transmitter s display Dia...

Страница 84: ...Endura APA592 pH Redox ORP transmitter 8 Troubleshooting and Diagnostics 82 OI APA592 EN Rev E The diagnosis Simulation screen is shown in Fig 8 4 Fig 8 4 Diagnosis Simulation Screen ...

Страница 85: ...nalog output signal that matches the Primary Value is not available The output signal in multidrop mode is basically a constant 4 mA and is used exclusively for the power supply In multidrop mode sensor or process data information is available as a HART signal only In addition to point to point and multidrop modes the third type of HART communication is burst mode When Burst Mode is activated the ...

Страница 86: ...ly Number Descriptor Message Installation Date Write protect Poll Address Asymmetric Poten PV Unit Sensor diag Isopotential point pH sensor type Analyzer type Run TC Recognition TC Recognition Status Temp sensor type Temp Comp Type Temp SV unit PV A0 Alarm typ PV Linearity PV Damp PV URV PV LRV Burst Mode Status Burst Mode Command Response Preambles HART Tag Poll Address PV lower sensor limit PV u...

Страница 87: ... slope PV cal offset alarm lim PV cal slope lo alarm lim PV cal slope hi alarm lim Reference Impedance TV Output Current Sensor Input QV Temperature SV PV Process Operating Conditions Loop test Installation Startup Sensor Electronics One point Manual PV Cal Two point Manual PV Cal Trend Observe Simulation Overview Masking D A trim Current Output Device reset Edit PV temp cal Temperature Cal Auto B...

Страница 88: ...t and of Range PV pH ORP pION or Ion Conc and PV percentage of range 3 Read Dynamic Variables and Current Current output value mA PV value pH ORP pION or Ion Conc and PV unit pH mV ppb ppm ug l mg l Temperature value and unit C or F Reference Impedance value and unit Kohm Sensor input value and unit mV 6 Write Polling Address When set to 0 Current Output is active and provides an analog output pro...

Страница 89: ...amping time Write protection status Any private label distributor code associated with the device 16 Read Final Assembly Number Returns the user defined final assembly number 17 Write Message Enables a user defined message of up to 32 characters to be entered 18 Write Tag Descriptor and Date Enables the user to assign a user defined 8 character tag to the device Enables a user defined 16 character...

Страница 90: ...tput of the device A value of 0 0 should be written to fixed Output Value to exit the device from fixed output mode 41 Start Self Test Performs self test function on the device 42 Master Reset Device can be reset 44 Write PV Units PV unit pH mV ppb ppm ug l or mg l ug l micro grams liter mg l milli grams liter 45 Write Trim Loop Current Zero Enables user to trim the lower endpoint for example 4 0m...

Страница 91: ...tes there is additional status information it can be obtained via this command 49 Write Sensor Serial Number Sensor serial number can be entered 59 Write Number of Response Preambles User can access and write the number of Response Preambles 108 Write Burst Mode Command Number Burst command numbers 1 2 3 can be entered 109 Write Burst Mode Control User can turn ON OFF Burst mode with this command ...

Страница 92: ... F after calibration Compensation Modes Dynamic Response 3 Seconds for 90 step change at 0 00 second dampening pH Glass antimony Sb ORP Redox Platinum Pt Gold Au pION Custom user programmable Glass 1x10¹³ pH 0 to 14 pH 2 to 16 pH over range ORP 1500 to 1500 mV pH 0 01pH ORP pION 1mV Auto recognition PT100 PT1000 3 k Balco 2 and 3 wire inputs pH Manual Automatic Nernstian Nernstian with solution co...

Страница 93: ...uring communication in accordance with HART FSK physical layer specification version 8 1 08 1999 section 8 1 Under voltage Protection UTerminal Mu 12 V results in Ia 3 8 mA Maximum Load Rload supply voltage 12 V 22 mA Max load depending on supply voltage V DC Configurable 4 to 20 mA standard with HART User programmable linear and non linear across the entire range Dynamic range 3 9 to 20 75 mA 3 8...

Страница 94: ...d inside outside 70 µm epoxy powdercoat aluminum magnesium content 6 copper free 0 5 Weight 1 3 Kg 3 lb Cable Gland Protection IP66 and 67 for plastic glands supplied with general purpose Intrinsically safe instruments IP67 for stainless glands required for explosion proof instruments EMC and RF Interference Emission and immunity for Class A and B equipment in accordance with EU Directive 2004 108...

Страница 95: ...60 C Non incendive FM and CSA when installed in accordance with the installation drawing P0909 of Appendix B FM Class I Div 2 Groups A B C D Class II III Div 2 Group F G T4 Ta 60 ºC CSA Class I Div 2 Groups A B C D Class II Div 2 Groups F G Class III Div 2 T4 Hazardous Area Dust Ignition proof FM and CSA FM XP Class I Div 1 Groups A B C D Class II III Div 1 Group E F G T4 Ta 60 ºC CSA Class I Div ...

Страница 96: ...E Agency Enclosure Ratings IP66 and IP67 NEMA 4X Approvals CE Mark The APA592 PH including type B LCD display configuration software meets all requirements for the CE mark in accordance with the applicable directives 2004 108 EC EMC 2006 95 EC LVD and 94 9 EC ATEX DS APA592 EN ...

Страница 97: ...w cover 4TB9515 0283 Wall and pipe mounting kit 4TB9515 0285 1 2 in NPT nylon cable gland I S Non Incendive 4TB9515 0286 1 2 in NPT nylon conduit plug I S Non Incendive 4TB9515 0287 M20 nylon cable gland I S Non Incendive 4TB9515 0288 M20 nylon conduit plug I S Non Incendive 4TB9515 0289 1 2 in NPT 316 stainless steel Ex d Explosion proof cable gland Table 11 1 Spares and Accessories ...

Страница 98: ...s steel Ex d Explosion proof conduit plug 4TB9515 0291 M20 316 stainless steel Ex d Explosion proof cable gland 4TB9515 0292 M20 316 stainless steel Ex d Explosion proof conduit plug 4TB9515 0280 Rear blind cover plus pH terminal block sticker Part Number Description Item Table 11 1 Spares and Accessories Continued APA 592 ...

Страница 99: ...coefficient option can be used to compensate for electrode and process changes with temperature Symbol Description Explosion proof approval The Ex label indicates a device that complies with the directive 94 9 EC CE mark The CE mark indicates that the device complies with the following directives and their basic safety requirements CE mark on the name plate of transmitter EMC directive 2004 108 EC...

Страница 100: ...f an electrochemical sensor to a reference temperature that is typically 25 C 77 F Temperature effects of pH sensors are well behaved and are characterized by the Nernst equation The APA592 PH transmitter applies Nernstian compensation to all three temperature compensation options when the transmitter is configured as a pH analyzer If interested in the uncompensated value set the transmitter to ma...

Страница 101: ...mVindication mV value indicated on the transmitter and proportional to the current output value T temperature of the solution in C after applying the factory and process calibration values Examples of solution coefficients for pure water applications are pure water 0 18 pH 10 C 50 F pure water with 1 ppm ammonia 0 31 pH 10 C 50 F The solution coefficient for the APA592 PH transmitter either adds o...

Страница 102: ...Endura APA592 pH Redox ORP transmitter Appendix B Installation Drawings 100 OI APA592 EN Rev E Appendix B Installation Drawings B 1 Drawing P0908 Fig B 1 Installation Drawing P0908 ...

Страница 103: ...Endura APA592 pH Redox ORP transmitter Appendix B Installation Drawings OI APA592 EN Rev E 101 B 2 Drawing P0909 Fig B 2 Installation Drawing P0909 ...

Страница 104: ...Endura APA592 pH Redox ORP transmitter Appendix B Installation Drawings 102 OI APA592 EN Rev E B 3 Drawing P0910 Fig B 3 Installation Drawing P0910 ...

Страница 105: ...Endura APA592 pH Redox ORP transmitter Appendix B Installation Drawings OI APA592 EN Rev E 103 B 4 Drawing P0911 Fig B 4 Installation Drawing P0911 ...

Страница 106: ...Endura APA592 pH Redox ORP transmitter Notes 104 OI APA592 EN Rev E Notes ...

Страница 107: ...Acknowledgements HART is a registered trademark of the HART Communication Foundation Siemens is a copyright of Siemens AG Sales Service Software ...

Страница 108: ...ion gb abb com abb com measurement We reserve the right to make technical changes or modify the contents of this document without prior notice With regard to purchase orders the agreed particulars shall prevail ABB does not accept any responsibility whatsoever for potential errors or possible lack of information in this document We reserve all rights in this document and in the subject matter and ...

Отзывы: