background image

6

3 SETTING UP

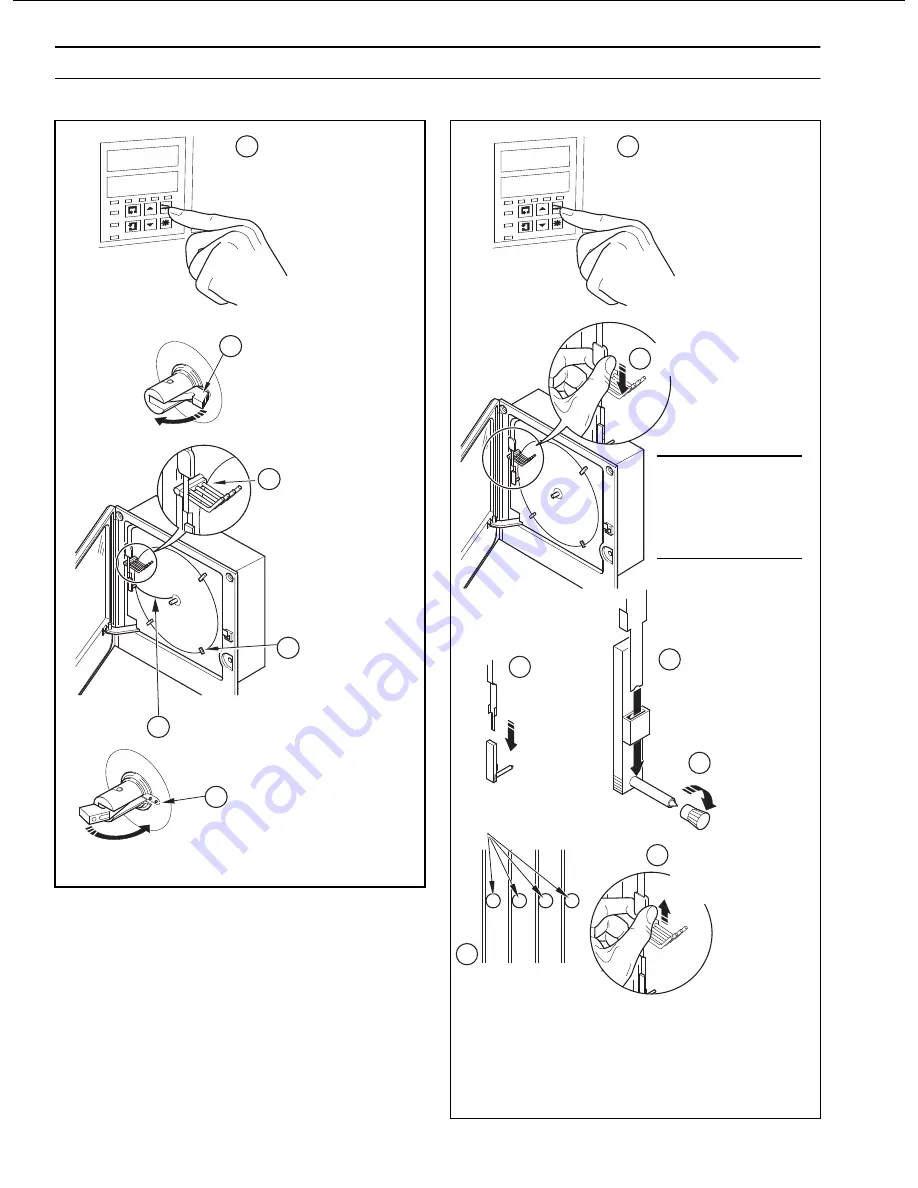
3.2 Fitting the Pen Capsule(s) – Fig. 3.2

Fig. 3.1 Fitting the Chart

Fig. 3.2 Fitting the Pen Capsules

75.0

Lift the chart clamp
and remove the chart

Fit new chart ensuring
that it is beneath the
pen lifter bars

Raise pens

Locate chart
under guides

Rotate chart to align the
time line with the red pen
(see also IM/C1900-OGR Fig. 2.1

or

 IM/C1900-OGC Fig. 2.1)

dEGF

Lower the chart clamp and press
down firmly to ensure that the 2
locating pins pierce the paper

1

2

3

4

5

6

3.1 Fitting the Chart – Fig. 3.1

75.0

Raise pens

Remove cap

Fit new pen capsule
ensuring that the arm
locates in the pen
capsule slot

Remove spent
capsule

dEGF

Gently pull the arm
off the bracket

Lifter bars

Ensure that the arm
is positioned above
its lifter bar

Slide pen assembly
onto the appropriate
bracket until it
clips into place.

1

2

3

4

5

6

7

Caution.

Take care not to

bend the arms

during removal and

re-fitting as pen

clashing may result.

Содержание C1900 Series

Страница 1: ...ch for or click on C1900 Circular chart recorder Datasheet DS C1900R EN C1900 Circular chart recorders and recorder controllers Installation Guide IM C1900 INS C1900 Circular chart recorders Operating...

Страница 2: ...roval of the Technical Publications Department Health and Safety To ensure that our products are safe and without risk to health the following points must be noted The relevant sections of these instr...

Страница 3: ...This Supplementary Manual provides an overview of the use of the C1900 Circular Chart Recorder on a Dairy Farm and describes the electrical connections and special alarm feature designed for this app...

Страница 4: ...arning light also located in the barn is illuminated if milk temperature and or time limits are exceeded An additional set of indicator and warning lights can be mounted in a more convenient location...

Страница 5: ...Red White Red White C1900 Milking System Power Supply A B E D C C1900 Connections A Analog input connection from tank RTD sensor B Analog input connection from return flowline RTD sensor C Digital in...

Страница 6: ...used for signal inputs and relay connections Connect the screen to the ground stud The terminal blocks can be removed from the main p c b when making connections Before removing any module note its po...

Страница 7: ...y Connections within Recorder 230 V AC Connections 115 V AC Connections 24 V AC DC Connections Terminal Block 2 Channel 2 Green High Voltage Digital Interface Card See Fig 2 1 for cover removal detail...

Страница 8: ...2 1 dEGF Lower the chart clamp and press down firmly to ensure that the 2 locating pins pierce the paper 1 2 3 4 5 6 3 1 Fitting the Chart Fig 3 1 75 0 Raise pens Remove cap Fit new pen capsule ensuri...

Страница 9: ...enabled and delay time has expired Alarm Enable signal is switched OFF by activation of refrigeration system Alarm is disabled immediately Alarm de activates 1 2 3 4 5 6 7 Note Refer to Programming G...

Страница 10: ...A s e Y e l b a n E t f i L n e P d e l b a n E s m r a l A e p y T t n e m e g d e l w o n k c A e n o N e c r u o S k c A l a b o l G e n o N 1 A m r a l A 1 B m r a l A s m r a l A r e h t O l l A...

Страница 11: ...Sales Software Service...

Страница 12: ...ll rights in this document and in the subject matter and illustrations contained therein Any reproduction disclosure to third parties or utilization of its contents in whole or in parts is forbidden w...

Отзывы: