Page 31
© Copyright 2021 ABB. All rights reserved.
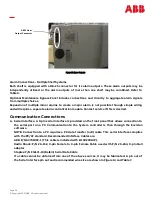
Remove Distribution Monitor (Refer to Figure 18):
1.
Loosen the screws located at the top and bottom of the distribution monitor front panel (2 screws total). Do
not loosen the module retaining screw.
2.
Grasp distribution monitor by the formed handle and pull it out.
3.
Protect distribution monitor within an ESD bag.
Figure 18 Distribution Monitor/Distribution Disconnect Module Removal and Installation
Distribution Monitor
-
Install / Remove
The distribution monitor (DM) may be removed / installed while the system is operating without
interrupting power delivered to the load as long as CB1 is ON. The INVERTER MAJOR alarm will be
asserted (MAJ alarm signals and INVERTER MAJOR LED).
Install Distribution Monitor (Refer to Figure 18):
1.
Insert the distribution monitor into Distribution Disconnect Module, using the formed handle.
2.
Secure the distribution monitor screws located at the top and bottom of the DM front panel (2 screws total).
3.
Shortly after installation, the green OK LED on the distribution monitor will illuminate. Within 60 seconds, the
System Controller will automatically perform a system update to recognize the new distribution monitor and
the inverter major alarm will retire.
4.
When installation is complete, the controller will reinitialize as described in steps 6, 7 and 8 of the Operational
Checkout Routine found in the Shelf Turn On and Operational Checkout section.
Loosen/tighten screws
for removal/installation
of Distribution Monitor
Formed handle
Module removal handle
Module retaining screw
CB 1


