VETSCAN SA USER’S MANUAL
v
1.1 SOFTWARE
|
1 8
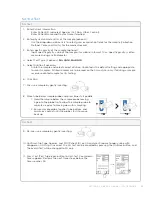
12. Apply urine sample to strip. Use a dropper pipette to
drop urine over entire strip, completely wetting each
pad. Alternatively, strip may be dipped into urine
sample, completely wetting every pad.
13. Blot either long edge of strip on absorbent paper to
remove excess urine. DO NOT blot the top surface
of the pads to avoid contamination. Work quickly to
blot excess urine.
14. Place strip on the UA Strip Tray. The end of the strip
should align with the end of the trough in the Strip Tray,
approximately where the top cover of the UA analyzer
is indented.
This step MUST be completed before the
countdown timer reaches 35 as the Strip Tray will begin
to slide into the analyzer.
The UA analyzer will time the
reactions and scan when appropriate.
WARNING!
If the Strip Tray has already moved into the analyzer to start scanning before the
strip is placed in the tray, an error will be reported on the UA and sent to the SA. The test will be
changed to a SA only test.
While measuring, the SA screen is locked, and navigation to other screens is prohibited. Also,
both the SA status indicator light (top right of the SA Results Panel) and the UA status indicator
light (top right of the UA Results Panel) will display yellow during measurement process. Do not
disconnect UA from SA during testing process. If the UA becomes disconnected during testing,
the UA test will be canceled automatically on the SA, and complete as an SA only test.
UA Test
(continued)


