background image

29

Approval Requirements

Permitted Connections

This telephone, with its associated
power  supply  connector,  may
only  be  connected  to  a  Centrex
telephone  system  using  a  socket
provided  by  your  system 
administrator.

Only  one  terminal  with  its 
associated  power  supply  may  be
connected  to  the  telephone
socke

t.

Non-permitted Connections

This  telephone  must  not  be 
connected to the Public Switched
Telephone Network.

Power Failure

In  the  event  of  a  local  power
failure,  calls  can  be  made  using
the  handset,  incoming  ringing
may  be  at  a  reduced  level  and
special  features  such  as  the 
display  and  handsfree  operation
will not function.

Safety Requirements

Power Supply

The  telephone  must  be  installed
near  an  electrical  outlet  which
should be easily accessible.

Caution Hazardous Voltages

When  the  terminal  is  connected
to  the  telephone  network  all  of
the interconnection points are at
Telephone  Network  Voltage
(TNV).

The  telephone  and  any  acces-
sories  must  be  assembled  and
connected  in  accordance  with
the  manufacturer’s  instructions
in  the  user  guide  before  the
equipment  is  plugged  into  the
telephone line socket.

CE Marking

This equipment complies with

the requirements of the EMC Directive
89/336/EEC for Electromagnetic
Compatibility and the LVD Directive
72/23/EEC for Electrical Safety 
as amended by Directive 93/68/EEC.

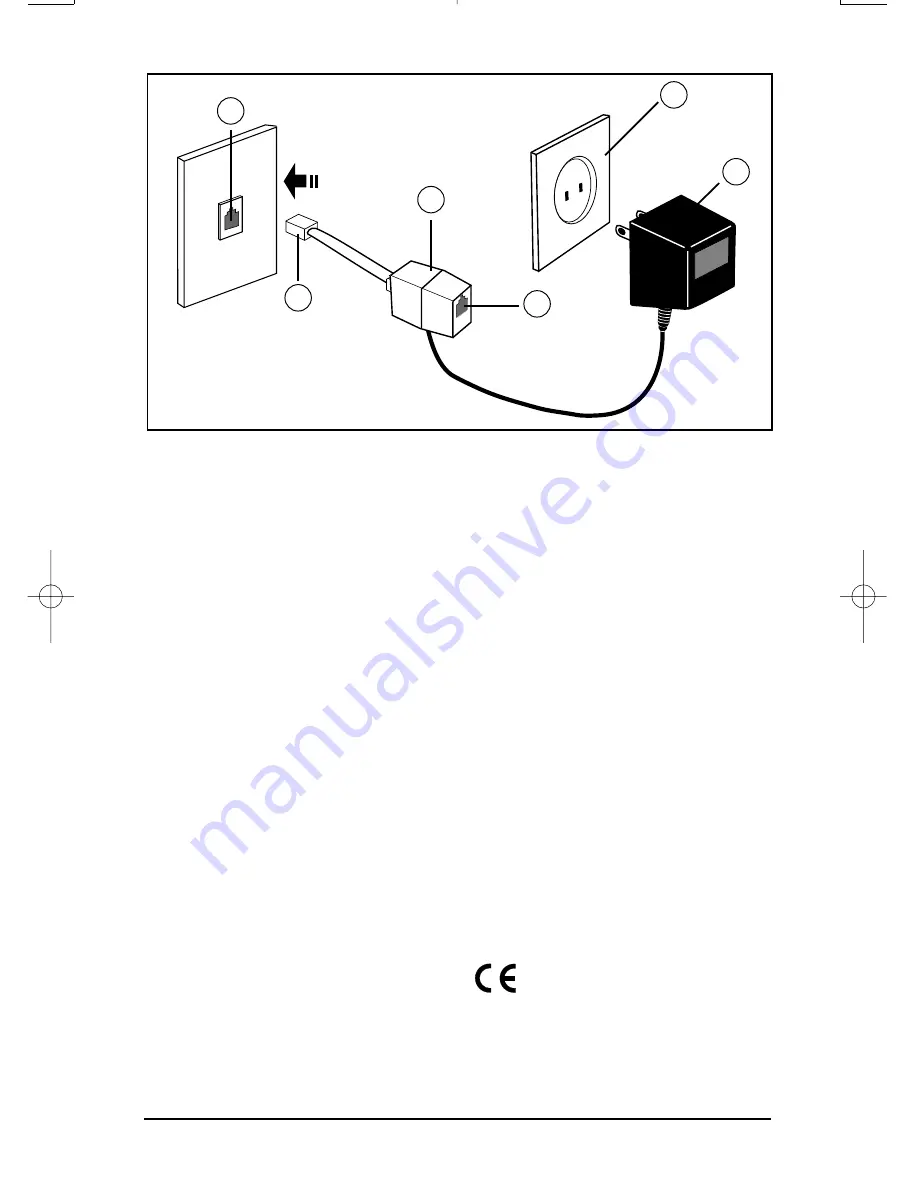
Figure 2 –   European Wall jack/AC adaptor connections

V

U

Y

Z

X

W

6310 E UG2.qxd  1/24/05  4:35 PM  Page 29

Содержание Featurephone M6310

Страница 1: ...M6310 Featurephone User Guide...

Страница 2: ......

Страница 3: ...old After you have covered the basics you can then read how to set up the local features available on the M6310 telephone Local features provide you with convenient ways to customize the set for your...

Страница 4: ...you hear when using the M6310 8 Handsfree Calling 8 Display Features 9 Setting up local features 10 Save Memory and Pause 10 Alerter Volume 11 Time and Date 12 Call Timer 12 Display Language 13 C O N...

Страница 5: ...ne 21 Leave Message 21 Override 21 Ring Again 22 Ways to transfer or share calls 23 Conference 23 Call Park 24 Privacy Release 24 Transfer 25 Controlling your telephone line 26 Make Busy 26 Privacy 26...

Страница 6: ...1 2 3 4 7 8 9 10 11 12 13 6 5 4 Using Your M6310 telephone the basics...

Страница 7: ...hat appear on your M6310 can be used by pressing the appropriate key 7 Feature Line Indicators The indicators appear beside active lines or features A steady means that the feature or line is active A...

Страница 8: ...the line key Making calls Using your handset 1 Lift the handset the PDN key is selected automatically and you hear a dial tone 2 Dial the number Using a line key 1 Press any available line key You hea...

Страница 9: ...1 Press Y 2 Press up or down to adjust the volume The display shows the adjusted Handsfree speaker volume level which remains in effect until the next adjustment Setting the On hook monitoring volume...

Страница 10: ...re allows you to use the built in microphone and speaker on your M6310 to carry on a telephone conversation While using Handsfree speak clearly and face the M6310 raise your voice a little if you move...

Страница 11: ...hows additional information For example when you have forwarded an incoming call to another telephone in your system your display shows the following information The top line of the display shows the...

Страница 12: ...up the following features Alerter Volume Time and Date Set Time and Date Format Call Timer Display Language C O Network Features Predial Memory Number Setting up local features Save Memory and Pause...

Страница 13: ...Call Distribution ACD environment These three local features only work with the Prime Directory Number PDN of the set Note that an incoming call interrupts the activation or programming of all local...

Страница 14: ...til the desired format is shown on the display 5 Press a to save the new format setting 6 Press b or r to exit programming mode Call Timer The Call Timer uses the display to show the time elapsed sinc...

Страница 15: ...tructed to do so by your System Administrator or Customer Service Representative use the following instructions to enable or disable Central Office C O Network Features When enabled the additional fea...

Страница 16: ...display 2 Pickup the handset or press Y The M6310 selects the PDN line and makes the call Note that you can edit the Predial number by using the key and the dialpad digits Save Number The Save Number...

Страница 17: ...you wish to store 6 Press a to save the new setting 7 Press b or r to exit programming mode To make a call using Memory Number 1 Press d until the stored number you wish to call is shown on the displ...

Страница 18: ...Dial the number you want to store 3 Press the Automatic Dial key again 4 Label the key You may want to use a name or telephone number to identify the key To erase an Automatic Dial key 1 Press the Au...

Страница 19: ...gh the speaker Telephones in your system can be organized in Intercom Groups based upon projects or departments Each telephone in the group is then assigned an Intercom group number See your Customer...

Страница 20: ...ministrator to nd out which type of codes are available to you To program a Speed Call number 1 Press i 2 Enter a one or two digit code 0 9 or 00 69 3 Dial the telephone number you want to assign to t...

Страница 21: ...ain The indicator beside the Call Forward key goes ON To cancel Call Forward 1 Press j The indicator beside the Call Forward key goes OFF Call Waiting Call Waiting lets you know when you have a second...

Страница 22: ...Waiting Call Pickup Message Waiting for the M6310 works with the Leave Message feature or with your organization s voice mail system An indicator beside the p key is ON whenever someone has left you...

Страница 23: ...a person on a call It is helpful in emergency situations or when someone expects you to call with important news To bridge into a two way call within your system 1 Press q when you hear a busy signal...

Страница 24: ...ator ashes 4 Lift the handset or press Y 5 Press s to automatically redial the number If you do not press s within a pre defined time limit between 8 32 seconds the Ring Again request is cancelled aut...

Страница 25: ...to establish a conference The line key indicator for the new person goes OFF once added to the conference 4 Repeat steps 1 3 until you have added all the desired parties to the conference To add an in...

Страница 26: ...u hear three short beeps followed by the dial tone 3 Dial the number of the telephone that parked the call Privacy Release If you share a line with other people and the line is programmed for Privacy...

Страница 27: ...s r to return to the original caller 3 Press m or t to complete the transfer and disconnect yourself from the call To transfer a call by establishing a conference 1 While on the current call press t T...

Страница 28: ...ancel Make Busy 1 Press x again The indicator beside the Make Busy key goes OFF Privacy If you share a line with other people and the line is not programmed for Privacy anyone can access the line whil...

Страница 29: ...tomer Service Representative if you need a replacement for a missing or damaged adapter 2 Remove the stand F 3 Insert one end of the line cord into the appropriate jack A located underneath the M6310...

Страница 30: ...position 6 Turn the M6320 right side up and position it on your desk ensuring that line cord runs through slot G 7 Insert the free end of the line cord into the open jack Z on the plastic connector Y...

Страница 31: ...sfree operation will not function Safety Requirements Power Supply The telephone must be installed near an electrical outlet which should be easily accessible Caution Hazardous Voltages When the termi...

Страница 32: ...ights reserved Information is subject to change since Aastra Technologies reserves the right without notice to make changes in equipment design or components as progress in engineering or manufacturin...

Отзывы: