background image

15

Aastra 610d, 620d, 630d

Aastra 610d, 620d , 630d Quick Reference Guide

Connecting the charging unit

Aastra 610d, 620d:

 This handset can be used without 

any changes to the charger cradle.

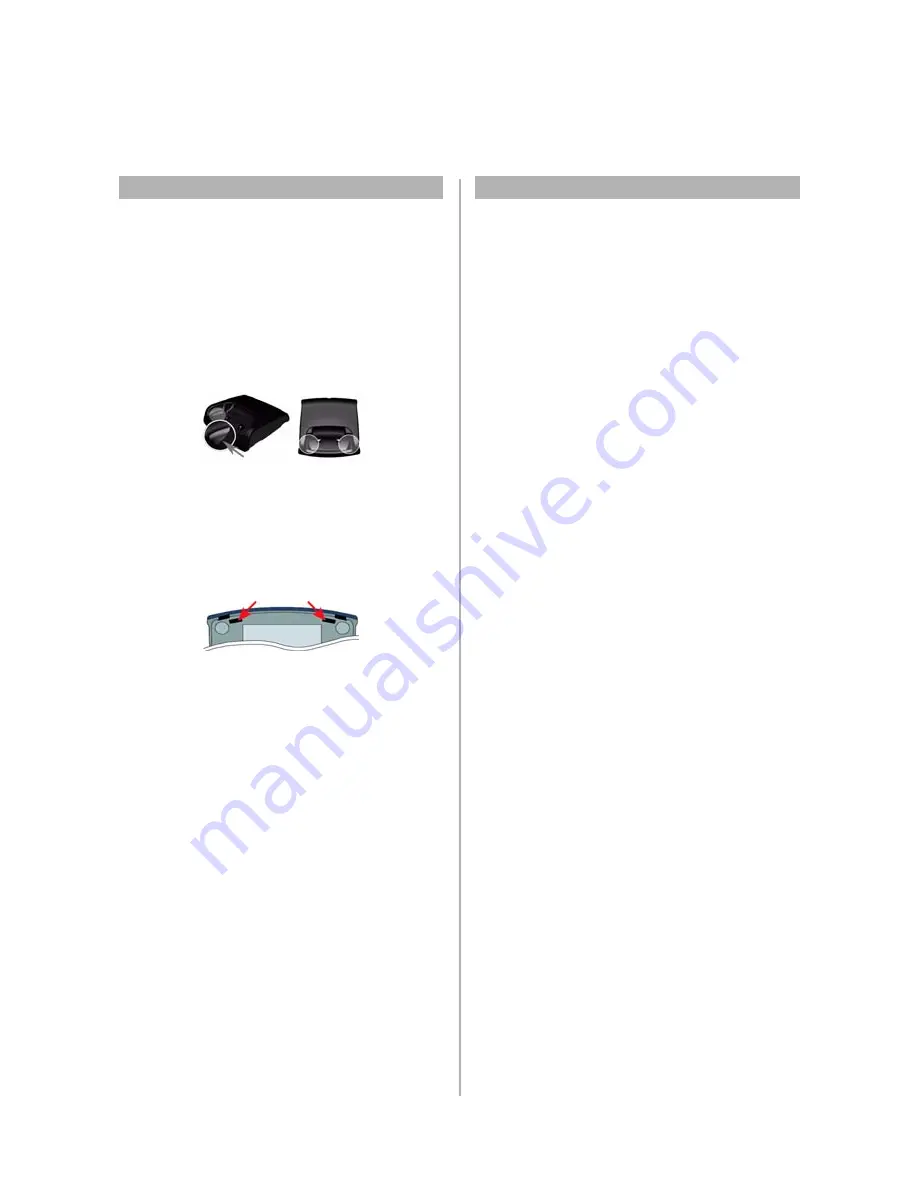
Aastra 630d

: To use this handset, you must remove the 

two lateral guides in the charger cradle. They are easy to 

lift on the inside edge using a fingernail or a paper clip.

The plastic guides can also be removed, by pushing a 

suitable screwdriver into the slits on the bottom of the 

charger.

Connect the plug-in power supply to the charger cradle 

and place the connection cable through the cable guide. 

Place the charger cradle on a non-slip surface. Change 

the plug of the power supply unit if necessary.

Power Supply / Power unit

The power supply unit is designed for 100V to 240V AC 

(50-60 Hz). It is supplied with four change adapters 

enabling virtually worldwide use. Where necessary, 

connect the plug normally used in your country to the 

power supply unit. There are two versions of the plug-in 

power supply unit that are connected slightly differently:

Version 1

: Set the switch on the power supply unit to 

OPEN and push out the existing plug upwards.

Then insert the new plug required into the power supply 

unit and lock it with the switch (LOCK).

Version 2

: Remove any existing plug by pressing OPEN. 

Then insert the required new plug into the power 

supply unit at a slight angle with the label TOP upwards. 

Press downwards until it snaps into place

Содержание Aastra 610d

Страница 1: ...ing it in the text flow Select Graphics Properties and make the following settings Width 15 4 cm Important Height 11 2 cm May be smaller Top 5 3 cm Important Left 0 3 cm Important This text should the...

Страница 2: ...EN LZT 102 4164 R1C Copyright Aastra Telecom Sweden 2012 All rights reserved...

Страница 3: ...air or replace the telephone set at no charge if returned within the warranty period If replacement parts are used in making repairs these parts may be refurbished or may contain refurbished materials...

Страница 4: ...ices are powered by a Li ion battery both standard and power battery It is vital that you read the safety regulations before using the battery for the first time Keep thesesafety regulations and all i...

Страница 5: ...tside this temperature range can lead to a longer than usual charging time or even to failure of the charging process An extremely short operating time after a full charge indicates that the lifetime...

Страница 6: ...6 Aastra 610d 620d 630d...

Страница 7: ...1 Aastra 630d Emergency call key 2 Earpiece 3 LEDs 4 Aastra 610d key volume adjustment Aastra620 630d 3 side keys programmable and volume adjustment 5 Hotkey programmable not Aastra 610 6 Display 7 3...

Страница 8: ...er or the VIP list Headset Press the answering button on the headset Call pick up Call ringing extension 8 France and New Zealand Press 4 Sweden Press 6 Group call pick up 8 Finland and Sweden Press 0...

Страница 9: ...ring calling Press Ckey to suppress the ringing Mute microphone during call Press softkey Volume and Ringing Adjust speaker volume during a call For Aastra 610d Press the volume button on the side of...

Страница 10: ...and New Zealand Press 4 Sweden Press 6 Conference Ongoing conversation Press softkey Dial number At answer press 3 Conference Repeat to add more Transfer Ongoing conversation Press softkey or Press Di...

Страница 11: ...0 Voice Mail Optional New voice mail message received A new voice mail message Press Select Voice box or Press Select info Voice box Call Forwarding Text Messages You can send and receive text message...

Страница 12: ...hone book entry Press Select entry from caller list Press softkey select Add to Enter entry details Confirm with softkey OK Press softkey to save Edit Phone book details Press navigation key or Press...

Страница 13: ...nguage Select language Press softkey to save Time Date Format Set time date and format Press softkey Select Time Alarms Change values of time date and alarms appointment by pressing Press softkey to s...

Страница 14: ...f the headset Status Press select Settings Bluetooth BT Status Press Change to switch Bluetooth on or off Inserting standard battery Aastra 610d 620d Push the battery cover downwards until it disengag...

Страница 15: ...non slip surface Change the plug of the power supply unit if necessary Power Supply Power unit The power supply unit is designed for 100V to 240V AC 50 60 Hz It is supplied with four change adapters...

Страница 16: ...ra 610d Handset Aastra 620d 630d Power Battery Pack Aastra 620d Cover for Power Battery Compartment Aastra 630d Cover for Power Battery Compartment Aastra 610d 620d Rotary Belt Clip Aastra 610d 620d L...

Страница 17: ...ent or relocate the receiving antenna Increase the separation between the equipment and receiver Connect the equipment into an outlet on a circuit dif ferent from that to which the receiver is connect...

Страница 18: ...and ards previously set by international standard bodies These standards include a substantial safety margin designedtoassurethe safetyofall persons regardlessof age and health This device and its ant...

Страница 19: ...or notice For questions regarding the product please contact your Aastra Certified Sales Partner Also visit us on www aastra com Printed on chlorine free paper Aastra Telecom Sweden AB 2012 All rights...

Отзывы: