background image

Page 14 

Aarrow Ecoburn Inset 5 

INSTALLATION


FINAL CHECK LIST 


Before handing over the installation to the  
customer it is requirement under Document J that 
the appliance is lit and the functioning of the   
chimney system is checked for satisfactory        
operation. 


 

Be sure that the chimney is operating 
and ALL smoke and fumes are vented to 
the atmosphere through the chimney  

          terminal.  


 

Check all joints and seals. 


 

Clean the outside of the appliance to 

          prevent any stains becoming burnt on. 


 

Check the flue draught which should 
read 1 - 2mm, or 0.1 - 0.2 mbar. 


 

If Building Control Consent route is being 
sought please complete the check list on 
page 15. 


 

For a registered Competent Persons 
Scheme, such as HETAS, please 

           complete the Certificate Of Compliance,  
           which is used for checking and reporting 
           the installation as imposed by the  
           Government 


 

Explain the controls and operation of the 
appliance to the customer.


The details on the 

Building Control Consent 

Checklist

  ( Page15 ) 

must 

be checked and      

completed in full by the installer at the time of      
installation.  
Please answer all questions as fully as possible. 

Aarrow stoves 

cannot be held responsible for the 

chimney or installation. 

MASONRY FIXING BOLTS 


The Aarrow Ecoburn Inset 5 is supplied with masonry 
fixing bolts to allow the installer to bolt the stove in 
place, to the back of the chair brick if required. 
In order to do this is will be necessary to remove the 
„knock out‟ hole plugs in the rear of the stove. 
These are located behind the tertiary air bar, which 
must be removed to access these fastening holes.    
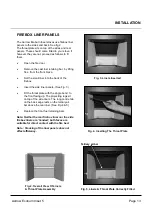
See Fig a, below.


Fig a. 

Bolt fixing ‘knock outs’


The fixing bolts supplied with the stove are designed to 
be screwed directly into masonry without the need for 
any form of wall plugs. A pilot hole of  6mm will need to 
be pre-drilled. Take care not to over tighten the fixing 
bolts as this may damage the chair brick / wall, or strip 
out the formed thread requiring involved repair work. 


Fixing bolts supplied are M10 x 75mm, Longer bolts 
may required if no chair brick is present these will have 
to be supplied by the installer. 


Installing without a chair brick in place 

(See page 10 for diagram showing chair brick) 
The stove is designed for installing into a fireplace with 
a standard 16” or 18”chair brick in place. If the chair 
brick has however been removed the stove can still be 
installed but must be back filled with a 1:6 cement/
vermiculite mix.  Anchoring the stove using masonry 
bolts will require the use of longer bolts (not supplied) 
capable of reaching solid masonry behind the infill mix, 
as this will not provide a sufficiently strong fixing point. 
The infill mix will need to be carefully dropped in behind 
the stove by inserting one small hand full at a time 
though the stove. This may take some time and must be 
done very carefully to insure 

NO VOIDS 

are left behind 

the stove body. Extra fire cement sealing where the 
stove flue outlet lip meets back of the fireplace recess 
may be needed. See fig b. 

Fig b. 

1:6 cement/
vermiculite infill 
to fill void left by 
removal of the 
chair brick. 

Carefully seal 
here with fire   
cement if        
necessary 

2 x 75mm fixing 
bolts, supplied 

Содержание ECOBURN INSET 5

Страница 1: ...Operating Installation Manual BK117 EN 13240 2001 Amd A2 2004 Rev 02 March 2011 Part No AFS1512 10 PLEASE RETAIN THIS GUIDE FOR FUTURE REFERENCE ECOBURN INSET 5 ...

Страница 2: ...ght 2009 Arada Ltd This booklet has copyright and may not be copied in whole or part or used for any purpose other than that for which it is supplied without express written consent from Arada Ltd Aarrow Ecoburn Inset 5 Page 2 All Aarrow Ecoburn Inset stoves are approved to European Standard EN 13240 and CE marked These appliances listed within this manual have been approved by HETAS Ltd as an int...

Страница 3: ...ilding Control Consent Checklist 15 SERVICE MAINTENANCE Annual Maintenance 16 Cleaning 16 Chimney Sweeping 16 Door Glass 16 Outer Finish 16 Summer Storage Non Usage 17 Adjusting The Door Hinges 17 Fuel Retainer Inspection 17 Fire Door Rope Replacement 18 19 Fire Door Glass Replacement 18 19 Service Record 20 OPERATING INSTRUCTION Page No Suitable Fuel 21 Lighting The Stove 21 Burning Wood 22 Reduc...

Страница 4: ...SONS SCHEME SUCH AS OPERATED BY HETAS IF IN DOUBT CONTACT HETAS LIMITED TELEPHONE NUMBER 0845 634 5626 www hetas co uk THIS STOVE MUST NOT BE CONNECTED TO A SHARED FLUE SYSTEM TO ALL USERS PETROLEUM COKE SOME OF WHOSE BRAND NAMES ARE CALCO PETROCOKE AND WONDERCO MUST NOT BE BURNED IN THIS APPLIANCE BITUMINOUS HOUSE COAL SHOULD NEVER BE USED IN YOUR STOVE TO USE THESE FUELS WILL INVALIDATE THE APPL...

Страница 5: ...F THE STOVE Your Aarrow stove is built to the highest standard of craftsmanship using the best materials and the most modern equipment available It is a highly efficient and sophisticated piece of machinery and when properly installed and operated it should provide a lifetime of heating satisfaction Safety is the most important consideration when installing your fire If not properly installed and ...

Страница 6: ... Fuel Retainers 2 2 Throat Plate 1 3 Side Liner 2 4 Back Liner 1 5 Wood Burning Tray 1 6 Tertiary Air Bar 1 7 Ash Pan 1 8 Operating Tool 1 9 Instruction Manual 1 CHECK LIST Page 6 Inside the appliance body you should find the following Aarrow Ecoburn Inset 5 ...

Страница 7: ...se Note The Aarrow Ecoburn Inset stove is fitted with a data plate located on the bottom of the right hand leg as shown opposite The data given is that registered on the HETAS website stating the output and performance of the stove The CE mark indicates that the stove performance has been independently certified by a competent body Data Plate Location Aarrow Ecoburn Inset 5 Agdhs dad Aaasdad Sgrt ...

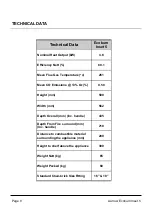
Страница 8: ...Gas Temperature c 261 Mean CO Emissions 13 O2 0 50 Height mm 590 Width mm 562 Depth Overall mm Inc handle 435 Depth From Fire surround mm Inc handle 210 Distance to combustible material surrounding the appliance mm 200 Height to shelf above the appliance 300 Weight Nett kg 65 Weight Packed kg 68 Standard Chair brick Size Fitting 16 18 ...

Страница 9: ...pliance The safety handling guidelines as set out on page 5 of this manual should be followed To make movement easier internal fittings fuel retainers grates firebox liners flue outlets hot plates throat plates etc can be removed Care should be taken to make sure that the hinges are not damaged during installation HEARTH FIRE SURROUND The stove must be installed on a floor with adequate load beari...

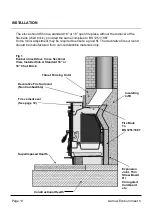
Страница 10: ...ut the removal of the fire back chair brick provided the same complies to BS 1251 1987 Some minor adjustment may be required to ensure a good fit The decorative fire surround should be manufactured from non combustible materials only Fig 1 Ecoburn Inset Stove Cross Sectional View Installed Into A Standard 16 or 18 Chair Brick Throat Forming Lintel Fire cement seal See page 12 Decorative Fire Surro...

Страница 11: ...of Europe Chimney Standards chimneys will be specified according to their performance designation as defined in BS EN 1443 that covers the General Requirements for chimneys The minimum performance designation required for use with solid fuel burning stoves is T450 N2 S D3 The flue and chimney installation must be carefully checked by a competent person before fitting the stove to ensure it is suit...

Страница 12: ...ove the Stove Door The stove may become front heavy should the door be opened during positioning prior to the stove being secured in place with the provided masonry bolts See page 14 If the stove is left unsupported and the door is fully open it may tip forward causing damage to the stove door or stove body or to the surrounding hearth brickwork etc Sealing the back and base of the stove to the de...

Страница 13: ...ert the side liner panels See Fig 3 Fit the throat plate with the single bend to the front facing up The projecting lugs sit on top of the side liners The long centre tab on the back edge rests on the tertiary air bar above the rear liner See Fig 4 5 Replace the front fuel retaining bars Note Neither the rear firebox liner nor the side firebox liners are handed both faces are suitable for direct c...

Страница 14: ...ocated behind the tertiary air bar which must be removed to access these fastening holes See Fig a below Fig a Bolt fixing knock outs The fixing bolts supplied with the stove are designed to be screwed directly into masonry without the need for any form of wall plugs A pilot hole of 6mm will need to be pre drilled Take care not to over tighten the fixing bolts as this may damage the chair brick wa...

Страница 15: ... partJ of Schedule1 of the Building regulations Print name and title Profession Capacity Telephone No Address Postcode Signed Date Registered member of e g CORGI OFTEC HETAS NACE NACS 7 Hearth form of construction new or existing 8 Inspection and testing after completion Test carried out by Test and Results Flue inspection Visual 6 Chimney or flue construction a State the type or make and whether ...

Страница 16: ...ng season It is important that the flue ways flue pipe and chimney be cleaned prior to lighting the fire after a prolonged shut down period DOOR GLASS The door glass should remain clear during normal burning However under certain conditions such as burning at a low rate or damp wood or over night burning the glass may become somewhat blackened To remedy this operate the appliance at a fast rate Al...

Страница 17: ... of the casting The fire door can be re aligned as follows When the appliance is cold open the fire door so that it is at right angles to the front of the stove Lift the fire door up off its hinges Gently tap the hinge pins in the direction to compensate for the misalignment Fig 6 Re fit the door and check to ensure it now sits square to the body if not repeat the above steps If the fire door need...

Страница 18: ... before refitting the door to the appliance FIRE DOOR GLASS REPLACEMENT In the event of the door glass being broken it can easily be replaced Please follow The door should be lifted off the hinges so that this operation can be carried out on a work bench or similar level surface Unscrew the four screw fixings securing the glass clips and remove both clips and fixings Carefully remove any pieces of...

Страница 19: ...Page 19 Aarrow Ecoburn Inset 5 SERVICE MAINTENANCE Please Note This should be carried out when the fire is cold and unlit Fig 10 Positioning The Glass Fig 11 Tightening The Glass Clip ...

Страница 20: ...ot covered in this manual please contact your Aarrow dealer Please keep all repair receipts safely Please ensure you have this manual available when an engineer visits so they can complete the service record chart Date of Visit Company Details Work Carried Out Signature Service Record Aarrow Ecoburn Inset 5 ...

Страница 21: ...RN PLASTICS OR HOUSEHOLD WASTE IN YOUR STOVE WARNING NEVER BURN LIQUID FUELS IN YOUR STOVE PLEASE CONTACT The Manufacturer For Further Details Advice On The Use Of Other Fuels Please Note Do not use petroleum based solid products such as Calco or Petrocoke To do so will INVALIDATE the appliance Guarantee See page 29 30 LIGHTING THE STOVE Prior to lighting the stove for the first time check with th...

Страница 22: ...sh inlet control to a lower setting Please note if the air wash control is fully closed the appliance will be starved of air and die down WARNING When wood is burnt slowly in a closed appliance it produces moisture and tar which will create con densation and deposits in the chimney This effect can be minimised by burning hard for a short period 15 to 20 minutes twice a day Please Note To avoid chi...

Страница 23: ...r replaced This should be done by a HETAS registered engineer ASH REMOVAL The appliance will require ash to be removed periodically but an ash bed of approximately 20mm 3 4 should be maintained Ash may be removed with a small shovel whilst the fire is still lit by raking the embers of a low fire to one side of the firebox and carefully removing the ash then repeating the procedure for the other si...

Страница 24: ...uired for clean efficient combustion of the fuel The air wash has an internal sliding plate with specially shaped slots housed within the stove body and is located above the fire door Sliding the control knob to the Right as far as it will go achieves the fully open position See Fig 12 Sliding it to the Left will shut off the air inlet slots as shown in Fig 13 Fig 12 Air Wash Fully Open Position F...

Страница 25: ...NSTRUCTIONS Page 25 Aarrow Ecoburn Inset 5 FUEL RETAINER BARS Two fuel retaining bars are supplied with the Ecoburn inset stove Fig 17 Please Note This should be carried out when the stove is cold and unlit Fig 17 ...

Страница 26: ...move the ash pan open the fire door fit the fork end of the operating tool into the ash pan slots and remove from the ash pit chamber Empty the ash into a suitable container and replace the ash pan into the stove withdraw the operating tool and close the fire door AIR WASH CONTROL KNOB The operating tool can also be used to adjust the air wash control knob Use the fork end of the tool place side o...

Страница 27: ...re door as any surrounding areas of the stove will be very hot WARNING Never attempt to open the fire door whilst the appliance is in use WITHOUT the use of the stove mitten or suitable gloves serious injuries may occur Caution must be taken when re fuelling the appliance always keep the stove mitten away from naked flames and sparks The Main Fire Door Handle This handle may reach 100 c always use...

Страница 28: ...et 5 OPTIONAL EXTRA ACCESSORIES Part Description Visual Aid Not to Scale Ecoburn Inset Aerosol Touch Up Paint AFS 101 Gothic Door Tracery ECB7TRACEG Lattice Door Tracery ECB7TRACEL Flue Gather Kit Includes Fixings 5 INSET GATHER ...

Страница 29: ...Ecoburn Inset Replacement Manual AFS1512 Air Wash Control Knob Includes Washer AFS1405 Replacement Hot Glove AFS1285 Throat Plate AFS1402 Ash Pan AFS1395 Rear Liner AFS1410 Side Liner AFS1409 Complete Liner set AFS1408 Fuel Retainer AFS1192 Operating Tool AFS008 SPARE PARTS ...

Страница 30: ...or Glass Kit Includes Fixings AFS1214 Hinge Kit Includes Fixings AFS047 Fire Door Rope Kit Glue AFS1021 Fire Door Assembly Complete AFS1218 Fire Door handle Assembly AFS1306 Wood Burning Tray AFS1401 Tertiary Air Top Includes Fixings AFS1403 Wood Cover Plates Includes Fixings AFS1404 Replacement Primary Air Slider AFS1369 Stove Fixing Bolts M10 x 75mm AFS1434 ...

Страница 31: ...nce being serviced and checked annually by a qualified heating engineer with documentation to be retained and produced in the event of a claim being made Claims are not valid where installation does not conform to appropriate building regulations The manufactures decision shall be final If your appliance proves to be defective as a result of faulty materials or workmanship during the guarantee per...

Страница 32: ...eplacement Documentation must be retained and produced in the event of a warranty claim This guarantee specifically does not cover accidental damage misuse general wear tear The use of non Aarrow replacement parts will invalidate your warranty For full details contact your local Aarrow retailer All guarantees are in addition to your statutory rights Please see page 31 for further information regar...

Страница 33: ...Page 33 Aarrow Ecoburn Inset 5 GENERAL DIMENSIONS Maximum width in front of fire place 202mm Requires a 225mm hearth totalling 427mm 210 ...

Страница 34: ...iner Bars Firebox Liners Throat Plate Air Wash function Door Catch Door Handle Ash Pan Operating Tool Operating Installation Manual Masonry Fixing Screws Assembled By Checked By Date of Purchase Name and Address of Supplier Arada Ltd The Fire Works Weycroft Avenue Axminster Devon EX13 5HU United Kingdom Tel 44 0 1297 35700 Fax 44 0 1297 35900 www arada uk com Aarrow Ecoburn Inset ...

Отзывы: