background image


120 

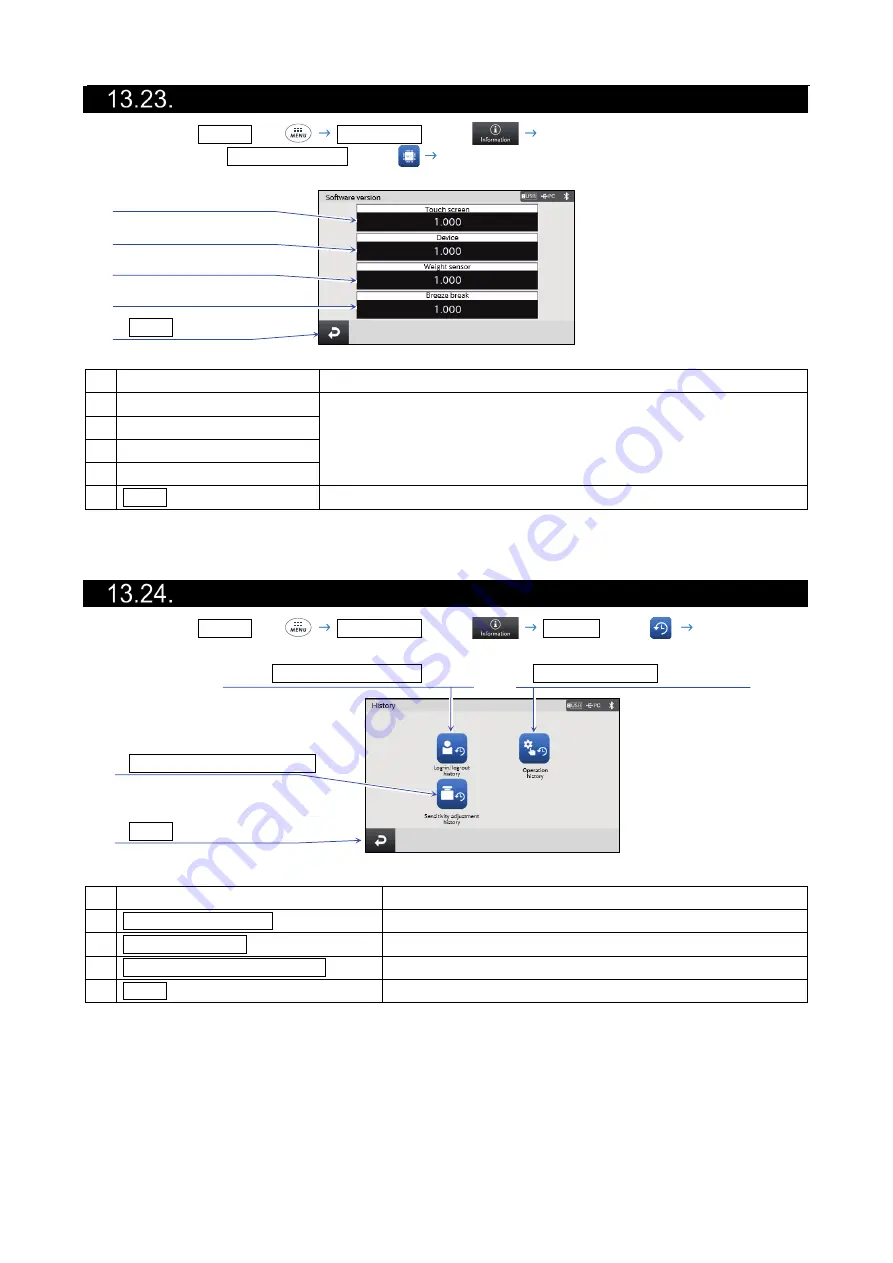
  Software version 

Display settings:  MENU  key 

    Information  button 


 Software version  button 

   [Software version] screen 


1

 Touch screen 


2

 Device 


3

 Weight sensor 


4

 Breeze break 


5

  Back  button 


Name 

Description 

1

  Touch screen 

Display the software version of each function used for the balance. 

2

  Device 

3

  Weight sensor 

4

  Breeze break 

5

   Back  button 

Returns to the previous screen. 


  History 

Display settings:  MENU  key 

    Information  button 

    History  button 

    [History] screen 


1

  Log-in/log-out history  button 

2

  Operation history  button 


3

  Sensitivity adjustment history  button 


4

  Back  button 


Name 

Description 

1

   Log-in/log-out history  button 

Displays the [Log-in/log-out history] screen. 

2

   Operation history  button 

Displays the [Operation history] screen. 

3

   Sensitivity adjustment history  button  Displays the [Sensitivity adjustment history] screen. 

4

   Back  button 

Returns to the previous screen. 


Содержание BA-125DTE

Страница 1: ...BA 6TE BA 6DTE BA 225TE BA 225DTE BA 125DTE 1WMPD4004315 ...

Страница 2: ...the instrument covered by this manual are subject to change for improvement without notice Windows Word and Excel are trademarks of the Microsoft Corporation registered in the U S and other countries and regions Mac and macOS are trademarks of Apple Inc registered in the U S and other countries and regions Product names and company names mentioned in this manual are trademarks or registered tradem...

Страница 3: ...3 Contents 1 Introduction 7 2 Part Names Installation and Precautions 9 3 Screens and Operations Keys and Buttons 19 4 IR Sensors and Auto Doors 24 5 Application 26 ...

Страница 4: ...nce Check Repeatability Measurement Screen 51 7 Communication device 52 8 Password Function 54 9 Menu Screen 61 10 Sensitivity adjustment screen 62 11 Calibration test check 69 12 Filter Settings 96 13 System settings 97 ...

Страница 5: ...5 14 Underhook 124 15 Interface Specifications Standard 125 16 Connection with Peripheral Devices 130 17 Printing Weighing Value Data with a Printer 133 18 Connecting to a Personal Computer 136 ...

Страница 6: ...6 19 Data Output 139 20 Command 150 21 Error Codes 155 22 Ionizer AX ION 25 158 23 Maintenance 160 24 Troubleshooting 160 25 Specifications 162 26 Compliance 169 ...

Страница 7: ...ation test results GLP Good Laboratory Practice Standards for implementing safety tests for drugs and medicines GMP Good Manufacturing Practice Rules for manufacturing and quality control The clock built into the balance allows you to output the weighing value with the date and time The clock settings can be restricted so that only the Administrator can change them Password function The BA T serie...

Страница 8: ...eliminator that does not generate wind and eliminates static electricity from charged objects before weighing in order to reduce errors due to static electricity The discharge electrode unit of the ionizer can be removed and can be cleaned and replaced by itself ...

Страница 9: ...ke sure that everything is included Do not connect the AC adapter to the balance until the balance is assembled and installed Do not connect the included AC adapter to other devices Use the dedicated AC adapter specified for the balance If you use the wrong AC adapter the balance and other equipment may not work properly Make sure that the AC adapter is unplugged before you connect the breeze brea...

Страница 10: ...Breeze break unit Breeze break ring A Dust plate A Small glass breeze break set Breeze break doors Aluminum round pans for analysis 10 pieces each Side panes 3 pieces Top pane Base stand Large pan φ15 0 8 mL Medium pan φ12 0 3 mL Small pan φ8 0 05 mL Pan B φ85 Breeze break ring B Dust plate B Breeze break front glass Breeze break unit Breeze break doors Unpacking Packing contents common to BA T se...

Страница 11: ...assemble the five parts of the weighing pan in the correct position by referring to the cross sectional view For BA 225TE BA 225DTE BA 125DTE assemble the four parts of the weighing pan in the correct position by referring to the cross sectional view Breeze break unit Step 1 Step 3 Step 2 Weighing unit For BA 225TE BA 225DTE BA 125DTE For BA 6TE BA 6DTE Pan A Pan support A Pan B Breeze break ring ...

Страница 12: ... the handle side Step 7 Assemble the breeze break doors on the left and right sides 7a Insert the breeze break doors on the left and right sides 7b Secure the breeze break doors with the latches Step 8 Assemble the breeze break front glass 8a Insert the breeze break front glass 8b Secure the breeze break front glass with the latches Top pane Side panes 3 pieces Step 5 Base stand Side pane Notch Ba...

Страница 13: ...of the weighing unit Loosen the leveling foot when stowing the cable in the groove Caution When stowing the cable do not tilt the weighing unit Step 11 Connect the breeze break unit and ionizer with the included cable C Caution The ionizer operates when the AC adapter is connected to the balance Step 12 Connect the included AC adapter to the balance Step 10 Groove for cable Loosen the leveling foo...

Страница 14: ...he display unit in a location other than on the anti vibration table so that errors due to tilt that occurs when operating the switches of the balance on the anti vibration table can be avoided Place the balance on a horizontal table and make sure that it is not tilted Install the balance in a stable location avoiding vibration and shock Corners of rooms on the first floor are best as they are les...

Страница 15: ...Screen Do not install the balance where flammable or corrosive gas is present How to adjust the level of the balance Level the balance by adjusting the leveling feet so that the bubble of the bubble spirit level is centered in the red circle Leveling foot Bubble spirit level When the bubble is off to the left Turn the leveling foot on the front right in the clockwise direction When the bubble is o...

Страница 16: ...er For example when the room temperature is 20 C convection occurs around a Petri dish or watch glass that is 40 C and the balance displays a value lighter than the actual weight Before weighing the sample and the container try to acclimatize them to the ambient temperature Perform the weighing operation carefully and quickly If measurement takes a long time error inducing factors will increase du...

Страница 17: ...h as powder liquid and metal pieces from entering the balance Precautions after use Avoid mechanical shock to the balance Do not disassemble the balance Do not use any strong organic solvents to clean the balance Clean the balance with a lint free cloth that is moistened with a mild detergent Prevent foreign substances such as powder liquid and metal pieces from entering the balance Caution on the...

Страница 18: ... use refer to 2 Part Names Installation and Precautions 5 RS 232C connector For configuration details refer to 13 13 RS 232C interface For specifications refer to 15 1 RS 232C specifications For usage details refer to 16 Connection with Peripheral Devices 6 USB mini B connector For configuration details refer to 13 14 USB interface For specifications refer to 15 2 USB specifications For usage deta...

Страница 19: ...s displayed when you touch the HOME key 1 Quick performance check button 10 Sensitivity adjustment calibration test button 2 Application button 11 Communication device setting button 3 Left IR sensor function change button 12 Right IR sensor function change button 4 Stabilization indicator 13 Capacity readability 5 Left IR sensor 14 Right IR sensor 6 Weighing display 15 Date time display 16 Warnin...

Страница 20: ...FF key is active during any operation When the screen display is turned off the standby screen appears When the screen display is turned on the weighing screen appears 8 HOME key Displays the weighing screen The HOME key is active during any operation 9 PRINT button Outputs data to the device connected to the balance Refer to 16 Connection with Peripheral Devices and 19 Data Output 10 CAL button T...

Страница 21: ...he start of weighing High Door open close Displayed when the left right breeze break door is open Low On screen operation buttons You can perform main operations for the balance on the touch screen of the display unit Touch the on screen buttons buttons with text and selection buttons for operation Caution There are no double click drag or flip operations Do not perform these operations as they ma...

Страница 22: ...umerical value is out of range touching this button returns to the original screen without applying the numerical value Character input screen A character input screen is displayed when you need to input characters On the character input screen you can input alphanumerics and symbols Screen for alphanumerics Screen for symbols 1 Caps button 5 Back button 2 Esc button 6 Enter button 7 Cursor move b...

Страница 23: ... but the input characters are displayed as Password input screen 1 Caps button 5 Back button 2 Esc button 6 Enter button 3 Symbol button 7 Cursor move buttons 4 Space button Name Description 1 Caps button Switches between lower and upper cases 2 Esc button Returns to the original screen without reflecting the input characters 3 Symbol button Keys for inputting characters change to symbols 4 Space ...

Страница 24: ...at the doors are fully open or partially open For details refer to 13 3 Breeze break auto doors Display settings MENU key System settings button Auto door button Auto doors settings screen You can also open and close the breeze break doors with the external switch AX SW137 PRINT or AX SW137 REZERO connected to the display unit connection terminal EXT SW1 or EXT SW2 and in the External input switch...

Страница 25: ...25 Right IR sensor Opens closes the left breeze break door Example for BA 6TE BA 6DTE Operation example Left IR sensor Opens closes the right breeze break door ...

Страница 26: ... to be used in the normal weighing 3 Minimum display digit No blank 1 digit blank 2 digit blank Select the minimum digit to be displayed for the normal weighing and minimum weight alert function 4 Statistical calculation function OFF ON Displays and outputs the statistical calculation result 5 Capacity indicator OFF ON Displays weighing values in a bar graph 6 Decimal separator Point Comma 7 Gross...

Страница 27: ... 37 429 g Tael Taiwan 37 5 g Tael China 31 25 g Tola India tol 11 6638038 g Messghal MES 4 6875 g The following tables show the capacity and readability for each unit according to the model of the balance Unit BA 6TE Precision range Capacity Readability Gram 6 20 0 000001 Milligram 6200 0 001 Once Avoir 0 218 0 0000001 Troy Once 0 199 0 0000001 Metric Carat 31 0 0 00001 Momme 1 65 0 000001 Pennywe...

Страница 28: ... 0 164 0 000001 Tael HK jewelry 0 0561 0 0000001 0 165 0 000001 Tael Taiwan 0 0560 0 0000001 0 165 0 000001 Tael China 0 0672 0 0000001 0 198 0 000001 Tola India 0 180 0 0000001 0 531 0 000001 Messghal 0 448 0 000001 1 32 0 00001 Unit BA 225TE Precision range Capacity Readability Gram 220 0 00001 Milligram 220000 0 01 Once Avoir 7 76 0 000001 Troy Once 7 07 0 000001 Metric Carat 1100 0 0001 Momme ...

Страница 29: ...ina 1 63 0 000001 7 04 0 00001 Tola India 4 37 0 000001 18 8 0 00001 Messghal 10 8 0 00001 46 9 0 0001 Unit BA 125DTE Precision range Standard range Capacity Readability Capacity Readability Gram 51 0 0 00001 120 0 0001 Milligram 51000 0 01 120000 0 1 Ounce Avoir 1 79 0 000001 4 23 0 00001 Troy Ounce 1 63 0 000001 3 85 0 00001 Metric Carat 255 0 0001 600 0 001 Momme 13 6 0 00001 32 0 0 0001 Pennyw...

Страница 30: ... RE ZERO button Zero display Sample Weighing value Zero after subtracting the tare Step 1 If you press the ON OFF key with a container tare placed on the weighing pan to display the weighing value zero is displayed after automatically subtracting the tare Zero display after subtracting the tare Caution In the zero display after subtracting the tare the range available for weighing becomes narrower...

Страница 31: ...ed value can be set to zero The re zero operation with the RE ZERO button will automatically judge whether to set the zero point or to tare Weighing range The weight range that the balance can display varies depending on the model When the gross weight weighed exceeds the maximum display E is displayed to indicate that the weighing range is exceeded When exceeded in the negative direction E is dis...

Страница 32: ...Place a container on the weighing pan When the displayed value exceeds the precision range the balance automatically switches to the standard range Step 3 Press the RE ZERO button to set the display to zero and enable the precision range Step 4 Place a sample in the container If the weighing value does not exceed the precision range the sample can be weighed in the precision range Step 5 Remove th...

Страница 33: ...his is the mode to determine the number of objects in a sample Based on the reference sample unit weight weight per piece the balance calculates and displays how many pieces the sample weight corresponds to The smaller the variation in the unit weight of sample pieces is the more accurate the count will be The balance is equipped with the Automatic Counting Accuracy Improvement ACAI function to im...

Страница 34: ...mon to the Number of samples input button in the Counting mode Sample input mode screen 3 Input directly button Displays the numerical value input display for the unit weight 4 Unit weight input button Input the unit weight Input range 0 1 mg to capacity for each model This screen is used to store the unit weight for the Counting mode Counting mode sample input Sample input mode screen Display set...

Страница 35: ...ces will yield more accurate counting result since the sample unit weight is usually considered to vary more or less Step 2 Place a container on the weighing pan and press the RE ZERO button to set the weighing value to zero Step 3 Place the specified number of sample pieces on the container weighing pan Step 4 Press the SAVE button When The unit weight has been stored is displayed the storage is ...

Страница 36: ...eighing pan Add approximately the same number of sample pieces as displayed Step 2 While Now performing ACAI updating the counting precision is displayed do not move sample pieces Step 3 ACAI has been performed is displayed and the precision is updated Each time this process is repeated the counting accuracy will improve further The range of ACAI after exceeding 100 is not predetermined Add approx...

Страница 37: ...ghing value in a percentage compared with a reference mass as 100 This is useful for target weighing or sample variance checks Storing the 100 reference mass Percent mode setting screen Display settings HOME key APP button Application settings screen Application selection button Select Percent mode HOME key Percent mode setting screen Percent mode setting button Percent mode setting screen 1 100 r...

Страница 38: ...g example for BA 6DTE Step 1 Place a container on the weighing pan if necessary and press the RE ZERO button to set the weighing value to zero Step 2 Place the specified number of sample pieces on the container weighing pan Step 3 Press the SAVE button The 100 reference mass has been stored is displayed Press the HOME key to return to the Percent mode screen Weighing example When samples are weigh...

Страница 39: ...ht alert function Displayed when the minimum weight alert function is enabled 2 Minimum weight setting button Displays the Minimum weight setting screen Also displays the currently stored minimum weight 3 Minimum weight alert display Displayed when the sample weight is less than the set minimum weight This is the screen for the minimum weight alert function This function can be used only in mg uni...

Страница 40: ...ude Exclude Select whether to include or exclude near zero for the minimum weight alert display 5 Outputting data less than the minimum weight OFF ON If set to OFF data with the weighing value less than the minimum weight is not output 6 Output the minimum weight button Outputs the minimum weight Settings in the red box are default values factory settings Near zero is within 12 d of 0 mg d is a un...

Страница 41: ...um weight setting for measurement 1 Measurement method 2 Measurement tolerance 3 Measure button Name Setting value Description 1 Minimum weight measurement method Automatic internal weight Manual external weight Select the minimum weight measurement method 2 Minimum weight measurement tolerance 0 1 1 0 Select the minimum weight measurement tolerance 3 Measure button Start the minimum weight measur...

Страница 42: ...setting measurement is performed with your weight to compute the minimum weight The procedure is displayed in the message field Weighing example for BA 6DTE Step 1 Press the RE ZERO button Step 2 Place a weight on the weighing pan Step 3 Remove the weight when the stabilization indicator is displayed Step 4 Repeat steps 1 2 and 3 ten times Step 5 When the measurement is complete the Minimum weight...

Страница 43: ...ed for the minimum weight measurement 2 Measurement tolerance Displays the minimum weight measurement tolerance 3 Repeatability standard deviation Displays the standard deviation for this measurement 4 Minimum weight Displays the minimum weight 5 PRINT button Outputs the minimum weight measurement result to the device connected to the balance 6 Register button Registers the minimum weight If the r...

Страница 44: ...eviation N Σ Xi 2 ΣXi 2 N N 1 Where Xi is the ith weighing value and N is the number of data Coefficient of variation CV Standard deviation Mean 100 Relative error of the maximum value MAX Maximum Mean Mean 100 Relative error of the minimum value MIN Minimum Mean Mean 100 If the minimum display digit is disabled for any data the calculation result is displayed with the minimum display digit disabl...

Страница 45: ... Statistical calculation function button Select ON HOME key Weighing screen with the statistical calculation function Statistical calculation results button 1 6 2 3 4 5 Name Description 1 Statistical calculation results area Displays the statistical calculation results 2 Statistical calculation setting button Displays the Statistical calculation setting screen 3 Delete all button Deletes all stati...

Страница 46: ...ts button Statistical calculation setting button 1 Statistical display output Name Setting value Description 1 Statistical display output No of data Sum No of data Sum Max Min Range Mean No of data Sum Max Min Range Mean SD CV No of data Sum Max Min Range Mean SD CV Relative error Selects the display output for statistical calculation results Settings in the red box are default values factory sett...

Страница 47: ...ing results Step Press the PRINT button in the Statistical calculation results screen Statistical display output Number of data Sum Maximum Minimum Range Mean Standard deviation Coefficient of variation Relative error Press N 10 SUM 10 000000 g MAX 1 010000 g MIN 0 990000 g R 0 020000 g AVE 1 000000 g SD 0 0094281 g CV 0 94 MAX 1 00 MIN 1 00 ...

Страница 48: ...ndicator Display settings HOME key APP button Application settings screen Capacity indicator button Select ON HOME key Weighing screen with the capacity indicator 1 Capacity indicator Name Description 1 Capacity indicator Displays the capacity indicator Displays the current weight as a blue bar with the capacity as 100 ...

Страница 49: ...lect Gross weight Tare weight 1 G NET display 2 Gross weight Tare weight display 3 RE ZERO button 4 TARE button Name Description 1 G NET display Displays the gross or net indicator G gross Displayed when the tare weight is zero NET net Displayed when the tare weight is non zero 2 Gross weight Tare weight display Displays the current gross weight and tare weight 3 RE ZERO button 1 Gross value Withi...

Страница 50: ...reen with the warning display function 1 Warning display Name Description 1 Warning display Displays two types of warnings according to the situation of the balance Warning display Name Description Display priority Static elimination recommended Displayed when the relative humidity inside the balance is 45 or less Lights up for about 30 seconds after the start of weighing High Door open close Disp...

Страница 51: ...e touch Display the quick performance check as follows Display settings HOME key P TEST button Repeatability measurement screen Quick performance check usage The quick performance check screen is common to the repeatability check screen described in 11 3 Repeatability check For details about setting each item refer to 11 3 Repeatability check ...

Страница 52: ...rive button 1 USB flash drive information 2 Remove USB drive button 3 USB device button 4 Bluetooth button Name Description 1 USB flash drive information Displays the information about the connected USB flash drive 2 Remove USB drive button Removes the USB flash drive 3 USB device button Displays the Communication device USB device settings screen 4 Bluetooth button Displays the Communication devi...

Страница 53: ...ector equipped as standard to connect the balance to PC For details about the communication method refer to 13 14 USB interface Communication device Bluetooth settings Display the USB device tab in the Communication device screen as follows Display settings Weighing screen Communication device button Bluetooth button 1 Bluetooth mode 2 Connection status Name Setting value setting range Description...

Страница 54: ...ng all functions are allowed at each user level There are four user levels Administrator Lab manager Supervisor and Operator Users can select the Lab manager and Supervisor user levels Users who are not logged in are an Operator Users who do not use the password function Administrator Only the Administrator can restrict functions Refer to 8 2 User authorization The Administrator is registered befo...

Страница 55: ...ment button Displays the User management screen Displayed only when the user is logged in as the Administrator 8 User authorization button Displays the User authorization settings screen Displayed only when the user is logged in as the Administrator User authorization Display the Log in screen as follows Display settings Weighing screen LOG IN key User authorization button User authorization setti...

Страница 56: ...screen Disabled button Calibration test check screen Settings Display settings MENU key Calibration test check button Calibration test check screen There is a button for navigating to the same settings screen during a periodic check This button is also disabled Disabled button User authorization Date time setting not allowed If the date time setting is not allowed in user authorization the followi...

Страница 57: ...led button Sensitivity adjustment calibration Test Ext sensitivity adjustment Display settings HOME key CAL button Sensitivity adjustment calibration test screen Disabled button Periodic check Sensitivity adjustment Daily check Sensitivity adjustment Display settings MENU key Sensitivityadjustment button Calibrationtest check button Dailycheck button Sensitivityadjustment screenor Periodiccheck bu...

Страница 58: ...itivity adjustment Display settings MENU key Sensitivity adjustment button Sensitivity adjustment screen Disabled button Sensitivity adjustment calibration Test Int sensitivity adjustment Display settings HOME key CAL button Sensitivity adjustment calibration test screen Disabled button Periodic check Sensitivity adjustment Daily check Sensitivity adjustment Display settings MENU key Sensitivity a...

Страница 59: ...it 4 Delete user button Delete the selected user A confirmation dialog is displayed before deletion You cannot delete Admin User management for registration Display the User management screen for registration as follows Display settings Weighing screen LOG IN key User management button Add user button User management screen for registration 1 User name input field 2 Password input field 4 User lev...

Страница 60: ...r level selection field 3 Modify user button 4 Register user button 6 Delete user button Name Description 1 User name Displays the user to be modified 2 Password input field Set the password to register The password consists of alphanumerics with a length of 4 characters 3 Modify user button Applies the set password and user level 4 Register user button Displays the User management screen for regi...

Страница 61: ... 2 Filter settings button Displays the Filter settings screen You can configure the response characteristics stability bandwidth and zero tracking settings 3 Back button Displays the weighing screen 4 Calibration test check button Displays the Calibration test check screen You can configure the operation and settings for the daily check periodic check repeatability check etc 5 System settings butt...

Страница 62: ...You can configure the settings for the CAL button standard value for external weight values and internal weight value correction for the weighing screen Since the balance s resolution is high weighing values may change due to gravity and daily environmental changes It is necessary to perform sensitivity adjustment with the weight in order to keep the weighing values from changing even if gravity o...

Страница 63: ...omatically output if GLP output in Data output is set to ON The balance performs sensitivity adjustment using the internal weight Be sure to warm up the balance with nothing on the weighing pan for at least an hour or at least four hours for BA 6TE 6DTE with the AC adapter connected to the power supply Do not apply vibration and the like to the balance during sensitivity adjustment When the adjust...

Страница 64: ...ys the date when the external sensitivity adjustment was complete 6 Time Displays the time when the external sensitivity adjustment was complete 7 Weight used Displays the type of the weight used 8 Adjustment weight value Displays the weight value used 9 PRINT button Outputs the sensitivity adjustment result The result is automatically output if GLP output in Data output is set to ON Settings in t...

Страница 65: ... weight value before input Step 3 The Sensitivity adjustment result screen for the external sensitivity adjustment is automatically displayed Please remove the weight Step 4 You can output the result by pressing the PRINT button The result is automatically output if GLP output in Data output is set to ON Weighing pan Confirm button External weight Confirm button Result display GLP output PRINT but...

Страница 66: ...ic sensitivity adjustment interval setting 0 5 01 0 01 5 02 0 02 5 03 0 03 5 04 0 04 5 05 0 05 5 06 0 07 0 08 0 09 0 10 0 11 0 12 0 14 0 16 0 18 0 20 0 22 0 24 0 Set the automatic sensitivity adjustment interval Settings in the red box are default values factory settings This function automatically adjusts the sensitivity of the balance according to ambient temperature change set time or interval ...

Страница 67: ...y Sensitivity adjustment button Settings button Sensitivity adjustment setting screen 1 External weight value input 2 Enter the correct internal weight value button Name Setting value setting range Description 1 External weight value input Input range 1 Input the external weight value This is common to the Adjustment weight value input item in the External sensitivity adjustment screen 2 Enter the...

Страница 68: ...function corrects the internal weight value based on your external weight Execute the external sensitivity adjustment in advance The balance automatically loads and unloads the internal weight and corrects the internal weight value Then the balance automatically executes the internal sensitivity adjustment When the adjustment is complete the Sensitivity adjustment setting screen is displayed The c...

Страница 69: ...ternal calibration test button Name Description 1 Periodic check button Executes the periodic check 2 Daily check button Executes the daily check 3 Internal calibration test button Executes the internal calibration test 4 External calibration test button Executes the external calibration test 5 Repeatability check button Displays the Repeatability measurement screen for check 6 Calibration test ch...

Страница 70: ...n the specifications If the humidity is 45 RH or less it is recommended that static elimination be performed before weighing Be sure to warm up the balance before use for at least an hour or at least four hours for BA 6TE 6DTE with the AC adapter connected to the power supply The warm up time is the period of time when the power to the balance is on before use You can measure up to 9999 hours for ...

Страница 71: ... next item 3 Level check Make sure that the air bubble on the spirit level is in the center of the circle If it is not in the center accurate weighing is not possible Refer to the leveling method and rotate the leveling feet to adjust the level of the balance The leveling method is the same as with the periodic check 5 1 6 2 3 4 Name Description 1 Leveling method button Displays the Leveling metho...

Страница 72: ...the tolerance 1 6 2 3 4 5 7 8 9 Name Description 1 Test weight value input field Input the value for your test weight 2 Tolerance input field Input the tolerance 3 Back button Returns to the previous screen 4 Skip button Skips this check item and proceeds to the next item 5 Accuracy check Start button Displays the Accuracy check mode screen 6 Test weight value input field Input the value for your ...

Страница 73: ... 1 Daily check results display Shows the results of the daily check 2 Exit button Exits the daily check and displays the Calibration test check screen 3 PRINT button Outputs the daily check results to the device connected to the balance 4 Scroll buttons Select the page 5 Save to USB button Outputs PDF data containing the daily check results to the USB flash drive connected to the balance ...

Страница 74: ...74 Output example for daily check output results Daily check output results Daily check PDF results ...

Страница 75: ... and humidity of the balance fall within the specifications If the humidity is 45 RH or less it is recommended that static elimination be performed before weighing Be sure to warm up the balance before use for at least an hour or at least four hours for BA 6TE 6DTE with the AC adapter connected to the power supply The warm up time is the period of time when the power to the balance is on before us...

Страница 76: ...he next item 3 Level check Make sure that the air bubble on the spirit level is in the center of the circle If it is not in the center accurate weighing is not possible Refer to the leveling method and rotate the leveling feet to adjust the level of the balance The leveling method is the same as with the daily check 5 1 6 2 3 4 Name Description 1 Leveling method button Displays the Leveling method...

Страница 77: ...ent When the test is completed the Calibration test result screen is displayed When the internal weight is used this is automatically performed When an external weight is used follow the instruction Do not apply vibration and the like to the balance during the calibration test 3 1 4 2 5 6 Name Setting value setting range Description 1 Weight to be used Internal weight External weight Select the we...

Страница 78: ...y adjustment 5 1 6 7 2 8 3 9 4 Name Setting value setting range Description 1 Weight to be used Internal weight External weight Select the weight to be used 2 Instruction display Displays the instruction for external sensitivity adjustment 3 External weight value input Input range 1 Input the external weight value This is common to the external weight value input field in the Sensitivity adjustmen...

Страница 79: ...weight the instruction is displayed on the screen 1 4 2 3 5 Name Setting value setting range Description 1 Weight to be used Internal weight External weight Select the weight to be used 2 Skip button Skips this check item and proceeds to the next item 3 Execute button Executes the pre loading 4 Instruction display Displays the progress and instruction 5 Back button Returns to the previous screen S...

Страница 80: ...ation 2 Measurement count Set the measurement count This is common to 11 8 1 Standard value setting Repeatability 3 Tolerance standard deviation Set the tolerance standard deviation This is common to 11 8 1 Standard value setting Repeatability 4 Back button Cancels and returns to the previous screen 5 RE ZERO button Sets the displayed value to zero 6 Settings button Displays the Standard value set...

Страница 81: ...ent 1 point 2 points You can select the number of loading points for measurement 3 Measuring load 1 Displays the nominal value and tolerance 4 Measuring load 2 Displays the nominal value and tolerance 5 Measuring load display Displays the measuring load 6 Back button Cancels and returns to the previous screen 7 Settings button Displays the Standard value setting screen Set the measurement count an...

Страница 82: ...display screen Displays the set tolerance maximum deviation from the center value 2 Tolerance maximum deviation from the center value Set the tolerance for eccentricity 3 Back button Cancels and returns to the previous screen 4 Eccentricity measurement result display Cancels the eccentricity measurement and returns to the previous screen 5 Settings button Displays the Standard value setting screen...

Страница 83: ... results of the periodic check 2 Operator name Displays the name of the user that performed the periodic check You can enter the name 3 Exit button Exits the screen that shows the results of the periodic check 4 PRINT button Outputs the periodic check results to the device connected to the balance 5 Scroll buttons Select the page 6 USB flash drive button Outputs PDF data containing the periodic ch...

Страница 84: ...84 Output example for periodic check output results Periodic check output results ...

Страница 85: ...85 Periodic check results PDF ...

Страница 86: ...n external weight follow the instruction When the measurement is complete Repeatability measurement result is automatically displayed This is common to the Quick performance check Repeatability measurement screen described in 6 Quick performance check Repeatability Measurement Screen Repeatability measurement with the internal weight Display settings MENU key Calibration test check button Repeatab...

Страница 87: ...hod select Measure button Repeatability measurement screen with an external weight 1 3 2 4 5 Name Description 1 Back button Returns to the previous screen 2 RE ZERO button Sets the displayed value to zero 3 Repeatability measurement result display Displays the repeatability measurement result 4 PRINT button Outputs the result to the device connected to the balance 5 Exit button Exits the screen th...

Страница 88: ...ult is automatically output if GLP output in Data output is set to ON 4 Exit button Exits the screen that shows the measurement result The internal weight is used to perform the calibration test Be sure to warm up the balance with nothing on the weighing pan for at least an hour or at least four hours for BA 6TE BA 6DTE with the AC adapter connected to the power supply Do not apply vibration and t...

Страница 89: ...ment result to the device connected to the balance The result is automatically output if GLP output in Data output is set to ON 6 Exit button Exits the screen that shows the measurement result Settings in the red box are default values factory settings 1 Input range BA 6TE BA 6DTE 0 9 g 5 g 5 1 g BA 225TE BA 225DTE 9 9 g 200 g 200 1 g BA 125DTE 9 9 g 100 g 100 1 g Your external weight is used to p...

Страница 90: ...gs button Daily periodic check reminder button Daily periodic check reminder screen 1 Daily check reminder before the start of weighing 2 Periodic check reminder 3 Periodic check cycle 4 Last periodic check date 6 Next periodic check date 5 Back button Name Setting value setting range Description 1 Daily check reminder before the start of weighing OFF ON Sets the daily check reminder before the st...

Страница 91: ...rt of weighing button Select ON Use the ON OFF key to turn on the display Daily periodic check reminder screen for daily check 1 Daily check reminder 2 Back button 3 Execute button Name Description 1 Daily check reminder Displayed at startup if Daily check reminder before the start of weighing is set to ON 2 Back button Cancels the check and returns to the HOME screen 3 Execute button Executes the...

Страница 92: ... reminder button Select ON Use the ON OFF key to turn on the display Daily periodic check reminder screen for periodic check 1 Periodic check reminder 2 Back button 3 Execute button Name Description 1 Periodic check reminder Displayed at startup if the periodic check reminder is set to ON 2 Back button Cancels the check and returns to the HOME screen 3 Execute button Executes the check ...

Страница 93: ...ard value setting Eccentricity screen 4 Back button Returns to the previous screen Standard value setting Repeatability Display settings MENU key Calibration test check button Settings button Standard value setting button Repeatability button Standard value setting Repeatability screen 1 Measurement count 2 Tolerance standard deviation 3 Back button Name Description 1 Measurement count Set the mea...

Страница 94: ...he previous screen Settings in the red box are default values factory settings You can change the sensitivity test settings The settings in this screen are common to the sensitivity test settings screen for the periodic check Standard value setting Eccentricity Display settings MENU key Calibration test check button Settings button Standard value setting button Eccentricity button Standard value s...

Страница 95: ...t data screen 1 Measurement location input 2 Weight used input 3 Back button Name Description 1 Measurement location input Input the measurement location 2 Weight used input Input the weight used 3 Back button Returns to the previous screen The Report data screen displays the measurement location and weight used ...

Страница 96: ... affect the balance 2 Stability bandwidth 1 d 2 d 3 d Sets the fluctuation range where the stabilization indicator of the weighing value is displayed 3 Zero tracking OFF Normal Strong Very strong Changes the setting of the zero tracking 4 Back button Returns to the previous screen 5 Previous button Returns to the previous screen 6 Next button Transitions to the next screen Settings in a red box ar...

Страница 97: ...e break doors for the left and right IR sensors 4 Date time setting button Displays the Date time setting screen 5 Buzzer button Displays the Buzzer settings screen 6 Communication button Displays the Communication screen You can configure settings for the output data connections and communication method 7 Language button Displays the Language screen 8 ID number button Displays the ID number setti...

Страница 98: ...l 7 Selects the brightness of the backlight of the display 2 Auto power OFF OFF ON 10 minutes Turns off the display after 10 minutes has elapsed without any operations 3 Auto power ON OFF ON This setting turns on the weighing mode display when the AC adapter is connected 4 Display refresh rate 5 times second 10 times second Selects the display and output rate This is common to the setting describe...

Страница 99: ... sensor sensitivity Least sensitive Standard Most sensitive You can select the IR sensor sensitivity 4 Back button Returns to the previous screen Settings in the red box are default values factory settings BA T series analytical balances are equipped with IR sensors that allow operation without directly touching the balance display At factory settings the IR sensors on the left and right of the di...

Страница 100: ...as previously opened to is automatically detected It is also possible to change the function table of the balance for the doors to be fully open or partially open Date time setting Display settings MENU key System settings button Date time button Date time setting screen 1 Current date and time 2 Date and time setting 3 Set button 4 Date format 5 Back button Name Setting value setting range Descri...

Страница 101: ...ting range Description 1 Buzzer sound OFF ON Selects ON OFF for the built in buzzer that sounds when a key is operated or the state changes 2 Back button Returns to the previous screen Settings in the red box are default values factory settings You can change the setting of the built in buzzer that sounds when a key is operated or the state changes ...

Страница 102: ...ous screen 5 USB interface button Displays the USB interface settings screen 6 Wired LAN button Displays the Wired LAN screen 7 Bluetooth button Displays the Bluetooth screen Data Output Display settings MENU key System settings button Communication button Data output button Data output screen 1 Data output mode button 4 Data to be added button 2 Data output settings button 5 Command settings butt...

Страница 103: ...ference Zero point Last stable value Selects the reference for the weighing value 5 Polarity Positive values only Negative values only Both positive and negative values Selects the auto print polarity 6 Display refresh rate 5 times second 10 times second Selects the display and output rate This is common to the setting described in 13 1 Display settings 7 Interval time Sets the interval time for o...

Страница 104: ...s weight Gross weight Tare weight Whether to add gross tare weight etc to the output data or not 5 Next button Transitions to the next screen 6 Previous button Returns to the previous screen 7 Back button Returns to the previous screen Settings in the red box are default values factory settings You can select to add the ID date and time to the output data in the Data to be added screen Data Output...

Страница 105: ... acknowledge error code OFF ON Select the response received processing or process completed to all commands sent from PC or PLC 3 Command time out No limit Limit to one second Sets the command timeout 4 Back button Returns to the previous screen Settings in the red box are default values factory settings AK Acknowledgment ASCII 06h CR Carriage return ASCII 0Dh LF Line feed ASCII 0Ah When AK acknow...

Страница 106: ...ON Turns the display on P Turns the display on off Only when the display is on R RZ Same as the RE ZERO button T TR Same as the TARE button ZR Zero If the load is within 2 of the capacity from the initial zero point the zero point is updated the tare value is cleared and the display is set to zero If the load exceeds 2 no processing is done CAL Sensitivity adjustment with the internal weight EXC S...

Страница 107: ... output to a personal computer or optional printer The GLP GMP compliant report includes the balance manufacturer A D model name serial number ID number date time and space for a signature For a sensitivity adjustment or calibration test the result and the weight used are also included The balance can output the following GLP GMP compliant reports via the connected external output Sensitivity adju...

Страница 108: ... is shown below Clock to be used Balance internal clock Outputs data with the internal clock of the balance Printer format AD 8127 PC format RsCom Manufacturer Model name Serial number ID Date Time Sensitivity adjustment using the internal weight Remarks Signature Space ASCII 20h TERM Terminator CR LF or CR CR Carriage return ASCII 0Dh LF Line feed ASCII 0Ah ...

Страница 109: ...put the date and time in response to ESC D ESC T AD 8127 multi functional compact printer RsCom WinCT data communication software etc Output examples of calibration test with the internal weight The GLP output when the weighing accuracy of the balance is checked using the internal weight is shown below Note that sensitivity adjusment is not performed Clock to be used Set to External device clock O...

Страница 110: ...elow Clock to be used Balance internal clock Outputs data with the internal clock of the balance Printer format AD 8127 PC format RsCom Manufacturer Model name Serial number ID Date Time Sensitivity adjustment using an external weight External weight value Remarks Signature Space ASCII 20h TERM Terminator CR LF or CR CR Carriage return ASCII 0Dh LF Line feed ASCII 0Ah ...

Страница 111: ...adjustment is performed Clock to be used Balance internal clock Outputs data with the internal clock of the balance Printer format AD 8127 PC format RsCom Manufacturer Model name Serial number ID Date Time Calibration test Zero point result Loaded weight result Target weight used Remarks Signature Space ASCII 20h TERM Terminator CR LF or CR CR Carriage return ASCII 0Dh LF Line feed ASCII 0Ah ...

Страница 112: ...p 1 In the weighing display press the GLP button to output the title block Step 2 Output the weighing value The output method depends on the setting of the data output mode Step 3 Press the GLP button to output the end block Printer format AD 8127 Title block PC format RsCom Manufacturer Model name Serial number ID Date Time Weighing value Remarks Signature End block Space ASCII 20h TERM Terminato...

Страница 113: ...elects the baud rate for the serial communication 2 Data bit Parity bits 7 bit EVEN 7 bit ODD 8 bit NONE Selects the bit length and parity bit for the serial communication 3 Data format A D standard format DP format KF format MT format NU format NU2 format CSV format You can select the data format 4 Back button Returns to the previous screen Settings in the red box are default values factory setti...

Страница 114: ...ndard format DP format KF format MT format NU format NU2 format CSV format You can select the data format 3 Format the USB flash drive button Format the USB flash drive 4 Back button Returns to the previous screen Settings in the red box are default values factory settings To connect the balance with your personal computer you can select from the Quick USB mode and USB Virtual COM mode For details...

Страница 115: ...e 4 Data format A D standard format DP format KF format MT format NU format NU2 format CSV format You can select the data format 5 Back button Returns to the previous screen 6 Previous button Returns to the previous screen 7 Next button Transitions to the next screen Settings in a red box are default values factory settings For specifications of the wired LAN refer to 15 5 Wired LAN specifications...

Страница 116: ...Settings in the red box are default values factory settings Caution on Bluetooth In the Bluetooth keyboard mode use a Bluetooth enabled device such as a personal computer or smartphone to perform a paring In the Bluetooth keyboard mode the communication is one way from the balance to the Bluetooth enabled device Only numerical values that represent weighing values are output In the Bluetooth seria...

Страница 117: ...lects the language used for the display 2 Back button Returns to the previous screen Settings in the red box are default values factory settings ID number settings Display settings MENU key System settings button ID number button ID number settings screen 1 ID number 2 Back button Name Description 1 ID number You can set an ID number of your choice 2 Back button Returns to the previous screen ...

Страница 118: ...l switches For the usage and specifications of external input terminals refer to 15 4 External input terminal external input switch Initialization Display settings MENU key System settings button Initialization button Perform initialization This function resets the various settings for the balance to the factory settings Items to be initialized are as follows Sensitivity adjustment data Weight val...

Страница 119: ...n screen 3 History button Displays the History screen 4 Back button Returns to the previous screen Balance information Display settings MENU key Information button Balance information button Balance information screen 1 Model name 2 Capacity 3 Readability 4 Serial number 5 Back button Name Description 1 Model name Displays the model name 2 Capacity Displays the capacity 3 Readability Displays the ...

Страница 120: ...k button Returns to the previous screen History Display settings MENU key Information button History button History screen 1 Log in log out history button 2 Operation history button 3 Sensitivity adjustment history button 4 Back button Name Description 1 Log in log out history button Displays the Log in log out history screen 2 Operation history button Displays the Operation history screen 3 Sensi...

Страница 121: ...l of the user that performed the log in log out operation 0 Operator 1 Supervisor 2 Lab manager 3 Administrator 4 Detail Displays Log in or Log out 5 Back button Returns to the previous screen 6 USB output Outputs the history to the USB flash drive as a CSV file The history function saves data only in English Up to the latest 100 history records are displayed Up to the latest 1000 history records ...

Страница 122: ...button Returns to the previous screen 6 USB output Outputs the history to the USB flash drive as a CSV file The history function saves data only in English Up to the latest 100 history records are displayed Up to the latest 1000 history records are stored and can be output to the USB flash drive as a CSV file If the history exceeds 1000 records the oldest record is deleted and the latest record is...

Страница 123: ...hen the operation was detected 3 Item Displays the results detected by sensitivity adjustment 4 Back button Returns to the previous screen 5 USB output Outputs the history to the USB flash drive as a CSV file The history function saves data only in English Up to the latest 100 history records are displayed Up to the latest 1000 history records are stored and can be output to the USB flash drive as...

Страница 124: ...ging direction pulling direction If the balance is tilted greatly attached parts such as the weighing pan will come off Remove them before work Keep in mind that draft enters the balance easily when the underhook cap is removed affecting the weighing values Usage Step 1 Remove the bottom cover of the balance The underhook can be seen Step 2 Hang the weighing pan from the underhook by using a line ...

Страница 125: ...ts Stop bits Data bits D Sub 9 pin assignments Pin No Signal name Direction Description Inch screw 4 40UNC RS 232C connector Display unit right side 1 Same potential as SG 1 2 TXD Output Transmit data 3 RXD Input Transmit data 4 N C 5 SG Signal ground 6 DSR Output Data set ready 7 RTS Input Request to send 8 CTS Output Clear to send 9 Output 12V output 1 Signal names other than TXD and RXD are nam...

Страница 126: ...nication button USB interface button In the USB interface screen select USB device mode Data format USB flash drive USB host In the BA T series you can connect a USB flash drive to the USB type A connector You can save weighing data etc in the USB flash drive and import the data into Windows or macOS computers easily No driver is required The balance weighing data etc are saved on the USB flash dr...

Страница 127: ...tch The external input terminal provides the functions RE ZERO key input on the balance PRINT key input and opening and closing the breeze break doors to the contact input via the wire extended from the connected plug To turn the contact input on short it for 100 ms or more To use the external input terminal you must select the function in the External input switch screen Refer to 13 19 External i...

Страница 128: ...E ZERO PRINT RE ZERO PRINT 1 2 3 1 2 3 Display unit External input switch 1 External input switch 2 Example of compatible plug Pin assignment Circuit diagram External view Pin Description Pin 1 PRINT Pin 2 RE ZERO GND Pin 3 1 GND common ground terminal 2 RE ZERO external contact input 3 PRINT external contact input ...

Страница 129: ... address For setting values contact your LAN administrator Subnet mask Default gateway Data format A D standard format DP format KF format MT format NU format NU2 format CSV format For details on the data format refer to 19 2 Weighing data format Cautions on the wired LAN For information about the connection to your local area network LAN contact your system administrator To connect to a PC direct...

Страница 130: ...ompact printer AD 8127 RS 232C Standard accessory RS 232C cable included with the printer AX KO2741 100 1 PLC Sold separately 2 PC 3 USB Standard accessory USB cable included with the balance AX KO5465 180 Wired LAN Sold separately LAN cable 4 Note 1 When using the AD 8529PR W Bluetooth converter sold separately the RS 232C cable that comes with the printer is not used 2 Check the interface specif...

Страница 131: ...ommunication button Data output button Data output mode button Data output mode screen Table of the data output mode Item Setting value Description Data output mode Key mode Outputs with the PRINT button if the weighing value is stable Auto print mode 1 Automatically outputs if weighing value is stable referencing zero 2 Immediately outputs with the PRINT button regardless of whether or not the we...

Страница 132: ...ommon to the printer and personal computer The weighing value is output at the same timing Connecting the printer to the balance The AD 8127 multi functional compact printer is a printer for balances Connect the printer and the balance display unit with an RS 232C cable RS 232C cable Display unit right side AD 8127 printer example Connecting the personal computer to the balance To connect the bala...

Страница 133: ... value Auto print mode Reference zero point Auto print mode Reference Last stable value Prints weighing value data at regular intervals Interval output mode 1 Prints weighing value data when the PRINT button of the printer is pressed Stream mode 1 MANUAL Manual print mode Prints weighing value data in chart format CHART Chart print mode 1 Unstable data is also output To set the AD 8127 to a mode o...

Страница 134: ...o print mode Reference zero point Auto print mode Reference Last stable value Prints weighing value data at regular intervals Interval output mode 1 1 Unstable data is also output To set the AD 8127 to a mode other than dump print mode and also print unstable data change the setting to Print unstable data US PRN PRINT in the function table of the AD 8127 You cannot print with printer keys or in ch...

Страница 135: ...e Switching the AD 8127 print mode PRN MODE By pressing and holding the ENTSAVE key of the AD 8127 it is possible to switch between EXT KEY External key print mode and DUMP Dump print mode without using the function table of the printer This is convenient when temporarily switching the AD 8127 to dump print mode for GLP output etc The data output compliant with GLP GMP can be output to a personal ...

Страница 136: ...t the function table of the balance to Quick USB mode MENU key System settings button Communication button USB interface button Select in the USB interface screen USB output format When USB is used select the output format in the 13 14 USB interface screen For details on the output format refer to 19 2 Weighing data format function table Setting procedure to send weighing data with the PRINT butto...

Страница 137: ...2C is possible by selecting the COM port with WinCT Windows Communication Tools Software In Virtual COM mode it is not necessary to set the baud rate data bit parity or stop bit of the data communication software Caution When installing the driver for Virtual COM mode for the first time it may take some time to install Setting procedure To use the Virtual COM mode set Virtual Com mode in the funct...

Страница 138: ...rd input is possible Inputs the GLP compliant output of the balance The test display function allows you to use your computer as an external display for the balance RsWeight The received data can be graphed in real time The maximum value minimum value average value standard deviation fluctuation count etc of the received data can be calculated and displayed WinCT Plus wired LAN WinCT Plus is data ...

Страница 139: ...displayed the weighing value will be output once the next time the stabilization indicator is turned on At this time the weighing value display will blink once to show that it has been output Auto print mode Zero point If the weighing value exceeds the range specified with Bandwidth Reference or Polarity in the Data output mode screen in the function table from the reference zero display and the s...

Страница 140: ...e stabilization indicator is turned on or not the weighing value will be output at the interval specified for Interval time in the Data output mode screen of the function table Press the PRINT button to start output and press the PRINT button again during output to stop it In the Interval output mode strings START and STOP are added to the PRINT button in the HOME screen Caution Depending on the c...

Страница 141: ...r to 13 14 USB interface MENU key System settings button Communication button USB interface button In the USB interface screen select the output format You can select the output format for the LAN connection in the Wired LAN screen For configuration details refer to 13 15 Wired LAN MENU key System settings button Communication button Wired LAN button In the Wired LAN screen select the output forma...

Страница 142: ...e feed ASCII 0Ah Q T Counting mode when stable Space ASCII 20h O L When overloaded In the external key print mode of the AD 8127 multi functional compact printer a received A D standard format is printed as shown on the right If the gross tare weight is added in the Data to be added screen of the function table the second header corresponding to the output data is appended to the header S T N 0 1 ...

Страница 143: ...en stable CR Carriage return ASCII 0Dh U S When unstable LF Line feed ASCII 0Ah Q T Counting mode when stable Space ASCII 20h KF format This is the Karl Fischer moisture meter format Consists of 14 characters not including the terminator There are no headers The polarity sign is added to the first character if it is not an overload or zero The data is zero suppressed leading zeros are replaced wit...

Страница 144: ...t with a command LF Line feed ASCII 0Ah S I When overloaded Space ASCII 20h When stable Output with the PRINT button D When unstable Output with the PRINT button NU format Only numerical data of the weighing value is output Consists of 10 characters not including the terminator The data is padded with polarity and zeros filling the data s higher order s surplus part with zeros If the data is zero ...

Страница 145: ... Line feed ASCII 0Ah T Tare weight Space ASCII 20h P T Preset tare weight Display settings MENU key System settings button Communication button Data output button Data to be added button Data to be added screen When other data is added to the weighing value all data will be output in one line The output sample will be as follows if the ID number data number date and time are added SAMPLE 0123 4 No...

Страница 146: ...U 0 1 2 3 4 5 6 7 CR LF NU2 1 2 3 4 5 6 7 CR LF When unstable 0 012345 g A D U S 0 0 0 1 2 3 4 5 g CR LF DP W T 0 0 1 2 3 4 5 g CR LF KF 0 0 1 2 3 4 5 CR LF MT S D 0 0 1 2 3 4 5 g CR LF NU 0 0 0 1 2 3 4 5 CR LF NU2 0 0 1 2 3 4 5 CR LF When overloaded positive E A D O L 9 9 9 9 9 9 9 9 E 1 9 CR LF DP E CR LF KF H CR LF MT S I CR LF NU 9 9 9 9 9 9 9 9 CR LF NU2 9 9 9 9 9 9 9 9 CR LF ...

Страница 147: ...9 CR LF NU2 9 9 9 9 9 9 9 9 CR LF Unit code Unit A D DP KF MT g g g g g mg m g m g m g m g PCS P C P C p c s P C S ct c t c t c t c t mom m o m m o m m o m m o ct stands for carat and mom stands for momme ASCII code symbols CR Carriage return ASCII 0Dh LF Line feed ASCII 0Ah Space ASCII 20h TAB Horizontal tab ASCII 09h ...

Страница 148: ...en the NU or NU2 format is selected with the Quick USB mode only the decimal point and number are output N o 1 CR LF Data number Terminator Quick USB connection outputting the numerical values only 0 0 1 CR LF Data number Terminator ID number The ID number stored in the balance is output Consists of 13 characters not including the terminator When the NU or NU2 format is selected with the Quick USB...

Страница 149: ... 1 2 3 1 CR LF Date Terminator Quick USB connection outputting the numerical values only 2 0 2 0 1 2 3 1 CR LF Date Terminator Time Outputs the time from the clock data of the balance 24 hour format Consists of 10 characters not including the terminator When the NU or NU2 format is selected with the Quick USB mode is output instead of 1 2 3 4 5 6 CR LF Time Terminator Quick USB connection outputti...

Страница 150: ...equests the weighing data when stabilized SIR Requests the weighing data continuously Stream output C Cancels the S ESC P or SIR command The Q RW and SI commands have the same function The S ESC and P commands have the same function Key control commands Command Description P Same as the ON OFF key ON Turns the display on OFF Turns the display off CAL Sensitivity adjustment using the internal weigh...

Страница 151: ... format 3 characters In the case of setting the unit weight value to 1 23 g the input will be UW 1 23 g Values exceeding the weighing capacity cannot be set Negative values cannot be set UW Requests the unit weight value Commands to set time and date Command Description TM Sets time In the case of setting time to twelve thirty four fifty six seconds the input will be TM 12 34 56 Do not set non exi...

Страница 152: ...d and completion of the process If the balance cannot execute the command it sends an error code EC Exx The following control commands are handled by the balance which sends an AK code acknowledgment ASCII 06h upon the completion of the process as well as upon confirmation of receipt of the command If the balance cannot execute the command process it sends an error code EC Exx To clear the error u...

Страница 153: ...display on Personal computer side Time Balance side ON command Standby mode Command received Process completed Zero display Example of the R command Re zero Personal computer side Time Balance side R command Before execution Command received Waiting for re zero stability processing Process completed Zero display Example of the CAL command Sensitivity adjustment with the internal weight Personal co...

Страница 154: ...s completed Zero display Action Place the container on the weighing pan Tare weight value Command received Waiting for tare stability processing Process completed Zero display Action Place the sample on the weighing pan Sample weight value Net weight value Tare weight value R CR LF S T 0 1 2 3 4 5 6 7 g CR LF T CR LF AK CR LF P T CR LF AK CR LF S CR LF AK CR LF AK CR LF T 0 0 0 1 2 3 4 5 g CR LF 0...

Страница 155: ...ription of the received command is incorrect e g The number of digits of numerical values is incorrect e g There are alphabet characters among the numerical values Check the transmitted command EC E07 Parameter setting error The value of the received command has exceeded the allowed value Check the setting range of the numerical value of the command Error 1 EC E11 Stability error Weighing value is...

Страница 156: ...s not function properly Perform the operation from the beginning Error 20 Sensitivity adjustment weight error heavy The weight is too heavy Check the nominal value of the weight Send the CAL command or wait for 5 seconds to clear the error Error 21 Sensitivity adjustment weight error light The weight is too light Check the nominal value of the weight Send the CAL command or wait for 5 seconds to c...

Страница 157: ...or the counting mode or percent mode rtc PF Clock battery error The clock backup battery has been depleted Set the time and date Even if the clock backup battery is depleted the clock and calendar function works normally as long as the balance is powered with the AC adapter If this error appears frequently contact your local dealer LoWVoLt Power supply voltage fault The voltage supplied from the A...

Страница 158: ...tallation Step 2 Connect the AC adapter plug it in and then turn on the power The power lamp of the ionizer lights up Step 3 Place the target object within the effective range of static elimination Step 4 Hold your hand over the IR sensor touchless infrared proximity sensor on the front of the ionizer to start static elimination The ION lamp indicating that static elimination is in progress lights...

Страница 159: ... swab etc on a regular basis If the static elimination capacity does not recover because the tip of the electrode needle on an electrode unit is worn out replace all of the four electrode units with new ones The lifetime of electrode units is approx 10000 hours Replacement procedure Step 1 Disconnect the balance connection cable and turn off the power Step 2 Rotate electrode units counterclockwise...

Страница 160: ...ollowing items If the problem persists after checking each item contact your local A D dealer for repair Frequently Asked Questions and answers to them are also posted on our website https www aandd jp 1 Checking that the balance works properly Method 1 Use check functions to check the balance operation Refer to 11 1 Daily check and 11 2 Periodic check Fatal failures are displayed as a message Met...

Страница 161: ... the sample a magnetic material iron etc Care must be taken when weighing magnetic materials Refer to 2 4 Precautions during use for more accurate weighing Other display The automatic sensitivity adjustment notice the indicator blinking indicates that the automatic sensitivity adjustment will start If the balance is not used for a certain period of time with this indicator blinking the balance aut...

Страница 162: ...100 reference mass Communication RS 232C printer PLC etc USB type A USB flash drive for data storage USB type B PC LAN TCP IP Bluetooth PC etc 2 Stereo jack external switch x 2 Power AC adapter Confirm that the adapter type is correct for the local voltage and power receptacle type Power consumption Approx 36 VA including the AC adapter 1 The internal weight may change in mass due to the usage env...

Страница 163: ...g point 0 0010 mg 1 g 0 0030 mg 6 g 0 01 mg 6 g 0 0025 mg 1 g Linearity 0 010 mg 0 02 mg 0 010 mg Stabilization time FAST setting good environment Approx 10 seconds Approx 10 seconds Approx 10 seconds Counting mode Minimum unit weight 0 1 mg Percent mode Minimum 100 reference mass 10 0 mg Applicable weights for calibration test sensitivity adjustment Any weight between 1 and 5 g factory setting 5 ...

Страница 164: ...ation time FAST setting good environment Approx 7 seconds Approx 7 seconds Approx 7 seconds Approx 7 seconds Approx 7 seconds Counting mode Minimum unit weight 0 1 mg Percent mode Minimum 100 reference mass 10 0 mg Applicable weights for calibration test sensitivity adjustment Any weight between 10 and 200 g factory setting 200 g Any weight between 10 and 100 g factory setting 100 g External dimen...

Страница 165: ... 173 Opening 106 Opening 102 Inside 64 Opening inside 67 Inside 62 C Opening 46 204 B Opening 95 Weighing unit Breeze break unit for BA 225TE BA 225DTE BA 125DTE 305 A Inside 104 Opening 106 173 Opening 102 Inside 132 Opening 95 Inside 166 C Opening 150 284 B 133 107 101 27 262 16 ...

Страница 166: ...166 Unit mm Display unit 138 182 73 Ionizer AX ION 25 162 68 129 ...

Страница 167: ...USB 9P USB converter Converts the RS 232C interface to USB Driver installation is required AD 8529PC W Bluetooth converter for a personal computer connection Enables wireless communication between a balance and a personal computer via Bluetooth up to 10 m Driver installation is required AD 8529PR W Bluetooth converter for a printer connection Enables wireless communication between a balance and a ...

Страница 168: ... pans Sample containers for measuring minute amounts Item name Description Item code Shape Aluminum analytical pans large φ15 0 8 mL 100 pcs AX ROUND PAN L Aluminum analytical pans medium φ12 0 3 mL 100 pcs AX ROUND PAN M Aluminum analytical pans small φ8 0 05 mL 100 pcs AX ROUND PAN S ...

Страница 169: ... is operated in a commercial environment This equipment generates uses and can radiate radio frequency energy and if not installed and used in accordance with the instruction manual may cause harmful interference to radio communications Operation of this equipment in a residential area is likely to cause harmful interference in which case the user will be required to correct the interference at hi...

Страница 170: ...MEMO ...

Страница 171: ......

Страница 172: ...ngdeungpo gu Seoul 07331 Korea 전화 82 2 780 4101 팩스 82 2 782 4264 OOO A D RUS OOO ЭЙ энд ДИ РУС Почтовый адрес 121357 Российская Федерация г Москва ул Верейская дом 17 Юридический адрес 117545 Российская Федерация г Москва ул Дорожная д 3 корп 6 комн 8б 121357 Russian Federation Moscow Vereyskaya Street 17 тел 7 495 937 33 44 факс 7 495 937 55 66 A D Instruments India Private Limited 509 Udyog Viha...

Отзывы: