TR 19
7
Check for leaks
7.1
Close all faucets.
7.2
Check all lines and connections for leaks. If leaks are found:
7.2.1
Turn off the main water supply.
7.2.2
Open a cold water faucet to depressurize the lines.
7.2.3
Close the faucet to eliminate any siphoning action.
7.2.4
Repair all leaks.
7.2.5
Turn on the water supply.
7.2.6
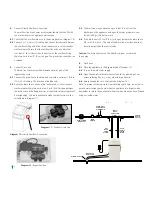
Place the appliance in the Service position to slowly fill the media
tank (Diagram 13).
7.2.7
Open a cold water faucet to purge air out of the media tank.
7.2.8
Close the faucet and recheck for leaks.
8
Connect the Controller
8.1
Make sure the controller is properly attached to the drive end cap
(Diagram 14).
8.2
Make sure the Turbine Sensor wire and the motor wire are plugged
into the controller.
8.3
Connect the transformer power cord to the controller (Diagram 15).
Do not plug the transformer into the wall yet.
8.4
Make sure the transformer cord is fed through the same area as the
drain and water lines.
8.5
Replace the valve cover.
Diagram 14:
Controller Tab Lock Detail
Diagram 13:
Service Position
Diagram 15:
Connect Transformer Power Cord
2" (50mm) Air Gap
Mains
Stopcock
Hard Water To
Outside Taps &
Drinking Water
Cold Soft
Water To
Property
Outlet
Valve in
Open
Position
Bypass
Valve in
Closed Position
Inlet
Valve in
Open
Position
Overflow Line
and Drain Line
Incoming Mains
Water Supply
Water Softener Model 410 Normal Operation Diagram
Содержание TRIASOFT MINI
Страница 2: ......
Страница 4: ...CONTENTS NDEK LER...
Страница 39: ......
Страница 81: ...TR 79 NOTE...
Страница 82: ...TR 80 NOTE...
Страница 83: ......


