background image

Service program

72

Instruction manual SGS

12

is

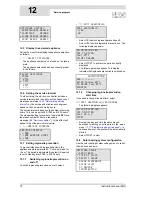
12.5 Display the selected appliance

Call up the menu for displaying the appliance selection 
as follows:

SELECT APPLIANCE

The appliance number can be found on the rating 
plate. 
The appliance selection has been correctly preset 
in the factory.

12.6 Setting the service interval

To aid servicing, the electronic controller includes a 
service interval which is used to set the frequency of 
maintenance interval

(14.2 "Determining service 

interval")

 by the service and maintenance engineer, 

based on the number of burning hours.
The service interval is based on the number of burning 
hours. This can be set to 500, 1000 and 1500 hours. 
The standard setting for number of hours is 

500

. Once 

the preset number of hours is reached, a 
message

(8.5 "Service condition")

.  to this effect will 

appear. Adjust the service interval via:

SERVICE INTERVAL

12.7 Setting legionella prevention

To prevent infection with legionella bacteria, the 
appliance heats the water to 65 °C once per week, for 
1 hour. This period is adjustable. By default, this period 
is set to Monday from 02:00 to 03:00 hours.

12.7.1

Switching legionella prevention on 
and off

To switch legionella prevention on or off, select:

ANTI LEGIONELLA

Select 

NO

 to switch legionella prevention off.

Select 

YES

 to switch legionella prevention on. The 

following display appears:

Select 

START

 to activate the period currently 

displayed.
The following display appears. This display 
indicates that legionella prevention is switched on.

12.7.2

Changing legionella prevention 
start time

If you wish to change the start time, select:

ANTI LEGIONELLA

 | 

YES

 | 

CHANGE

The following display appears.

Now set the day and time the same way as 
described for setting an extra period in the  week 
menu

(11.11 "Programming an extra period")

. In 

this case however, the pump will be automatically 
started.

Select 

START

 to start.

12.8 Solar heating system configuration

Use the solar heating system settings menu to reach 
the menus shown here:

APPLIANCE HISTORY

 BURNINGHOURS 000410

^IGNITIONS

001000

ÈFLAME ERRORS 000021

 IGNIT ERROR

000013

SELECT APPLIANCE

 »5934

^ 8576

È 3379

6527

....

SERVICE INTERVAL

 » 500      

^ 1000 BURNING HOURS

È 1500        

ANTI LEGIONELLA

 »YES

 NO

ON MO 02:00 LEG

OFF MO 03:00

Tset 65ÉC

»START CHANGE

LEG Ê Ê Ê Ê

02:45 Monday 60ÉC

MO 03:00 Tset 65ÉC

RUNNING

ON ÈMO 02:00 LEG

OFF MO 03:00

Tset 65 o C

START

SETTINGS SOLAR

 »DRAIN BACK

^ TYPE OF FLUID

È DELTA T SOLAR

SOLAR DIFFERENCE

SOLAR LIMIT

QT SENSOR

CONTRIBUTION

a

Содержание SGS - 100

Страница 1: ...80 100 Installation User and Service Manual Installation User and Service Manual...

Страница 2: ...www aosmithinternational com your installer...

Страница 3: ...er than that stated in this manual and in accordance with the General Conditions registered at the Eindhoven Chamber of Commerce Refer further to the General Conditions These are available on request...

Страница 4: ...4 Instruction manual SGS gis...

Страница 5: ...6 Water connections Vented 26 3 7 Water connections Unvented 27 3 8 Gas connection 28 3 9 Solar heating system 28 3 10 Air supply and flue 28 3 11 Electrical connection 35 3 12 Electrically connecting...

Страница 6: ...program 64 11 6 Starting and stopping the week program 64 11 7 Changing the appliance s standard week program 64 11 8 Adding times to a week program 66 11 9 Deleting times from a week program 67 11 1...

Страница 7: ...zing maintenance 96 16 Warranty certificate 97 16 1 General warranty 97 16 2 Tank warranty 97 16 3 Conditions for Installation and use 97 16 4 Exclusions 98 16 5 Scope of the warranty 98 16 6 Claims 9...

Страница 8: ...Table of contents 8 Instruction manual SGS...

Страница 9: ...d to follow the printed instructions may lead to personal injury and damage to the appliance 1 2 What to do if you smell gas Warning If there is a gas smell No naked flames No smoking Avoid causing sp...

Страница 10: ...temperature Note To determine the correct maintenance frequency it is recommended to arrange for the service and maintenance engineer to check the appliance on both the water and gas side within three...

Страница 11: ...ibes the main menu of the display This is the actual menu for the user however the installation engineer and service and maintenance engineers will also need to use this menu Service program This chap...

Страница 12: ...Introduction 12 Instruction manual SGS 1 gis...

Страница 13: ...rner 17 by the fan 18 The heated tap water leaves the tank through the hot water outlet 2 Once the appliance is completely filled with water it will constantly be under mains water pressure When hot w...

Страница 14: ...causing hot water to flow from the storage tank into the appliance The pump switches off as soon as S3 equals Tnet The other settings that govern the control behaviour are Tset Tset is the the require...

Страница 15: ...hes off The value of Tsolar diff is adjustable 12 8 5 Setting the solar difference Tsolar limit Preset 12 8 4 Setting the solar limit temperature water temperature at which heating via the solar heati...

Страница 16: ...otation varies too much from the set value Protection Description Against frost T1 5 C T2 5 C The frost protection cuts in The water is heated to 20 C For maximum water temperature T1 85 C T2 85 C The...

Страница 17: ...e pressure in the tank This prevents damage being caused to the enamelled coating in the appliance or to the tank A non return valve prevents excessive pressure buildup in the water supply system This...

Страница 18: ...The heating fluid type is set 12 8 2 Setting the heating fluid type in the solar heating system during installation Temperature protection for solar heating system 2 5 5 Safety of the solar heating s...

Страница 19: ...amaging the appliance remove the packaging carefully We recommend unpacking the appliance at or near its intended location Caution The appliance may only be manoeuvred in an upright position Take care...

Страница 20: ...ly filled with water when considering the maximum floor load This maximum floor load may be between 400 and 4500 kg This depends on the type of storage tank 3 3 3 Water composition The appliance is in...

Страница 21: ...mage to the immediate environment or floors below the level of the boiler room If this is the case then the appliance should be installed above a wastewater drain or in a suitable metal leak tray 3 3...

Страница 22: ...3 4 1 Dimensions of the appliance gas data 3 4 3 Gas data and other specifications 3 4 2 General and electrical specifications of any accessories you plan to use 3 4 1 Dimensions of the appliance Pla...

Страница 23: ...in valve connection 225 225 S Height of T P valve connection 1425 1425 W Height of condensation drain 240 240 1 Cold water supply connection external R11 2 R11 2 2 Hot water outlet external R11 2 R11...

Страница 24: ...e mbar 7 0 6 0 Gas consumption m3 h 8 3 10 1 LP gas Gas category G31 37mbar propane Orifice diameter mm 4 70 5 10 Nominal load gross calorific value kW 84 8 103 3 Nominal output kW 81 9 99 8 Supply pr...

Страница 25: ...truction manual SGS 25 is 3 5 Installation diagram This figure shows the installation diagram This diagram is used in the sections in which the actual connection process is described Installation diag...

Страница 26: ...water 3 Fit a stop valve 11 in the hot water outlet pipe for servicing 4 If a circulation pipe is required continue by installing the circulation pipe 3 6 3 Circulation pipe Legend Only applicable num...

Страница 27: ...g pressure of the appliance is 8 bar Because the pressure in the water pipe at times can exceed 8 bar you must fit an approved pressure reducing valve 1 3 Fit a non return valve 5 and an expansion ves...

Страница 28: ...ons refer to the electrical diagram 17 4 Electrical diagram solar heating system and the table Electrical connector block 1 Connect the supply from the solar collector to the inlet F of the heat excha...

Страница 29: ...neral and local regulations 1 3 Regulations Depending on the approved installation types there are several alternatives for connecting the air supply and flue gas discharge The appliances are approved...

Страница 30: ...Installation 30 Instruction manual SGS 3 is Types of appliances IMD 0468 R0 C43 C13 C53 B23 C33...

Страница 31: ...eeded Even if the total pipe length is less than the stated maximum the maximum number of bends may not be exceeded The following example illustrates how to use the table Type of appliance Description...

Страница 32: ...the requirements stated in the table Appliance with concentric flue gas discharge material According to the table the maximum length allowed is 15 metres and there may be up to three 90 bends Both req...

Страница 33: ...ed galvanised sheet steel Pipe diameters Flue gas discharge 130mm Air supply 200mm 1 No other wall flue terminal is permitted Use this item number to order the wall conduit set from supplier manufactu...

Страница 34: ...ongest pipe must be used to check the maximum length In this case the chimney pipe is the longest This is 35 metres This 35 metres is the sum of pipe sections 1 2 3 4 and 5 The length of the transitio...

Страница 35: ...ecting an extra error signal Alarm OUT Note The optional components are not included in the rating for electrical power consumption stated in the table 3 4 2 General and electrical specifications 3 11...

Страница 36: ...move the protective cap B from the electrical section The connector block C is now visible Note Consult the table for the connections and consult the electrical diagram for the electrical component co...

Страница 37: ...t the supplier for details of the correct isolating transformer 2 Connect phase L neutral N and earth to terminals 16 through 21 of the terminal block as stated in the table 3 11 2 Preparation 3 Fit t...

Страница 38: ...the cables X5 and X6 to terminals 1 and 2 as indicated in the table 3 11 2 Preparation 2 Fit the cable in the strain relief If you do not need to make any more connections Fit the cap on the terminal...

Страница 39: ...the fourth lead to terminal 13 3 Fit the cables in the strain relief 4 Continue 3 12 4 Connecting solar collector 3 12 4 Connecting solar collector Note This sensor must be mounted in the solar colle...

Страница 40: ...head pump Note This pump is essential if a greater head is required When the system has such a high resistance 110 kPa that the pump in the pump station is insufficient you can connect a second ON OFF...

Страница 41: ...es This procedure assumes that these two gauges are available Gas control 3 13 1 Preparation To check the supply pressure and burner pressure proceed as follows 1 Isolate 10 3 Electrically isolating t...

Страница 42: ...from this nipple 5 Switch on the power to the appliance using the isolator on the appliance 6 Switch the electronic controller ON by setting the 0 I switch to position I The display will now show INT...

Страница 43: ...creases 3 Cover the opening of the adjusting screw and check the burner pressure against the value given in the gas table 3 4 3 Gas data 4 If the pressure is not set correctly repeat the preceding ste...

Страница 44: ...Installation 44 Instruction manual SGS 3 is...

Страница 45: ...factory the appliance will have be adapted using a special conversion kit Caution You must check the supply pressure and burner pressure once the conversion is complete Orifice assembly 1 Isolate the...

Страница 46: ...into each injector 6 7 Refit the 3 part gas coupling 2 8 Check the burner pressure and supply pressure 3 13 Checking the supply pressure and burner pressure 9 Replace the cover 10 Remove the sticker...

Страница 47: ...on manual SGS 47 gis 5 Filling 5 1 Installation diagram This figure shows the installation diagram This diagram is used in the sections in which the actual connection process is described Installation...

Страница 48: ...p is defective or incorrectly fitted 5 3 Filling vented installations To fill the appliance proceed as follows 1 Open the stop valve 11 in the hot water pipe and if present the stop valves 4 for the c...

Страница 49: ...oled down sufficiently to prevent personal injury burns Note The filling procedure described in this manual is intended for the pump system supplied by the supplier of the appliance For any other syst...

Страница 50: ...nd expands 11 Switch off the glycol pump 12 Close the valve of the inlet combination and disconnect the glycol pump including the hoses Note Dispose of the residual glycol in the filler hose in an env...

Страница 51: ...on manual SGS 51 gis 6 Draining 6 1 Installation diagram This figure shows the installation diagram This diagram is used in the sections in which the actual connection process is described Installatio...

Страница 52: ...mains water pressure exceeds 8 bar 3 T P valve mandatory 4 stop valve recommended in pipe C and mandatory in pipe A 5 non return valve mandatory 6 circulation pump optional 9 drain valve 10 manual ga...

Страница 53: ...on the cursor in front of OFF 3 Confirm OFF with 4 Wait until the fan has stopped The symbol is then dimmed Caution Failure to wait until the fan stops purging can cause damage to the appliance 5 Swit...

Страница 54: ...fficiently Note The draining procedure described in this manual is intended for the pump system supplied by the appliance supplier For any other system you should follow the procedure for that system...

Страница 55: ...er is shown as in the figure both with and without icons 7 3 Meaning of icons The table explains the meanings of the icons Icons and their meaning 7 4 Electronic controller ON OFF switch The ON OFF sw...

Страница 56: ...main menu The main menu comprises OFF ON WEEK PROGRAM EXTRA PERIOD and SETTINGS You have to scroll down further to see the options EXTRA PERIOD and SETTINGS The selected option is confirmed using Pre...

Страница 57: ...ed to fulfil a single period of demand Once the period has passed the appliance automatically returns to the previous operating mode The figure shows the display with the following information line on...

Страница 58: ...There are various types of errors LOCK OUT ERRORS When the cause has been removed these errors require a reset with the button before the appliance can resume operation BLOCKING ERRORS These errors d...

Страница 59: ...heating system 5 Press once on the blue arrow to position the cursor beside ON then press 6 Confirm the selection START OPERATION with The appliance is now in ON mode If there is a heat demand the app...

Страница 60: ...dimmed The icon is activated 5 After a number of seconds pre glow the gas control is opened and ignition takes place The icon is activated The message IGNITION appears 6 After ignition the flame is d...

Страница 61: ...iance The appliance should only be isolated from mains power in the correct way The correct procedure is as follows 1 Activate the MENU with 2 Position the cursor in front of OFF 3 Confirm OFF with Ca...

Страница 62: ...Shutting down 62 Instruction manual SGS 10 gis...

Страница 63: ...s the appliance will automatically return to the mode it was previously in 11 2 Notational convention for menu related instructions The MENU of the electronic controller is divided into submenus For e...

Страница 64: ...e week program This following are discussed Starting and stopping the week program Changing the appliance s standard week program Adding times to a week program Deleting times from a week program 11 6...

Страница 65: ...itch on time the switch off time setting is automatically adjusted with the switch on time 4 Use and to set the minutes In the example this is 15 Confirm with The cursor moves to the switch off hour d...

Страница 66: ...l to INSERT Confirm with The sub menu for adding a period will appear Example As an example we will program an extra period in which the switch on time is set to 18 00 hours and the corresponding swit...

Страница 67: ...st programmed period 6 Scroll with to START OPERATION Confirm with The week program is active 11 10 Extra period Use an extra period when you either want to have the appliance switch on and off for a...

Страница 68: ...od Setting the switch off time 1 Use and to set the hours In the example this is 012 Confirm with The cursor moves to the minute digits which flash 2 Use and to set the minutes In the example this is...

Страница 69: ...2 2 Setting day and time To enter the time and day 1 Call up the menu for entering the day and time as follows 2 SETTINGS Confirm with The display shows the menu for settings 3 Scroll with and to DAY...

Страница 70: ...nce specifications as follows 1 SETTINGS Confirm with 2 Scroll with to SPECIFICATIONS Confirm with The display shows the sub menu for displaying appliance specifications 3 Scroll with to the section t...

Страница 71: ...error history as follows HISTORY OF ERRORS The controller will display an overview of Blocking errors and Lock out errors In both cases the electronic controller reserves 15 lines for the last 15 erro...

Страница 72: ...witching legionella prevention on and off To switch legionella prevention on or off select ANTI LEGIONELLA Select NO to switch legionella prevention off Select YES to switch legionella prevention on T...

Страница 73: ...ng the solar limit temperature The solar limit temperature is the maximum water temperature obtained in the appliance via the solar heating system measured by sensor T1 This value can be set between 6...

Страница 74: ...no 3 values are reported on the display ACTUAL actual energy the amount of energy currently being supplied LAST 24hr energy supplied over last 24 hours TOTAL total energy supplied since day 1 Call up...

Страница 75: ...recommended action See the figures The first shows a possible error the second shows the appropriate checking action There are various types of errors all falling into one of two groups LOCK OUT ERROR...

Страница 76: ...r or local gas company immediately Display is off Appliance is turned off Start the appliance up 9 Starting and running No supply voltage present 1 Check if the isolator is ON 2 Check that there is po...

Страница 77: ...fice s 15 4 3 Clean the orifice s Hot water supply insufficient or absent Appliance is turned off Start the appliance up 9 Starting and running No supply voltage present 1 Check if the isolator is ON...

Страница 78: ...ed connection If the leak persists or a component needs replacement consult your installation engineer Leakage from a component 1 Tighten component joints 2 Any defective components must be replaced L...

Страница 79: ...to JP5 See the SGS electrical diagram 17 Appendices Damaged cable or defective sensor Replace sensor T1 To replace the necessary parts you must contact your installation engineer S04 blocking error Op...

Страница 80: ...t the bottom of the tank Short circuit in sensor circuit Replace sensor T2 To replace the necessary parts you must contact your installation engineer S12 blocking error Short circuit in sensor 1 of te...

Страница 81: ...ndices Condensation on the flame probe 1 Disconnect the lead at the flame probe 2 Ignite the appliance three times with an interrupted ionisation circuit 3 Reconnect the ionisation lead to the flame p...

Страница 82: ...e the SGS electrical diagram 17 Appendices To replace the necessary parts you must contact your installation engineer Fan speed too low 1 Check the fan speed 2 If the fan speed is too low check the se...

Страница 83: ...d or chimney flue for blockages 6 Clear any blockage that may be present 7 Reset appliance controller Defective controller 1 Check that the controller is receiving power 2 Check that the controller is...

Страница 84: ...ctly fitted Refit them if necessary 3 Check for cracks in the hoses on the pressure switch and in the air supply hose between fan and burner If necessary replace the hoses 4 Check that the flue gas ou...

Страница 85: ...r 3 Measure the resistance across the hot surface igniter This must lie between 2 and 5 ohms 4 Check that the hot surface igniter lights up during ignition 5 If necessary replace the hot surface ignit...

Страница 86: ...ill present after the gas valves have closed 3 If this is the case the gas control must be replaced If the error cannot be resolved or is persistent contact your installation engineer To replace the n...

Страница 87: ...tion for maintenance If there is insufficient pressure differential clean the heat exchanger If the pressure differential is acceptable check that the pressure switch is closing using a multimeter If...

Страница 88: ...rror Ignition relay error RAM error EEPROM error EEPROM contents do not match the software version Processor software error C03 blocking error Reset error Too many resets in too short a period Wait fo...

Страница 89: ...Replace the sensor if the error persists To replace the necessary parts you must contact your installation engineer E04 lock out error Error in dummy sensor 2 The two dummy sensors in the tank detect...

Страница 90: ...laced contact your installation engineer Collector temperature excessive Temperature S1 is higher than Tcollector max The pump in the solar circuit switches off until S1 70 C 1 You can let the message...

Страница 91: ...can be set to 500 1000 or 1500 burning hours The standard setting is 500 burning hours Example In the first three months the appliance has burnt 300 hours During maintenance it is evident that one se...

Страница 92: ...Maintenance frequency 92 Instruction manual SGS 14 is...

Страница 93: ...mportant to write down the appliance type and model and the full serial number of the appliance These details can be found on the rating plate Only by ordering with this information can you be sure to...

Страница 94: ...to the desired value 11 4 Setting the water temperature 11 Remove the plastic cover on the top of the appliance 12 Check the supply and burner pressure 3 13 Checking the supply pressure and burner pr...

Страница 95: ...prevent effective conduction of the heat to the water Periodic cleaning and descaling prevents buildup of these deposits This increases the service life of the appliance and also improves the heating...

Страница 96: ...the burner s 3 Fit the burner s 15 4 3 Clean the orifice s 1 Detach the orifice s 2 Remove all contamination present in the orifice s 3 Fit the orifice s 15 4 4 Cleaning the heat exchanger 1 Detach t...

Страница 97: ...heater the warranty shall be reduced to one year from the original installation date 16 3 Conditions for Installation and use The warranty set out in article 1 and 2 will apply solely under the follo...

Страница 98: ...water heater other than by an approved service engineer 16 5 Scope of the warranty The obligations of A O Smith pursuant to the specified warranty do not extend beyond free delivery from the Veldhoven...

Страница 99: ...ction This appendix contains Menu structure of the main menu 17 2 Menu structure Appliance electrical diagram 17 3 Electrical diagram for the appliance Electrical diagram solar heating system 17 4 Ele...

Страница 100: ...OINT APPLIANCE HISTORY WEEK PROGRAM SELECT APPLIANCE START OPERATION PROGRAM OVERVIEW EXTRA PERIOD SERVICE INTERVAL SETTINGS LANGUAGE DAY TIME SPECIFICATIONS REGULATION INTERVAL IGNITION SPEED SOLAR D...

Страница 101: ...Instruction manual SGS 101 is...

Страница 102: ...Appendices 102 Instruction manual SGS 17 is 17 3 Electrical diagram for the appliance Electrical diagram 1 brown 2 blue 3 green 4 black 5 white 6 grey beige 7 red 8 dark green 9 yellow...

Страница 103: ...nk P Dummy Q Temperature sensor T1 top of tank R Selection resistor S Pressure switch T Potentiostat U Frequency controller V RS 485 interface W Electrical anodes X Signalling for electrical anodes Y...

Страница 104: ...Appendices 104 Instruction manual SGS 17 is 17 4 Electrical diagram solar heating system Electrical diagram 1 brown 2 blue 3 green 4 black 5 white 6 grey beige 7 red 8 dark green 9 yellow...

Страница 105: ...olar collector return GG Controller BUS link HH Temperature sensor S3 top storage tank F2 Fuse 1 2 L Power 3 N 4 n a 5 n a 6 n a 7 Extra head pump for solar heating system ON OFF 8 L1 9 N 10 Solar hea...

Страница 106: ...Appendices 106 Instruction manual SGS 17 is...

Страница 107: ...OFF OFF 5 ON C ON OFF OFF 6 ON C ON OFF OFF 7 ON C ON OFF OFF 8 ON C ON OFF OFF 9 ON C ON OFF OFF 10 ON C ON OFF OFF 11 ON C ON OFF OFF Period DAY TIME Tset Pump 1 ON MO 14 30 70 C ON OFF OFF MO 16 15...

Страница 108: ...Appendices 108 Instruction manual SGS 17 is...

Страница 109: ...71 draining 51 E electrical connection 35 electrical connector block 35 environmental conditions 19 error 58 extra period 57 operating mode 57 settings 68 F fan 16 filling 47 flame probe 17 floor loa...

Страница 110: ...ling 56 service check 10 91 service engineer 10 service required 58 setting date 69 setting service interval 72 softlite 16 specifications 22 supply pressure 41 symbol installation engineer 10 service...

Отзывы: