background image

8

e

6 T

hreaT

 a

nalysis

 r

eporTer

 Q

uick

 s

TarT

 G

uide


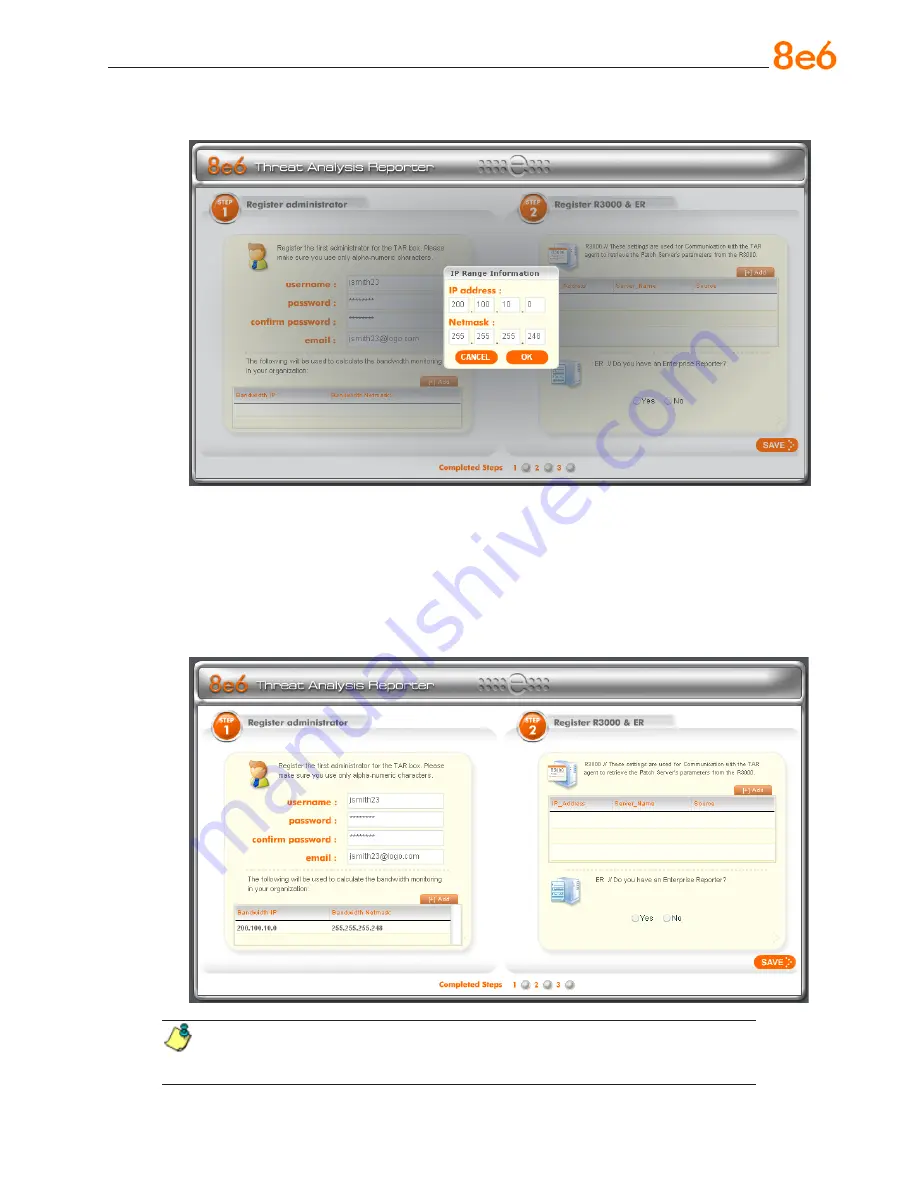
D.  Click the [+] Add tab below to open the IP Range Information dialog box:


E.  Enter the

 Bandwidth IP 

address range for the bandwidth the Threat Analysis Re-

porter will monitor.

F.  Enter the 

Bandwidth Netmask

 for the bandwidth IP range to be monitored, using 

the dotted decimals notation format.

G.  Click 

OK

 to close the dialog box and to display your entries in the list box:


NOTE: 

Additional Bandwidth IP address ranges can be included by clicking the 

[+] Add tab again and making the entries described in steps E through G above.

Содержание Threat Analysis Reporter TAR

Страница 1: ...GUIDE QUICK START Model TAR HL 005 004 SL 004 004 MSA 004 004 Release 1 2 00 Updated 09 19 08 Threat Analysis Reporter...

Страница 2: ...The information in this documentation is subject to change without notice The Threat Analysis Reporter products have been tested and found to comply with the limits for a Class A digital device pursu...

Страница 3: ...Supply 23 General Safety Information 24 Install the Server 27 Step 1 Initial Setup Procedures 27 Step 1A Quick Start Setup Procedures 28 Step 1B LCD Panel Setup Procedures 44 Step 2 Wizard Setup Proce...

Страница 4: ...iv 8e6 Threat Analysis Reporter Quick Start Guide...

Страница 5: ...to monitor such threats so management can enforce corporate Internet usage policies Working in conjunction with 8e6 s R3000 Enterprise Filter the Threat Analysis Reporter translates end user Internet...

Страница 6: ...Regulatory Specifications and Disclaimers This section cites safety and emis sions compliance information for the TAR models referenced in this document Appendix Optional Ethernet Tap Installation Thi...

Страница 7: ...6111 Domestic US 1 888 786 7999 International 1 714 282 6111 8e6 Taiwan Taipei Local 2397 0300 Domestic Taiwan 02 2397 0300 International 886 2 2397 0300 Procedures When calling 8e6 Technologies rega...

Страница 8: ...lope containing a CD ROM with a PDF of the Threat Analysis Reporter User Guide The latest version of the user guide can be obtained from our Web site at http www 8e6 com docs tar_ug pdf NOTES A couple...

Страница 9: ...hysical shock Isolated from strong electromagnetic fields and noise caused by electrical devices such as elevators copy machines air conditioners large fans large electric motors radio and TV transmit...

Страница 10: ...er to the power supply will not overload any circuits Con sideration should be given to the connection of the equipment to the supply circuit and the effect that overloading of the circuits might have...

Страница 11: ...self B Two pairs of short brackets to be used on the front side of the outer rails are also included Install the Inner Rails Both the left and right side inner rails have been pre attached to the chas...

Страница 12: ...o functions The first is to lock the server into place when installed and pushed fully into the rack which is its normal position Secondly these tabs also lock the server in place when fully ex tended...

Страница 13: ...is to install the server chassis into the rack Do this by lining up the rear of the chassis rails with the front of the rack rails Slide the chassis rails into the rack rails keeping the pressure even...

Страница 14: ...r follow the server will ex tend out the front of the rack A larger chassis should be positioned to balance the weight between front and back If a bezel is included on your server remove it Then attac...

Страница 15: ...nst the hooks on the right side of the chassis as show below on the left 3 Securely attach the slide to the chassis with two M4 flat head screws and repeat the steps 1 3 to install the left inner slid...

Страница 16: ...er you have installed the short and long brackets to the outer slides you are ready to install the whole slide assemblies outer slides with short and long brackets at tached to the rack See the previo...

Страница 17: ...Chassis into the Rack 1 Push the inner slides which are attached to the chassis into the grooves of the outer slide assemblies that are installed in the rack as shown below 2 Push the chassis all the...

Страница 18: ...o the rack To avoid personal injury and property damage please carefully follow all the safety steps listed below Before installing the chassis rails Close the chassis using the chassis cover Unplug t...

Страница 19: ...on each of the inner rail 4 Attach an inner rail to each side of the chassis and secure the inner rail to the chas sis by inserting three Type G screws through the holes on each side of the chassis a...

Страница 20: ...ts Please note that the brackets are marked with Up Front Arrows front and Up Rear arrows rear 2 Secure the front short bracket marked with the Up Front arrows to the outer rail with two Type G screws...

Страница 21: ...TE The chassis may not slide into the rack smoothly or easily when installed the first time Some adjustment to the slide assemblies might be needed for easy installation 8 You will need to release the...

Страница 22: ...pth of 28 to 33 Determine the placement of each component in the rack before you install the rails Install the heaviest server components on the bottom of the rack first and then work up 1 In the pack...

Страница 23: ...ype H screws and Type I washers as shown below See the previous page for descriptions of Type H and Type I hardware components 4 Attach the rear long bracket to the rear end of the rack and secure it...

Страница 24: ...Start Guide 5 Measure the depth of your rack and adjust the length of the rails accordingly Then secure the rails to the chassis with Type G screws 6 Slide the inner rails which are attached to the ch...

Страница 25: ...ported Make sure that all the components are securely fastened to the chassis to prevent components fall ing off from the chassis The rack assembly should be properly grounded to avoid electric shock...

Страница 26: ...old the bezel upright and facing towards you Fig 1 Fig 1 Front of bezel B Note that each end of the bezel contains two raised bumps Fig 2 Fig 2 Bumps on right end of bezel Fig 3 Grooves in right U sha...

Страница 27: ...ic Rim countries Power Supply Precautions Warning Use a regulating uninterruptible power supply UPS to protect the server from pow er surges voltage spikes and to keep the server operating in case of...

Страница 28: ...e crushed or punctured Besides irreparable damage to the unit the result could be dangerous heat and even fire CAUTION There are no user serviceable components inside the chassis The chassis should on...

Страница 29: ...the server if the AC power cord has been damaged Always unplug the AC power cord before removing the unit for servicing Electrical Safety Precautions Warning Heed the following safety precautions to p...

Страница 30: ...xplosion if the battery on the motherboard is installed upside down which will reverse its polarities CAUTION DANGER OF EXPLOSION IF BATTERY IS INCORRECTLY REPLACED REPLACE ONLY WITH THE SAME OR EQUIV...

Страница 31: ...power cord and keyboard or PC laptop computer with HyperTerminal and serial port cable and USB DB9 se rial adapter if there is no serial port on your laptop NOTE Before installing the Threat Analysis...

Страница 32: ...of the front panel see Fig 3 for an SL unit Fig 4 for an MSA unit and Fig 5 for an HL unit Once the Threat Analysis Reporter is powered up proceed to the Quick Start menu instructions Serial Console...

Страница 33: ...ont panel power button at far right Fig 4 Diagram of MSA chassis front panel power button at far right Fig 5 Diagram of HL chassis front panel power button at far right Once the Threat Analysis Report...

Страница 34: ...console follow these procedures to create a HyperTerminal session on the serial console A Launch HyperTerminal by going to Start Programs Accessories Communica tions HyperTerminal B In the Connection...

Страница 35: ...d to the serial port on the laptop probably COM1 and then click OK to open the Properties dialog box dis playing the Port Settings tab D Specify the following session settings Bits per second 9600 Dat...

Страница 36: ...o open the Properties dialog box displaying the Connect To and Settings tabs G Click the Settings tab and at the Emulation menu select VT100 H Click OK to close the dialog box and to go to the login s...

Страница 37: ...b interface if using a NAT device Login screen password prompts The login screen displays after powering on the Threat Analysis Reporter unit using a monitor and keyboard or after creating a HyperTerm...

Страница 38: ...Enter the administrator password prompt re enter your password s3tup r3k G Press Enter to display the Administration menu where you can begin the Quick Start setup process using the configuration scr...

Страница 39: ...terface lan1 IP address field enter the IP address for the LAN 1 interface and then press Enter to go to the next screen B At the Enter interface lan1 netmask field enter the subnet mask for the LAN 1...

Страница 40: ...d enter the IP address for the LAN 2 interface and then press Enter to go to the next screen E At the Enter interface lan2 netmask field using the dotted decimals notation for mat enter the subnet mas...

Страница 41: ...t gateway Press Enter to display the confirmation prompt B Press Y for Yes to confirm and save your entry for the gateway IP address and to go to the Configure Domain Name Servers screen Configure Dom...

Страница 42: ...to use enter the IP address for that server Press Enter to display the confirmation prompt C Press Y for Yes to confirm and save your entries for the domain name servers and to go to the Configure Hos...

Страница 43: ...tion screen A Use the up and down arrows in your keyboard to select your region After selecting your locality press Y for Yes to confirm and save your regional selection and to go to the next screen B...

Страница 44: ...alysis Reporter interface Press Enter to display the confirmation prompt B Press Y for Yes to confirm and save your entry and to go to the next screen C At the Enter wizard password field enter the pa...

Страница 45: ...ion menu After making all entries using the Quick Start setup process you will return to the Admin istration menu Press X to return to the Quick Start menu screen Or to verify the status of the Threat...

Страница 46: ...IP address specified in screen 5 Configure default gateway Configure host name specified in screen 7 Configure Host Name DNS server IP address es specified in screen 6 Configure Domain Name Servers C...

Страница 47: ...be installed for bandwidth monitoring A Plug one end of a standard CAT 5E cable into the Threat Analysis Reporter s LAN 1 port the port on the left Fig 1 Portion of SL and MSA chassis rear Fig 2 Porti...

Страница 48: ...n arrow left arrow right arrow checkmark and X LCD Menu Press the X key to display the LCD Menu In the LCD panel an arrow displays to the left of the currently selected menu item Use the up or down ar...

Страница 49: ...he IP LAN 1 LAN 2 screen displays with the following menu items Configure LAN 1 2 IP Change LAN1 2 Netmask A Choose Configure LAN 1 2 IP and press the checkmark key to go to the Configure LAN 1 2 IP s...

Страница 50: ...the Configure DNS IP 1 2 screen B Use the up down keys to increase decrease the current value and the left right arrow keys to navigate across the line C Press the checkmark key to accept your entry...

Страница 51: ...After making a selection press the checkmark key to display the Save Changes screen Choose Yes to save your changes and to return to the 8e6 menu Choose No to return to the previous screen Admin Conso...

Страница 52: ...heckmark or right arrow key three times to view each of the three avail able options heartbeat feature enabled checkbox populated with x heartbeat feature disabled checkbox empty check for a heartbeat...

Страница 53: ...rightness screen use the left right arrow keys to decrease increase the brightness of a screen with a feature that is enabled Off Brightness In the Off Brightness screen use the left right arrow keys...

Страница 54: ...porter 8e6 Enterprise Reporter server IP address and server name if an ER unit is con nected to the R3000 Access the Threat Analysis Reporter Administrator Console A Launch Internet Explorer B In the...

Страница 55: ...oceed to the next sub section Log in to the Threat Analysis Reporter Wizard Log in to the Threat Analysis Reporter Wizard A In the Username field of the Login dialog box type in the username specified...

Страница 56: ...ill use when logging into the Threat Analysis Reporter Administrator console The global administrator has the highest level of permissions in the Threat Analysis Reporter interface B Enter the passwor...

Страница 57: ...hreat Analysis Re porter will monitor F Enter the Bandwidth Netmask for the bandwidth IP range to be monitored using the dotted decimals notation format G Click OK to close the dialog box and to displ...

Страница 58: ...s made for the IP address range click the Add tab to re open the IP Range Information dialog box and edit information as necessary Click OK to close the dialog box and to display the modified informat...

Страница 59: ...s of the R3000 server to be used with the Threat Analysis Re porter In our example this is 200 100 160 74 which is the LAN 2 IP address of the R3000 server C Enter the Server Name of the R3000 to be u...

Страница 60: ...he list box NOTE Additional R3000 servers can be included by clicking the Add tab again and making the entries described in steps A through E above To modify an R3000 entry double click the R3000 entr...

Страница 61: ...essary Click OK to close the dialog box and to display the modified informa tion in the list box To designate an R3000 as the Source R3000 server click the entry for the R3000 server in the list box t...

Страница 62: ...the question Do you have an Enterprise Reporter A Enter the IP address of the ER server to be used with the Threat Analysis Re porter In our example this is 200 10 101 76 B Enter the Server Name of th...

Страница 63: ...in dialog box of the Threat Analy sis Reporter interface so you can begin using the application NOTE To shut down the Threat Analysis Reporter server press the power button on the front of the unit to...

Страница 64: ...WR Power HD HDD Activity NIC1 LAN 1 NIC2 LAN 2 OH Overheat MSA chassis control panel LED Indicator Key Button Key A Power F Reset B HDD Activity G Power C LAN 1 D LAN 2 E Overheat LED indicators alert...

Страница 65: ...red LED indicates a fan failure A steady red LED on and not flashing indicates an overheating condition which may be caused by cables obstructing the airflow in the system or the ambient room tempera...

Страница 66: ...s to the left of the power supplies a steady blue UID LED indicator displays when the UID button on the control panel is pressed This LED remains lit until the UID button is pressed again Power Suppli...

Страница 67: ...side of the front panel LED Indicator Key LOG Log Download Status RAID Hard Drive Status DB Database Status UPDT Software Update Status LED Indicator Color Condition Description LOG Green On Download...

Страница 68: ...ions Commission FCC Class A Notice USA This equipment has been tested and found to comply with the limits for a Class A digi tal device pursuant to part 15 of the FCC Rules These limits are designed t...

Страница 69: ...t Analysis Reporter Quick Start Guide 65 Electromagnetic Compatibility Class A Notice Industry Canada Equipment Standard for Digital Equipment ICES 003 Bureau of Standards Metrology and Inspection BSM...

Страница 70: ...N55022 2006 EN55024 1998 A2 2003 EN61000 3 2 2000 EN61000 3 3 2001 Product Name s Internet Appliance Product Model Number s HL 005 004 SL 004 004 MSA 004 004 Year in which conformity is declared 2008...

Страница 71: ...ed Save all packing materials in the event that the unit needs to be returned to 8e6 Technologies The NetOptics box should contain the following items 1 NetOptics 10 100BaseT Tap 2 Power Supply units...

Страница 72: ...es outlined in this step require the use of a CAT 5E cable A Provide power to the Ethernet Tap by connecting both power cords from the unit to the power source AC power in rear panel of NetOptics 10 1...

Страница 73: ...sover cable to the Ethernet Tap s Network A port Ports in front panel of NetOptics 10 100BaseT Tap E Using a straight through cable connect one end to the Ethernet Tap s Network B port F Connect the o...

Страница 74: ...1 crossover cable 67 69 E EMC 64 66 F FCC 64 H HL 1 4 7 22 24 27 28 29 43 44 61 62 63 64 66 HyperTerminal Setup 30 I ICES 003 64 65 Install Bezel 22 Install TAP 67 L LCD Panel 27 Login screen 33 LVD 6...

Страница 75: ...ck Start Guide 71 R R3000 1 27 42 50 55 56 57 68 69 Rack Setup Precautions 6 RAID 1 63 reboot 45 47 RoHS compliant 66 S serial port cable 27 28 shut down 48 SL 1 4 11 22 27 28 29 43 44 60 63 64 66 spa...

Страница 76: ...enue Orange CA 92865 4232 Tel 714 282 6111 or 888 786 7999 Fax 714 282 6116 Sales Technical Support 714 282 6117 General Office Satellite Office 8e6 Taiwan 7 Fl No 1 Sec 2 Ren Ai Rd Taipei 10055 Taiwa...

Отзывы: