8
e
6 e
nterprise
r
eporter
Q
uick
s
tart
G
uide
6
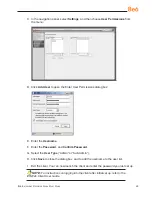
2. For this exercise, make entries in the following fields:
Save Name
,
Description
, and
For E-Mail output only
(
To
and
Subject
fields).
3. Choose the
Save and Schedule
option from the “Save” options at the bottom of the
window. The three “Save” options are as follows:
Save and Schedule
- Choosing this option lets you save criteria from the current
report view and then set up a schedule to run the report using that criteria.
Save and Run
- Choosing this option lets you save criteria from the current re-
port view and then automatically generate a report in the specified output format.
Save Only
- Choosing this option lets you save criteria from the current report
view.
NOTE:
Saved reports can be edited at any time. These reports are accessed
by going to Custom Reports in the left panel, selecting Saved Custom Reports, and
then choosing the report from the
Report Name
drop-down menu.
In the ER Web Client User Guide index, see:
• How to: save a custom report
See also:
• How to: access Saved Custom Reports
• How to: edit a saved report
•
•
•


