background image


EE 

C o p y r i g h t  ©

 4I P N E T ,  I N C .  A l l  r ig h ts  r es er v ed .                                          


4ipnet H S G 1 2 0 0  

  Q u ic k  I ns ta l l a tio n G u id e 

ENGLISH 

4ipnet

 H S G 1 2 0 0  W i r e l e s s  H o t s p o t  G a t e w a y  


System Overview 

 
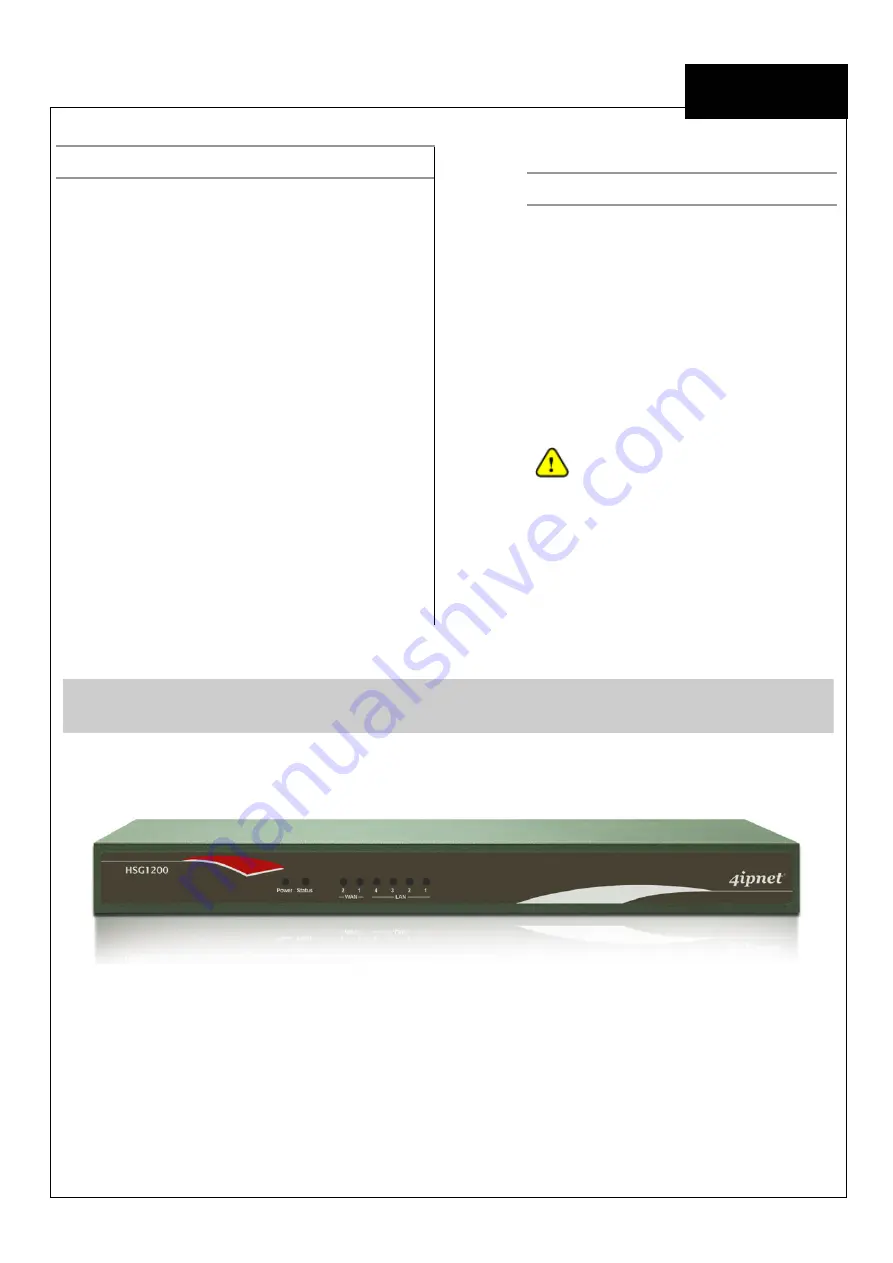
Front Panel 


1. 

Power

    ON indicates the power on, and OFF indicates the power off. 

2. 

Status

    Power and Status both ON indicate system ready, OFF indicates BIOS running, and BLINKING   

                      indicates OS running. 

3. 

WAN


ON indicates connection, OFF indicates no connection, and BLINKING indicates data transmitting. 

4. 

LAN


ON indicates connection, OFF indicates no connection, and BLINKING indicates data transmitting. 


Preface 

4ipnet HSG1200 Wireless Hotspot Gateway in 19” 
rack-mountable is designed to provide an 
easy-to-use, all-in-one solution for hotspot service 
providers. A single HSG1200 enables a hotspot 
provider to service multiple hot-spot franchises in a 
mall area through the feature of 
multiple-Service-Zone. Each service zone can have 
its own login skin and an independent SSID.   
HSG1200 is also ideal for hospitality application.   
For example, a hotel can use the service zone 
feature to separate the privileges of staff, guest, and 
VIP usage for accessing Internet. 

This Quick Installation Guide provides instructions 
and reference materials for getting started with 
4ipnet HSG1200. This guide will also show how to 
connect HSG1200 to other network devices. 

Package Contents 

1. 

4ipnet HSG1200 x 1 

2. 

Quick Installation Guide x 1 

3. 

CD-ROM 

(with User Manual and QIG)

 x 1 

4. 

Power Cord x 1 

5. 

Power Adaptor (12DC, 2A) x 1 

6. 

Cross-over Ethernet RJ-45 Cable x 1 

7. 

RS-232 DB9 Console Cable x 1 


It is recommended to keep the original 

packing material for possible future 
shipment when repair or maintenance is 
required. Any returned product should be 
packed in its original packaging to prevent 
damage during delivery. 


Содержание HSG1200

Страница 1: ...V1 0 0 4ipnet HSG1200 Quick Installation Guide ...

Страница 2: ...v ice pursuant to part 1 5 of the F C C R ules These limits are designed to prov ide reasonable protection against harmful interference in a residential installation This eq uipment generates uses and can radiate radio freq uency energy and if not installed and used in accordance with the instructions may cause harmful interference to radio communications H owev er there is no guarantee that inter...

Страница 3: ...pot provider to service multiple hot spot franchises in a mall area through the feature of multiple Service Zone Each service zone can have its own login skin and an independent SSID HSG1200 is also ideal for hospitality application For example a hotel can use the service zone feature to separate the privileges of staff guest and VIP usage for accessing Internet This Quick Installation Guide provi...

Страница 4: ...l start to speed up blinking before resetting the system to default configuration 3 WAN For connecting to external networks which are not managed by HSG1200 via ADSL or Cable Modem or connecting to a certain LAN of an organization via Switch or Hub 4 LAN For connecting to the networks managed by HSG1200 such as client networking devices HSG1200 supports Service Zone function including Port Based m...

Страница 5: ... ON to indicate a proper connection Using a non certified power adapter may damage this system 2 Connect an Ethernet cable to WAN1 Port on the rear panel Per your needs connect the other end of the cable to a networking device such as ADSL modem cable modem switch or hub The WAN1 LED indicator should be ON to indicate a proper connection 3 Connect an Ethernet cable to any LAN Port on the rear pane...

Страница 6: ... an IP address dynamically Connect the PC to any LAN Port of HSG1200 An IP address will be assigned to the PC automatically via the HSG1200 built in DHCP server 2 Launch a web browser to access the web management interface of HSG1200 by entering https 192 168 1 254 or http 192 168 1 254 in the address field Note https is used for a secured connection 3 The following Administrator Login Page will t...

Страница 7: ...y recommended to change the administrator s password Step 2 WAN1 Interface For setting up both wired WAN and wireless LAN functions Select a proper type of Internet connection for WAN1 interface from the following three available connections Static Dynamic or PPPoE Your ISP or network administrator can advise on the connection type available to you Below depicts an example for Dynamic Click Next t...

Страница 8: ...e system A confirmation dialog box will then appear Click OK to continue A Confirm and Restart message will appear on the screen during the restarting process Please do not interrupt the system until the Administrator Login Page appears Note The system is trying to locate a DNS server at this stage Therefore a longer startup time is required if the configured DNS cannot be found When the following...

Страница 9: ...er as the Password then Click Login Note 1 HSG1200 supports multiple authentication options including built in local user database and external authentication database e g RADIUS The system will automatically identify which authentication option is used from the full username entered 2 The format of a full valid username is userid postfix where userid is the user ID and postfix is the name of the ...

Страница 10: ...a an ADSL or a cable modem HSG1200 uses virtual LAN VLAN technology to partition one physical network under its control into nine logical virtual networks called Service Zones including one untagged zone and eight tagged zones The untagged zone is also referred as the Default Service Zone in this system which is always enabled On the other hand the other four tagged zones can be enabled or disable...

Страница 11: ...mode each LAN port can only serve traffic from one Service Zone An example of network application diagram is shown as below one Service Zone for Guest and one for Employee The switches deployed under HSG1200 in Port Based mode must be Layer 2 switches only Configuration Steps Step 1 Configure Service Zone 1 for Guest Assume that LAN1 is assigned to the Service Zone 1 SZ1 for Guest Click the System...

Страница 12: ... the Service Zone Name field Step 3 Configure Authentication Settings for SZ1 Check the Enabled radio button to enable Authentication Required for the Zone Check the Default button and Enabled box of Guest Users to set ONDEMAND authentication method as default Disable all other authentication options Then click Apply to activate the settings made so far A warning message You should restart the sys...

Страница 13: ...nfigure LAN Port Mapping for SZ1 Select the LAN Port Mapping tab from the System menu to enter the LAN Ports and Service Zone Mapping page Select Guest from the drop down list box of LAN1 Click Apply to save the selection A warning message You should restart the system to activate the changes will appear at the bottom of the page Do NOT restart the system until you have completed all the configura...

Страница 14: ...a t e w a y LAN1 is now configured for Guests Step 5 Configure Service Zone 2 for Employee Assume that LAN2 is assigned to the Service Zone 2 SZ2 for Employee Select the Service Zones tab and click Configure of SZ2 Step 6 Configure Basic Settings for SZ2 Check the Enabled radio button of Service Zone Status to activate SZ2 Enter a name for SZ2 e g Employee in the Service Zone Name field ...

Страница 15: ...Server 1 to set LOCAL authentication method as default Disable all other authentication options Then click Apply to activate the settings made so far A warning message You should restart the system to activate the changes will appear at the bottom of the page Do NOT restart the system until you have completed all the configuration steps Step 8 Configure LAN Port Mapping for SZ2 Select the LAN Port...

Страница 16: ...ng message You should restart the system to activate the changes will appear at the bottom of the page Click the hyperlink of Restart to restart the system and activate all configurations Please do not interrupt the system during the restarting process Once the settings of two Service Zones are completed the configured result will be displayed in the Service Zone Settings page SZ1 and SZ2 are both...

Страница 17: ...0 Q u ic k I ns ta l l a tio n G u id e ENGLISH 4ipnet H S G 1 2 0 0 W i r e l e s s H o t s p o t G a t e w a y For configuration of Tag based Port Based service zone and information please refer to the User s Manual Appendix D Service Zone Deployment Example P N V 10 0 2 0 0 9 0 4 0 8 ...

Отзывы: