background image

Orion Installation Guide

4

Unpack and Check Contents

The Orion terminal is a state of the art transaction terminal for all non-cash payment methods. To
start, unpack the unit and inspect for shipping damage. Remove the desiccant pack from the
upper paper roll compartment and remove the protective film from the LCD screen. Check that
the following items are included:

Power supply including power cord (P/N 4A-4010)

Phone cord (P/N 4A-4243)

Roll of thermal paper (P/N 4A-4022)

Inkjet cartridge (P/N 4A-4130)

If any of these items is missing, contact your service provider. Do not use a damaged
terminal.

!

Caution:

Place the terminal in a location that is convenient to both the purchaser and the

cashier, and on a hard surface that allows adequate ventilation. Avoid areas with excessive heat
or dust, oil or moisture, direct sunlight, devices that radiate heat, and devices that cause
excessive electrical noise and/or magnetic fields such as air conditioners, fans, electric motors,
neon signs, or high-frequency security devices.

Warning:

Do not use this product near water, including a bathtub, wash basin, sink, tub, or

pool.

Setting up the Printers

Loading Paper

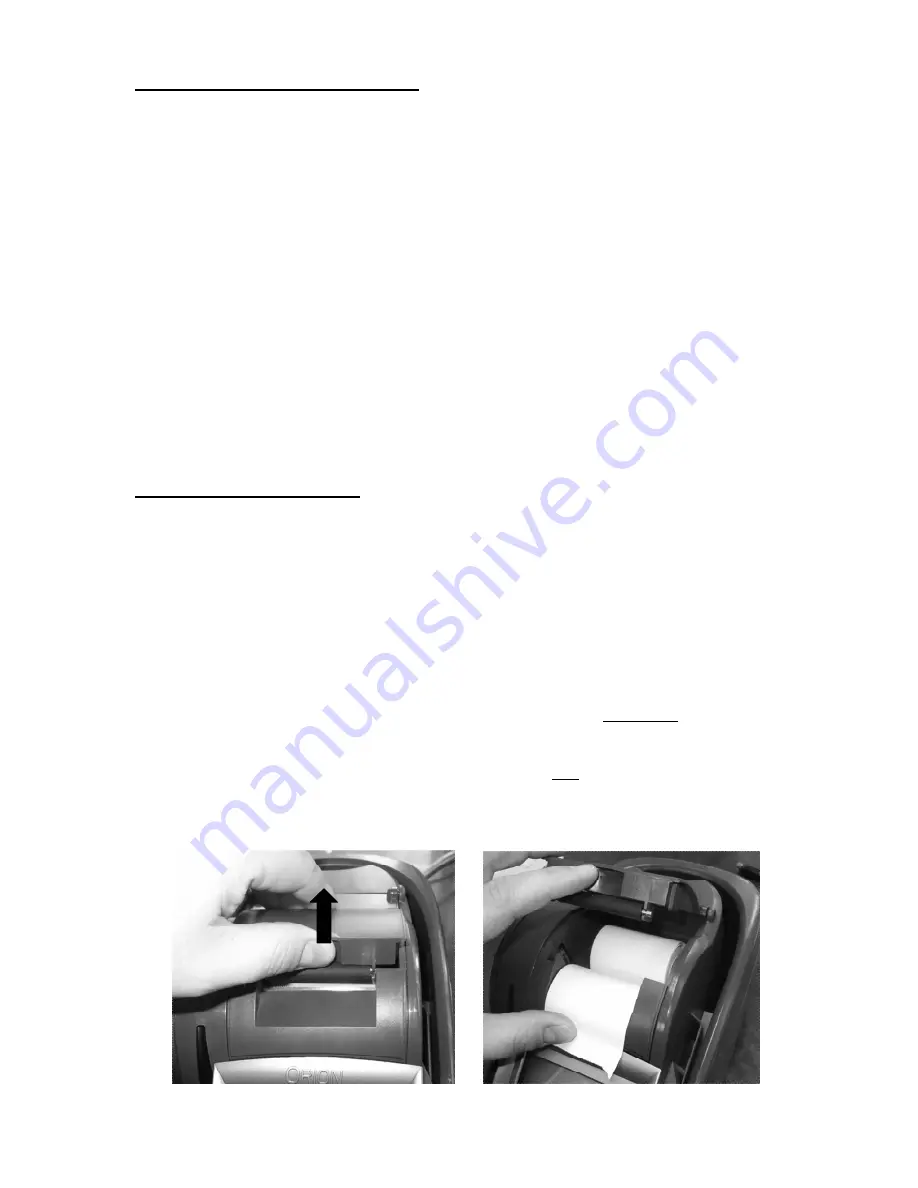
The printer has been designed to eliminate feeding and jamming problems. No spindle or
threading of the paper through a mechanism is required. Use the following procedure to load
paper into the Orion receipt printer:

Use only single-ply thermal-sensitive roll paper that is 2-¼ inch wide and up to 85 feet in length,
like the roll included with the terminal. Additional roles are available from office supply stores.

1.

Lift the cover under the thumb rest as shown below. The door will snap open. (FIGURE
1)

2.

Unravel a few inches of the paper roll.

3.

Place the roll into the pocket oriented so the paper feeds from underneath the roll as
shown below. (FIGURE 2)

4.

Pull the end of the paper towards the keypad and close the cover by pressing in the
middle of the lid until it snaps shut. Be sure the door is fully closed and not partially open
on one side.

5.

Tear off the excess paper by pulling it down and at a slight angle.

FIGURE 1

FIGURE 2

Содержание Orion IV

Страница 1: ...ORION IV Installation Guide TM...

Страница 2: ...may be copied distributed stored translated or transmitted in any form or by any means without the prior written consent of 4Access Communications Company Orion 4Access and the 4Access logos are regis...

Страница 3: ...nfiguring the Terminal ____________________________________________________ 8 Setting the LCD Contrast ___________________________________________________________ 8 Setting the Date and Time _________...

Страница 4: ...itioners fans electric motors neon signs or high frequency security devices Warning Do not use this product near water including a bathtub wash basin sink tub or pool Setting up the Printers Loading P...

Страница 5: ...ce of the cartridge 2 Turn the unit upside down or on its side Remove the printer door by squeezing the release tabs and lifting as shown below FIGURE 3 3 Important Orient the printer cartridge tab to...

Страница 6: ...n easily connect to your network using a standard RJ 45 CAT5 Ethernet cable This type of cable is available at most office and computer supply stores 1 Connect a CAT5 cable to the Ethernet port on the...

Страница 7: ...s barcode scanners PIN pads USB cameras and other PC devices can be connected to the ports however contact your sales representative for a complete list of supported peripherals See additional precaut...

Страница 8: ...Press Key In Password and Press Enter Key the manager password 1234 and press Select Utility Select Configuration Configuration Select Set Date Time Configuration Date Time Select Set Date Time Manual...

Страница 9: ...Subnet Gateway and DNS address and input the static values Note Press 1 then the ALPHA key three times to create a period between values 8 Press the CLEAR key and choose YES to save your entries 9 Ch...

Страница 10: ...unterclockwise until they release FIGURE 9 2 Gently open the side door to access the inner areas 3 Moisten a clean dry cotton swab ball or pad with 70 isopropyl rubbing alcohol Disposable cleaning pad...

Страница 11: ...rab check 2 Pull check from the back of the unit being careful not to rip the check so it may be re scanned 3 Press the CLEAR key to return to the main menu 4 If the terminal is unresponsive unplug an...

Страница 12: ...r cycle the terminal Pin pad or Barcode Reader does not work 1 Power cycle the terminal 2 Connect device to the other COM port and power cycle the terminal Modem or Ethernet does not work reliably 1 S...

Страница 13: ...inputs of the device This is to avoid damage to the equipment caused by local lightning strikes and other electrical surges Surge protectors are available at most computer and supply stores Environmen...

Отзывы: