background image

5

Chapter 

 Sound Settings

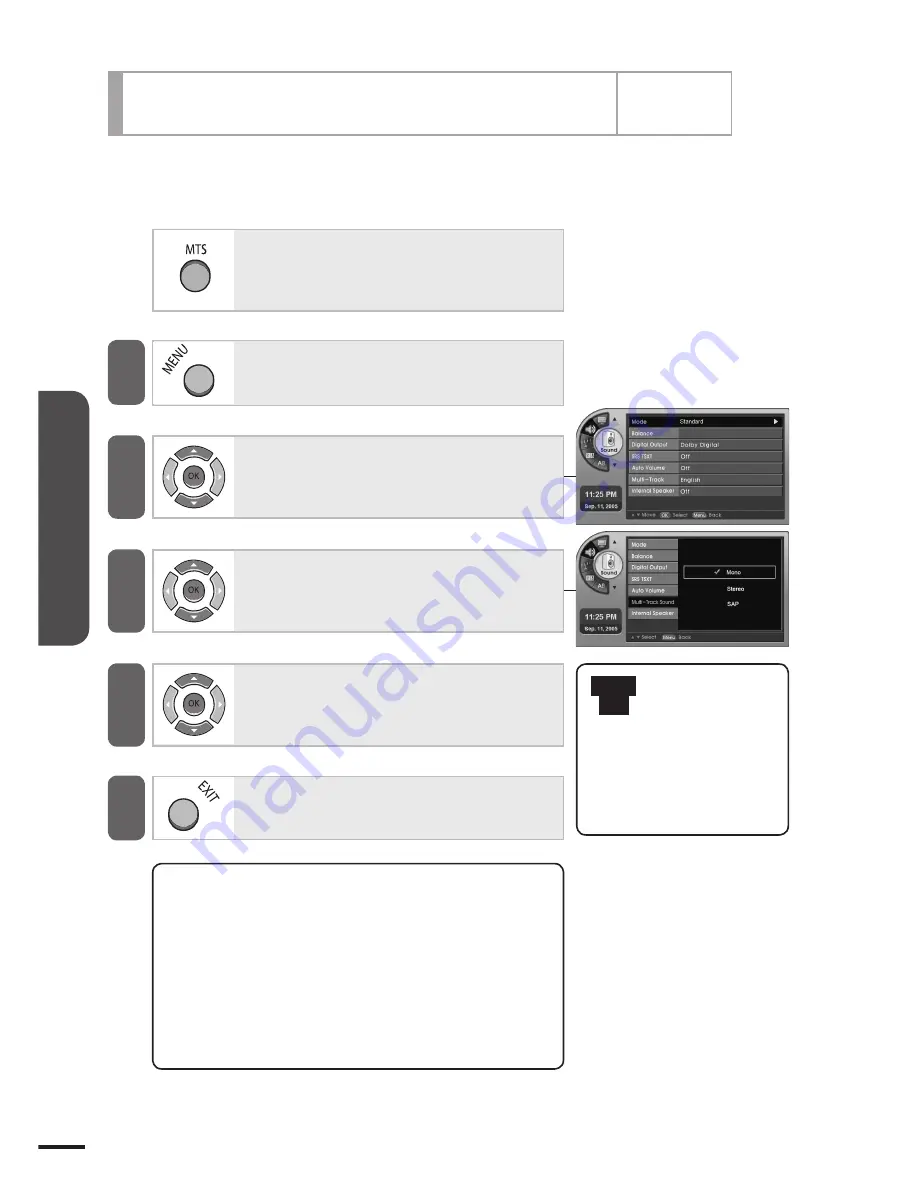
Press 

MTS

.

You can select your favorite settings [Mono], [Stereo] 

or [SAP].

Press 

MENU

.

The Menu will appear.

Press ▲/▼ to move to 

Sound

, then press 

OK

.

The [Sound] Menu will appear.

Press ▲/▼ to move to 

Multi-Track

, then press 

OK

.

The [Multi-Track] Menu will appear

Press ▲/▼ to move to 

Mono

Stereo

 or 

SAP

then press 

OK

.

The selected sound will be set.

Press 

EXIT

 to exit the menu.

While Mono is on air

■  All modes will have mono 

sound.

While Stereo is on air

■  Mono: Mono sound is 

selected.

■  Stereo: Stereo sound is 

selected.

■  SAP: Mono sound is 

selected.

While SAP is on air

■  Mono: Mono sound is 

selected.

■  Stereo: Mono sound is 

selected

■  SAP: SAP sound is selected.

Sound (Analog Broadcasting) Settings

2

1

3

5

Useful 

Tips

■  The sound settings 

are only supported 

in TV (analog 

broadcast) mode.

■  [Stereo], [SAP] will 

only operate when 

a network signal is 

available.

Содержание CL260WS

Страница 1: ...erating your set Retain it for future reference Record model number and serial number of the set See the label attached on the back of the set and quote this information to your dealer when you require service Owner s Instructions English LCD TV ...

Страница 2: ... your outlet consult an electrician for replacement of the obsolete outlet 10 Protect the power cord from being walked on or pinched particularly at plugs convenience receptacles and the point where they exit from the apparatus 11 Only use attachments accessories specified by the manufacturer 12 Use only with the cart stand tripod bracket or table specified by the manufacturer or sold with the app...

Страница 3: ... the cable ground shall be connected to the grounding system of the building as close to the point of cable entry as practical Caution FCC CSA regulations state that any unauthorized changes or modifications to this equipment may void the user s authority to operate it Caution To prevent electric shock match the wide blade of plug to the wide slot and fully insert the plug Attention pour eviter le...

Страница 4: ...ing accessory recommended by the manufacturer Move the LCD TV and cart with care Quick stops excessive force and uneven surfaces can make the unit and cart unsteady and likely to overturn Provide ventilation for the LCD TV The unit is designed with slots in the cabinet for ventilation to protect it from overheating Do not block these openings with any object and do not place the LCD TV on a bed so...

Страница 5: ...not attempt to service the LCD TV yourself Refer all servicing to qualified service personnel Unplug the unit from the wall outlet and refer servicing to qualified service personnel under the following conditions when the power supply cord or plug is damaged if liquid has been spilled on the unit or if objects have fallen into the unit if the LCD TV has been exposed to rain or water if the LCD TV ...

Страница 6: ... radio television technician for additional suggestions You may find the booklet called How to Identify and Resolve Radio TV Interference Problems helpful This booklet was prepared by the Federal Communications Commission It is available from the U S Government Printing Office Washington DC 20402 Stock Number 004 000 00345 4 The party responsible for product compliance Your dealer Caution Any chan...

Страница 7: ...igital apparatus complies with Canadian ICES 003 Cet appareil numéique de la classe B est conforme à la norme NMB 003 du Canada This device complies with part 15 of the FCC Rules Operation is subject to the following two conditions 1 This device may not cause harmful interference and 2 This device must accept any interference received including interference that may cause unesired operation This t...

Страница 8: ...bilities Set up your personal theater with high definition video and surround sound Display Panel TFT LCD DCRe Digital Cinema Reality Engine implemented and high definition video supported Surround Sound System Dolby Digital 5 1Ch High quality sound system with SRS TruSurround XT implemented Watch movie clips simply by connecting to your PC Automatic resolution detection with the VESA Plug Play fu...

Страница 9: ...ital Signal Strength 18 Menu Transparency Settings 19 Power Saving Mode Settings 20 Chapter 2 Connections and External Input Settings Before Connecting you TV 22 Connecting an Antenna 23 Connecting a VCR 25 Connecting a DVD Player 27 Connecting a Home Theater 28 Connecting a Cable Satellite 29 Connecting a Camcorder Gaming Device 31 Connecting a HDMI Connection 32 Connecting a DVI Connection 33 Co...

Страница 10: ... 61 TV Activation Time Settings 62 TV Deactivation Time Settings 63 Chapter 6 V Chip Entering a PIN 66 TVPG Rating 68 MPAA Ratings 70 Canadian English Ratings 71 Canadian French Ratings 72 Chapter 7 Captions Captions Settings 74 Analog Mode 75 Digital Mode 76 Digital Font Options 77 Chapter 8 Connecting a PC Checking Items before Connecting to a PC 80 PC Settings 81 Adjusting the Position 82 Adjus...

Страница 11: ...emote Control Buttons 8 Remote Control Buttons 9 Remote Control Instructions 10 Automatic Channel Settings 12 Adding or Removing Channels 14 Adding Favorite Channels 15 Current Program Information 16 Digital Signal Strength 18 Menu Transparency Settings 19 Power Saving Mode Settings 20 ...

Страница 12: ...Also used to move to a previous item on the on screen menu 2 TV AV Displays a menu of all available input sources 3 VOL Press to decrese or increase the volume These buttons are also used to select items on the on screen menu 4 CH Press to change channels These buttons are also used to select items on the on screen menu 5 POWER Used to turn the TV on and off 6 Remote Control Receiver 7 Power Indic...

Страница 13: ...ogramme Up Down selects a programme or a menu item switches the set On from standby 5 MENU selects a menu 6 POWER STANDBY INDICATOR r illuminates red in standby mode illuminates green when the set is switched On 7 REMOTE CONTROL SENSOR Power Cable Remote Control Battery 2 Owner s Instructions The picture of the product may vary depending on the model Front panel and parts ...

Страница 14: ...nector Optional not included Connect to Connector 9 PC Cable Optional not included Connect to Connector 6 DVI PC Sound Cable Optional not included Connect to Connectors 3 5 Component Signal Cable Connect into Connector Sound Cable Connect to Connector AV Cable Optional not included Connect to Connector 0 Coaxial Cable Connect to Connector 7 Connection Cables 7 RF Input 75 Ohm Terminal 8 Optical Di...

Страница 15: ...djust the screen size 9 Numeric buttons Press to change the channel directly using the numeric buttons 10 Button When selecting a digital broadcast channel press the Main channel number sub channel number Analog channels can be viewed when the sub channel is zero 11 FAV Watch your favorite channels 12 CHANNEL Press to change channels 13 INFO Check the current program information screen status mult...

Страница 16: ... Press to select Antenna Cable as the picture source 20 CH LIST Press to see the channel list 21 MTS Press to select your favorite language for digital broadcasting You can select your favorite mode Mono Stereo SAP 22 STILL Press to pause the current scene 23 CAPTION Press to activate English subtitles 24 ADD DEL Press to add or delete a channel to from your channel list 25 PRE CH Press to view th...

Страница 17: ... to the previous menu 1 Push the mark at the back of the remote control and pull forward slightly 2 Insert two AAA 1 5V batteries ensuring the correct polarity 3 Close the lid Caution Use only Alkaline Batteries Remote Control Instructions Press to select on screen menu items and change menu values Inserting the batteries into the remote control 10 Chapter 1 General Information ...

Страница 18: ...ard turned on Remote Control Reception Angle Use the Remote control within a range of 7 10m and at an angle of 30 to either side of the receiver Caution Used batteries should be recycled and kept out of children s reach Do NOT use new and old batteries together Change both batteries at the same time When not using the remote control over a long time remove the batteries from the unit Use only Alka...

Страница 19: ...ppear Press and move to Auto Memorizing then Press OK The Auto Memorizing menu will appear Press to move to the type of Antenna connection and press OK The Auto Memorizing menu will appear Press to check the status then press OK The Auto Memorizing menu will appear After memorizing all receivable channels a menu appears with the number of channels that have been memorized Press EXIT to exit the me...

Страница 20: ...i Useful Tips When Air Cable is selected the TV searches for channels both Analog and Digital from the antenna input When selecting Air only only Air channels are scanned Analog Digital When selecting Cable only only Cable channels are scanned Analog Digital If any antenna connection status is changed please perform automatic channel memorization again When stopping the automatic channel scan the ...

Страница 21: ...the ADD DEL menu appears press OK to either add or remove Adding or removing all memorized channels Press MENU The Menu will appear Press to move to Channel then press OK to finish The Channel menu will appear Press to move to Channel List then press OK The Channel List menu will appear Press to move to the channel you wish to add and then press the RED Button If the channel has the mark the chann...

Страница 22: ...nnel List menu will be selected Press to move to the favorite channels then press the GREEN button Make sure that the selected channel has been checked To exit from the favorite channel set up press the green button again Press EXIT to exit the menu Useful Tips At least one or more channels must be memorized before setting up your favorite channels A removed channel cannot be added to your favorit...

Страница 23: ...u will disappear and information about the current channel will appear Press to move to a digital broadcast program then press OK Detailed information about the selected digital broadcast program will appear This is available when the original program supplies the relevant information Press EXIT to exit the menu Useful Tips Detailed information about the channel will not appear unless it is provid...

Страница 24: ...cel the reservation Reserving a Program is only possible for future programs that are NOT on air at the moment Press the RED button to see the next viewing list Press the Green Button to see the previous page Press the Yellow Button to see the forward page Press the GUIDE Button to see detailed information for the selected digital program ...

Страница 25: ...to move to Channel then press OK The Channel menu will appear Press to move to Signal Strength then press OK The reception sensitivity will be shown in the menu Press EXIT to exit the menu This shows the current digital signal strength as a picture Before Starting Keep the digital TV receiving mode as is ...

Страница 26: ...o move to Menu Transparency then press OK Menu Transparency will be selected Press to select the transparency then press OK There are 4 options in menu transparency Opaque Semi Opaque Semi Trans and Transparent Press EXIT to exit the menu Menu Transparency Settings Menu Transparency sets the background transparency of the menu 2 4 5 1 3 ...

Страница 27: ...1 20 Chapter 1 General Information Power Saving Mode Settings Press E SAVING Each time E SAVING is pressed Standard and Saving modes are switched Saving mode conserves power ...

Страница 28: ...nnecting an Antenna 23 Connecting a VCR 25 Connecting a DVD Player 27 Connecting a Home Theater 28 Connecting a Cable Satellite 29 Connecting a Camcorder Gaming Device 31 Connecting a HDMI Connection 32 Connecting a DVI Connection 33 Connecting a PC 34 TV External Input Settings 35 ...

Страница 29: ...he product may be damaged if turned on while still in the process of being connected 3 Connect the left white and right red cables correctly to the sound cable 4 Check the terminals to connect the product to on the rear panel For each connector please refer to Rear panel and Connectors p 7 Before Connecting you TV Please check the list below before connecting the product to other devices 22 Chapte...

Страница 30: ...al If both Air Cable are available then connect both AIR and CABLE terminals Connect the TV power cord when connecting everything else 1 2 3 Caution Avoid bending the copper tip at the center of the coaxial cable Useful Tips If the signal is too weak to be received by the TV purchase an additional wavelength amplifier for better reception Setting up an UHF antenna will receive a digital broadcast ...

Страница 31: ...e Channel button ex Change from Channel 4 to 11 Keep pressing the Channel button until you get to Channel 11 Watching Digital Broadcasting 1 Turn on the TV and follow the steps in Automatic Channel Settings Useful Tips p 12 Currently all broadcast Air Analog Digital and Cable Analog Digital channels have been memorized 2 Changing the channel by pressing the CHANNEL button Ex Press the CHANNEL butt...

Страница 32: ...he TV to the Sound output white red of the VCR Useful Tips If there is a terminal called S Video Output connect the TV S Video Input terminal to the VCR S video output terminal Connect the sound cable to the Video2 S Video Input left right white red 1 2 3 VCR Audio Cable or Watching a VCR 1 Turn on the TV and press the INPUT button then select VIDEO1 or VIDEO2 If external input mode is not selecte...

Страница 33: ...nnect the same coaxial cable to the AIR terminal or CABLE terminal at the back of the TV or the TV OUT terminal at the back of the Video and TV Caution Avoid bending the copper tip of the coaxial cable Watching a VCR 1 Move the switch at the back of the VCR to 3 or 4 2 Turn the TV on and select Channel 3 or 4 3 Turn on the VCR and press the play button ex Selecting Channel 4 1 2 ...

Страница 34: ...put terminals Y Pb Pr are switched the screen will appear red or blue Useful Tips Depending on the brand of DVD player the output terminals Y Pb Pr or Y Cb Cr will be marked If the DTV receiver supports DVI it may be connected via an HDMI or DVI cable instead of a component cable DVD Player Componenet cable Audio cable Viewing a DVD 1 Turn on the TV press the INPUT button then select COMPONENT1 or...

Страница 35: ...eater or AV Amp Connect the Digital Audio output terminal at the back of the TV to the DVD Home Theater or AV Amp to view digital broadcasts using 5 1 channel speakers Watching a DVD title with Home Theater 1 Turn on the TV and press the INPUT button to select COMPONENT1 or COMPONENT2 If COMPONENT mode is not selected check if the component cable is connected properly 2 Turn on the DVD Home Theate...

Страница 36: ...he rear panel of the Cable Satellite receiver using video connectors Connect the AV1 sound input left right or AV2 sound input left right white red terminal to the rear panel of the Cable Satellite receiver using audio connectors 1 2 3 Set top Box Watching Cable Satellite broadcast 1 Turn on the TV press INPUT and select VIDEO1 or VIDEO2 2 Turn on the cable satellite receiver and select the channe...

Страница 37: ...he copper tip at the center of the coaxial cable Useful Tips If you would like to record cable satellite programs in step 2 instead of pressing CABLE connect the Antenna input terminal and the receiver s TV signal output Refer to the instruction manual of the VCR Watching Cable Satellite 1 Set the dip switch on the rear panel of the Cable Satellite receiver to 3 or 4 2 Turn on the TV and select ch...

Страница 38: ...the TV and camcorder after all other connections are done Useful Tips Connect the Gaming Device and other devices as above If your Gaming Device has a component output terminal then connect the component sound video input terminal of the TV and the Component sound video output terminal of the Gaming Device Game Watching recorded materials from the camcorder 1 Turn on the TV and press INPUT then se...

Страница 39: ...ion The sound signal also carries multi channel 5 1 Channel so that it isproperly called a multimedia interface rather than a video terminal The difference between HDMI and DVI is that the size is smaller HDCP has an embedded cipher function and supports multi channel audio Watching HDMI 1 Turn on the TV and press INPUT then select HDMI 2 Place a DVD title into an external device connected via HDM...

Страница 40: ...ower of the TV and the external device Useful Tips When connecting equipment using a DVI connection cable use a DVI HDMI gender sold separately or on one side HDMI other side DVI type of connection cable HDMI DVI connecting cable not included in packet sold separately HDMI DVI cable Watching stream via the DVI connector 1 Turn on the TV and press INPUT then select HDMI 2 Operate the external devic...

Страница 41: ...y available for PCs with a sound output terminal Watching a PC screen on a TV 1 Turn on the PC and check if your PC settings are correct If they are not correct your screen will be doubled or distorted Setting up your PC is referred to in p 90 2 Turn on the TV and press INPUT then select PC 3 Adjusting the PC screen Refer to p x91 95 for adjustments Connecting a PC PC Audio cable PC Video cable PC...

Страница 42: ...the selected external input screen Useful Tips Check if the connecting cables are properly connected if the input mode was not selected TV External Input Settings You can change the signal of the TV or of the external device connected to your TV 1 2 35 Chapter 2 Connections and External Input Settings ...

Страница 43: ......

Страница 44: ...Chapter 3 Screen Adjustments Screen Mode Setting 38 Screen Custom Mode Settings 39 Unstable Screen 41 Film Mode Settings 42 Adjusting the Screen Size 43 Capturing a Still screen 45 ...

Страница 45: ...c Mild Manual can be selected Press EXIT to exit the menu Screen Mode Standard The manufacturer default for the optimal conditions status Dynamic Select this for a brighter screen You will be able to see the screen more clearly Mild Select this for a darker screen It has the advantage of saving power and making your eyes less tired Manual You can select your own defined screen setting conditions S...

Страница 46: ...ture Adjusting the user screen Before Starting The Mode needs to be changed to Manual in the menu Press and move to a menu then press OK An additional adjustment bar will appear Press and move to a location then press OK Press to move to Brightness Contrast Sharpness Color or Tint Press EXIT to exit the menu Useful Tip Adjusted values will be save as a Manual mode value Screen mode and custom valu...

Страница 47: ...or Temperature then press OK The Color Temperature Menu will appear Press to move to a menu Press to move to Normal Cool or Warm Press EXIT to exit the menu Useful Tips The PC and HDMI inputs support not only screen color mode but also R G B custom mode functions The screen color mode and custom adjustment value PC HDMI are saved individually TV AV1 2 S VIDEO etc 2 5 1 3 4 ...

Страница 48: ...el then press OK The Channel Menu will appear Press to move to Fine Tune then press OK The Fine Tune Menu will be selected Press to adjust Press EXIT to exit the menu Undoing a channel adjustment From step 4 above pressing Number 0 will change the value to 0 and automatically make minor channel adjustments If minor channel adjustment is on manual then changing to the current channel will not perfo...

Страница 49: ... will appear Press to move to On Press to toggle Film Mode between Off and On Press EXIT to exit the menu Useful Tips Even if film mode is activated the signal status may take precedence Film Mode Settings Set your selection to ON to watch your movies titles at the best quality You will be able to watch with a more realistic movie screen 42 Chapter 3 Screen Adjustments ...

Страница 50: ...Format The screen size will be selected Press EXIT to exit the menu Useful Tips Depending on the input signal the screen size may not be selected The screen size may be saved individually according to the input signal digital TV analog TV external input1 2 S video etc Adjusting the Screen Size You can select the size of the screen depending on the type of program 2 4 5 1 3 43 Chapter 3 Screen Adju...

Страница 51: ...4 3 For video and the current broadcast screen ratio Precautions If you force a still picture or use the basic 4 3 screen over a long time then the LCD TV can show some residual images These problems are not covered by the warranty If possible try to utilise full screen mode Useful Tips Some screen modes might not be selectable depending on the input signal While watching digital broadcasting or i...

Страница 52: ...still image Useful Tips Audio will continue to operate while the screen is paused Pressing a channel number or input signal will automatically cancel the function Capturing a Still screen You can pause a scene on the screen 45 Chapter 3 Screen Adjustments ...

Страница 53: ......

Страница 54: ...ettings 48 Custom Sound Mode Settings 49 Sound Balance Settings 50 Digital Audio Output Settings 51 Automatic Volume Control Settings 52 Sound Digital Broadcasting Setting 53 Sound Analog Broadcasting Settings 54 Using External Speakers 55 ...

Страница 55: ...IT to exit the menu Sound mode Standard Basic sound mode Music Experience live and natural sound Movie Experience the marvels of surround sound as in a movie theater Sports Experience the passion of the real playground News You can hear the sound of the newsanchor clearly Manua You can create your own sound mode Sound Mode Settings You can adjust the mode to Music Movie Sports or News depending on...

Страница 56: ...e Manual menu will appear Press to select either low or high sound as required then press to change the volume Adjust to low or high sound Press EXIT to exit the menu Useful Tips You can use the equalizer to adjust Standard Music Movie Sports News mode to change the Mode to Manual Custom Sound Mode Settings You can adjust low high sound as required 2 1 4 6 3 5 49 Chapter 4 Sound Settings ...

Страница 57: ...Sound Menu will appear Press to move to Balance then press OK The Balance Menu will appear Press to change the sound to the left right You can adjust the volume of the left right speaker Press EXIT to exit the menu Sound Balance Settings You can balance your speakers for better sound quality 2 4 5 1 3 ...

Страница 58: ...icence of Dolby Laboratories The Dolby or D symbol is a trademark of Dolby Laboratories Useful Tips Dolby digital can be selected while a digital broadcast is on or HDMI is connected HDMI can only be used when dolby digital audio is allowed If not PCM will be output no matter what mode has been set PCM Pulse Coded Modulation A digital signal without compression with optical output your sound outpu...

Страница 59: ...ess to move to Auto Volume then press OK The Auto Volume Menu will appear Press to move to On or Off then press OK Press EXIT to exit the menu Automatic Volume Control Settings You can automatically adjust the sound level of different channels to the proper volume level which make it out differently from each channel 2 4 1 3 5 ...

Страница 60: ...e set language will be selected Press MENU The Menu will appear Press to move to Sound then press OK The Sound Menu will appear Press to move to Multi Track then press OK The Multi Track Menu will appear Press to select English Spanish or French then press OK The sound settings primarily set up the language But in the menu you can select your favorite language settings no matter what the broadcast...

Страница 61: ... OK The selected sound will be set Press EXIT to exit the menu While Mono is on air All modes will have mono sound While Stereo is on air Mono Mono sound is selected Stereo Stereo sound is selected SAP Mono sound is selected While SAP is on air Mono Mono sound is selected Stereo Mono sound is selected SAP SAP sound is selected Sound Analog Broadcasting Settings 2 4 1 3 5 Useful Tips The sound sett...

Страница 62: ...Press to move to Internal Speaker then press OK The Internal Speaker Menu will appear Press to select Off then press OK The internal amp is turned off Press EXIT to exit the menu Using External Speakers If you set the internal amp to OFF while watching through a home theater system the TV sound will be muted 2 4 1 3 5 ...

Страница 63: ......

Страница 64: ...Chapter 5 Time Settings Automatic Time Settings 58 Manual Time Settings 59 Time and Date Settings 60 Time Zone Settings 61 TV Activation Time Settings 62 TV Deactivation Time Settings 63 ...

Страница 65: ...r Press to select Auto Press EXIT to exit the menu Useful Tips The time will be set automatically by the digital broadcasting information There may be a slight error in the time depending on the broadcast station Pressing INFO will show the current time Automatic Time Settings If you set your auto time setting your time will be shown through digital broadcast received information 2 4 6 1 3 5 58 Ch...

Страница 66: ...s OK The Clock Menu will appear Press to move to Manual then press OK The Manual Clock item can be selected Press to move to Manual Clock then press OK Press to change the year month day am pm hours and minutes Press EXIT to exit the menu Manual Time Settings 2 4 6 1 3 5 7 8 Setting the year month day hours and minutes can be done by pressing the numeric buttons 59 Chapter 5 Time Settings ...

Страница 67: ...Press to move to Daylight Saving then press OK The Daylight Saving Menu will appear Press to move to Yes then press OK Select Yes for Daylight Saving and NO to cancel Daylight Saving Press EXIT to exit the menu Time and Date Settings Users can select Daylight Saving Before Starting Set the Clock to Auto Refer to page 58 2 1 4 6 3 5 60 Chapter 5 Time Settings ...

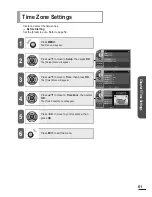
Страница 68: ...ress OK The Time Menu will appear Press to move to Time Zone then select OK The Time Zone Menu will appear Press to move to your local area then press OK Press EXIT to exit the menu Time Zone Settings Users can select the time zones Before Starting Set the Clock to auto Refer to page 58 2 1 4 6 3 5 61 Chapter 5 Time Settings ...

Страница 69: ...s channel volume and time period to turn on Press EXIT to exit the menu Useful Tips The turn on period can be set to Cancel Everyday or Once Cancel Automatic turn on will be Once The TV automatically turns on ONCE at the set time Everyday The TV will turn on everyday at the set time TV Activation Time Settings You can set a time for the TV to automatically turn on Before Starting Setting the curre...

Страница 70: ...M hours minutes and turn off period Press EXIT to exit the menu Useful Tips The turn off period can be set to Cancel Everyday or Once Cancel The TV turn off time is deactivated Once The TV will turn off Once at the set time Everyday The TV will turn off everyday at the set time TV Deactivation Time Settings You can select the time to turn off the TV Before Starting Setting up the current time Refe...

Страница 71: ...automatic turn off is active then the TV will turn off when there is no signal on the TV or there is no external input signal for 15 minutes or more If automatic turn off is active and the TV is turned on by the turn on option and no button is pressed for 3 hours the TV will automatically turn off TV Deactivation Time Settings If there is no signal on the TV for 15 minutes or more or if no button ...

Страница 72: ...Chapter 6 V Chip Entering a PIN 66 TVPG Rating 68 MPAA Ratings 70 Canadian English Ratings 71 Canadian French Ratings 72 ...

Страница 73: ...be blocked You need to set the password of the V chip then go to Changing PIN and set it to ON If a User loses the password the Master Password needs to be used Enter the 4 digit password 0 9 using the remote control The V Chip Menu will appear Press to move to Changing PIN then press OK The Changing PIN Menu will appear Use the keypad to set up the new password Entering a PIN This option sets up ...

Страница 74: ...or changed Press to move to On Off then press OK The On Off Menu will appear Press to move to On then press OK You will block certain channels and you can also select TVPG Rating MPAA Rating Can English Rating Can French Rating Pressing Off will unblock the channels Press EXIT to exit the menu 9 10 67 Chapter 6 V Chip ...

Страница 75: ...ng then press OK The TVPG Rating Menu will appear Press to move to a rating then press OK The lock symbol will be marked and the rating will be set Pressing OK will display the Unlock symbol and cancel the setting Press EXIT to exit the menu TVPG Rating You can block programs based on the TV program rating Before Starting Enter your password for the V Chip then move to the Changing PIN menu and se...

Страница 76: ...ons TV Y7 Directed for older children Themes and elements in this program may include mild physical or comedic violence or may frighten children under the age of seven TV Y All children The themes and elements in this program are specifically designed for a very young audience including children from ages two six TV FCC Content Sub Categories V Violence S Sexual content L Offensive language D Dial...

Страница 77: ...IT to exit the menu Useful Tips Description of the MPAA and TV FCC Rating Codes The MPAA Rating System Movies G General Audience No restrictions PG Children under 13 should be accompanied by an adult PG 13 Parental guidance suggested Children under 13 should be accompanied by an adult R Restricted Viewers should be 17 or older NC 17 Not classified Viewers should be 17 or older X Adults only MPAA r...

Страница 78: ...l be marked and the rating will be set Pressing OK will display the Unlock symbols and limit the view Press EXIT to exit the menu Useful Tips Canadian English Ratings E Expect No restriction C Children C8 Viewers should be 8 or older G General Audience PG Parental guidance suggested Children under 14 should be accompanied by an adult 14 Restricted Viewers should be 14 or older 18 Restricted Viewer...

Страница 79: ...he lock symbol will be appear and the rating will be set Pressing OK again will display the Unlock symbol and cancel the rating Press EXIT to exit the menu Useful Tips Canadian French Rating E Expect No restriction G For all 8 Restricted Viewers should be 8 or older 13 Restricted Viewers should be 13 or older 16 Restricted Viewers should be 16 or older 18 Restricted Viewers should be 18 or older C...

Страница 80: ...Chapter 7 Captions Captions Settings 74 Analog Mode 75 Digital Mode 76 Digital Font Options 77 ...

Страница 81: ...f then OK The On Off Menu will appear Press to move to On then press OK Captions will be activated Selecting Off will cancel the captions Press EXIT to exit the menu Useful Tips When captions are Off in case you can t set up Analog Mode Digital Mode Digital Font Option to set up the Caption setting as On may be done Captions Settings 2 1 3 4 5 ...

Страница 82: ...ess MENU The Menu will appear Press to move to Caption then press OK The Caption menu will appear Press to move to Analog Mode then press OK The Analog Mode Menu will appear Press to move to CC1 TEXT4 then press OK Analog Caption may be selected Selecting Off will cancel the Captions Press EXIT to exit the menu Useful Tips If a caption source is not provided by the broadcasting station or by the v...

Страница 83: ...gital Mode Menu will appear Press to move to Service1 Service6 then press OK Digital Caption may be set Selecting Off will cancel Digital Captions Press EXIT to exit the menu Useful Tips If the broadcasting station or videotape does not provide subtitles there are no viewing captions Alternate method to the above method Simply press the CAPTION button on the remote control The availability of capt...

Страница 84: ...ect Size Edge Style select the font type mode then press OK Size Adjust the digital caption font size to default small standard or large Style Either default or style0 through style7 can be selected Background Foreground Color Either default or from white to cyan can be selected Background Foreground Opacity Either default or Solid to Flashing can be selected Edge Style Either default or none to R...

Страница 85: ......

Страница 86: ...Chapter 8 Connecting a PC Checking Items before Connecting to a PC 80 PC Settings 81 Adjusting the Position 82 Adjusting the Frequency 83 Adjusting the Phase 84 Automatic Screen Settings 85 ...

Страница 87: ...ut if it is different only the power light will be on or there is no screen at all So please refer to your instruction manual and adjust the frequency accordingly Resolution dot line Vertical Frequency Hz Horizontal Frequency kHz Clock Frequency MHz 640 X 350 85 37 9 31 500 720 X 400 70 37 9 35 500 640 X 480 60 31 5 25 175 640 X 480 75 37 5 31 500 800 X 600 60 37 9 40 000 800 X 600 75 46 9 49 500 ...

Страница 88: ...s OK close the window and press OK in the Display Properties window 6 Turn off the PC and connect to the TV Useful Tips This may differ depending on the PC and Windows version A TV can support up to 32Bit color while being used as a TV monitor The display may differ depending on the manufacturer and the Windows version You have to select a display resolution which is support by the TV when connect...

Страница 89: ...o PC press OK The PC Menu will appear Press to move to Position then press OK The Position menu will appear Press to adjust the position of the screen Press EXIT to exit the menu Adjusting the Position If the screen is skewed towards a specific direction try to adjust the position Before Starting Select the input selection as PC 2 1 4 6 3 5 ...

Страница 90: ...ear Press to change the frequency Press EXIT to exit the menu Useful Tips This product primarily supports a TV and secondarily supports monitor functions so a PC monitor screen may be affected If adjusting the frequency does not remove unnecessary noise then try maximum phase adjustment Adjusting the Frequency This function will remove or reduce flickering on the screen unstable boundaries unneces...

Страница 91: ... PC press OK The PC Menu will appear Press to move to Phase then press OK The Phase menu will appear Press to adjust the phase Press EXIT to exit the menu Useful Tips If the phase is modified incorrectly the screen may become blurred Adjusting the Phase If adjusting the frequency does not remove unnecessary noise adjust the phase 2 1 4 6 3 5 ...

Страница 92: ...OK The PC Menu will appear Press to move to Auto then press OK The Auto menu will appear Press OK to launch the option Press EXIT to exit the menu Automatic Screen Settings The PC signal sent out to the TV is automatically adjusted by the automatic screen adjustment option The Position Frequency and Phase values are automatically adjusted 2 1 4 6 3 5 ...

Страница 93: ......

Страница 94: ...Self Service Check List 88 Chapter 9 Appendix Troubleshooting ...

Страница 95: ...o your antenna cable Menu and Remote Control SYMPTOMS SOLUTIONS The Remote Control isn t functioning well Press input selection to select the device to play Change the batteries Check the polarity of the batteries Check the angle of the remote control from the product or if there are any obstacles between the remote control and the product Check if you have pressed the correct key for the correct ...

Страница 96: ...annel has been selected correctly Try changing the position of the antenna Picture with white and black dots Check if your antenna is damaged or any connections are broken Replace your antenna Only certain channels are in black and white Check if the program is being broadcast in black and white Try to check the hue or contrast The Sub Screen is black Check the power of the external device connect...

Страница 97: ...malfunction after the volume is increased Try to adjust the external devices connected to the TV Digital channel receiver DTV DVD Cable channel receiver video If you can adjust your sound try to balance the volume of the TV and the external device Channel SYMPTOMS SOLUTIONS The channels are not functioning Connect the antenna connectors again Set to memorize channels in the automatic channel setti...

Страница 98: ... deactivates when any key is pressed or the mouse is moved The screen looks like there is water flowing on it Check the connector connected to the TV The screen is unclear and blurry Change the frequency and phase adjustment Change the Resolution and frequency to the standard limit 1024x768 60Hz Unstable and flickering screen The resolution and frequency of the PC s Graphics Card should be set wit...

Страница 99: ......

Страница 100: ...Chapter 10 Additional Information Specifications 94 END USER LIMITED WARRANTY 95 ...

Страница 101: ...tal Sound System MTS MTS VIDEO Color System NTSC M NTSC M Video System CVBS S VHS CVBS S VHS Component Video Input 480i 480p 720p 1080i 480i 480p 720p 1080i Audio Input 500mVrms 500mVrms PC Frequency Horizontal 30 60kHz 30 60kHz Vertical 60 75Hz 60 75Hz Display Colors 16 7 million 16 7 million Resolution Maximum 1280 X 1024 60 Hz 1280 X 1024 60 Hz Optimum 1366 X 768 60 Hz 1366 X 768 60 Hz Audio Sp...

Страница 102: ...bed herein or to extend the duration of any warranties beyond the time period described herein on behalf of 3S Digital The warranties described herein shall be the sole and exclusive warranties granted by 3S Digital and shall be the sole and exclusive remedy available to the purchaser Correction of defects in the manner and for the period of time described herein shall constitute complete fulfillm...

Страница 103: ...Memo ...

Страница 104: ...Memo ...

Страница 105: ...Owner s Instructions ...

Отзывы: