background image

Chapter 2   Setting Up Your ChassisTouch FPD Monitor

3M Touch Systems Proprietary Information

15

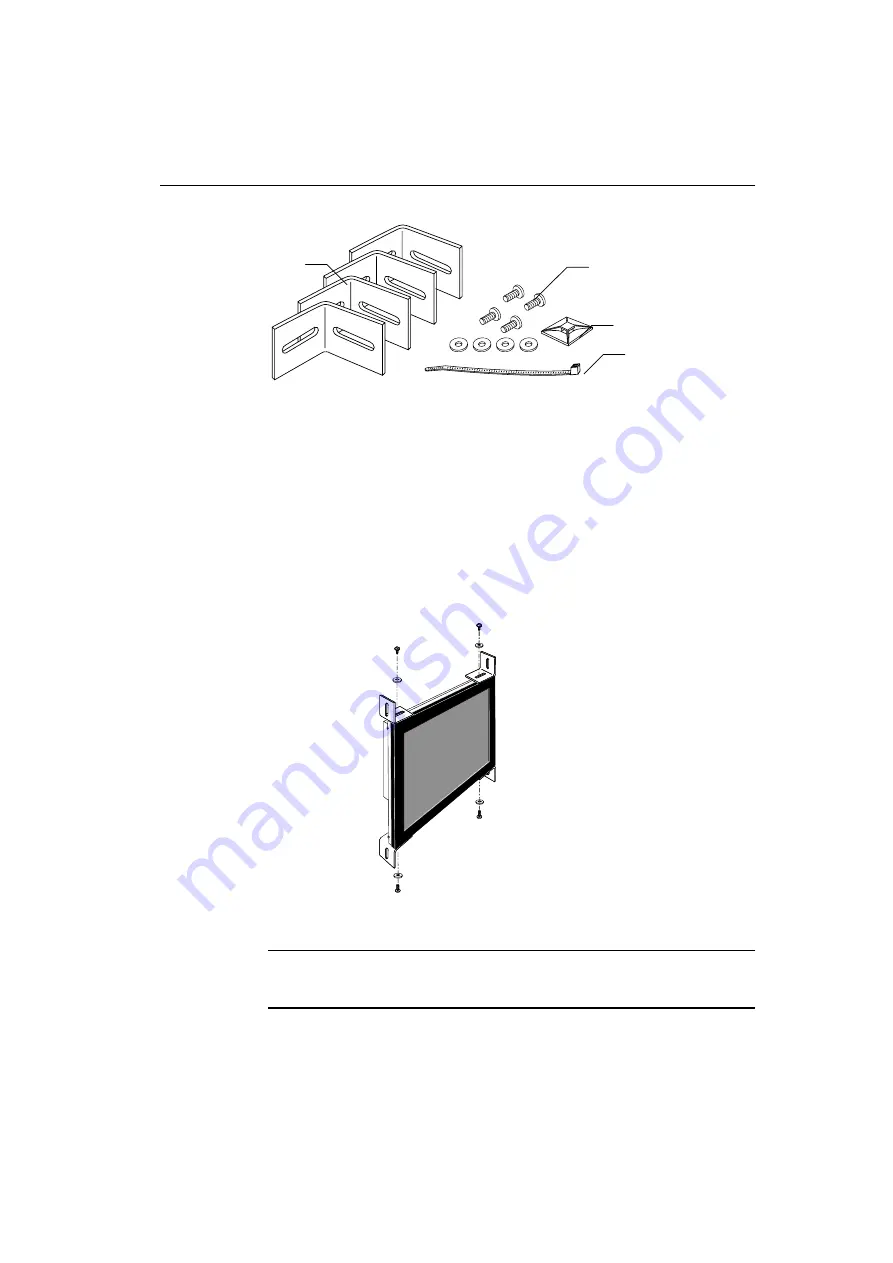
The ChassisTouch hardware accessory kit includes four brackets,
washers, and screws.  The mounting holes are located on the sides of the
monitor and are threaded to an M4 thread.

You can attach the brackets to the edges of the chassis.  The brackets are
slotted, allowing the chassis to slide in and out.  You can also rotate the
brackets to various positions.

Both units have the 100mm VESA mounting pattern on the back case to
allow for arm mount capability.

Suggested Mounting for the 15.1

!!!!

 ChassisTouch

Note:

 Do not mount the chassis unit directly from the rear of the cover.  Always

use the holes and brackets provided. Do 

not

 drill additional holes in the unit to

mount brackets in other locations.

Four M4x10 screws and
four M4 flat washers

Cable mount

Four brackets

Cable tie

Содержание ChassisTouch 15

Страница 1: ...ms Proprietary Information 15 1 and 17 ChassisTouch Flat Panel Display Monitors User Installation Guide 3M Touch Systems Read and understand all safety information contained in this document before using this product ...

Страница 2: ...cification 3M makes no additional warranties express or implied including but not limited to any implied warranties of merchantability or fitness for a particular purpose In particular but without limitation 3M makes no representations or warranties concerning the effective life of the products or their ability to survive user s environmental testing Purchaser is responsible for determining whethe...

Страница 3: ...isTouch FPD Monitor System Requirements 13 Unpacking Your Touch Monitor 14 Mounting the ChassisTouch Monitor 14 Access to the Video Controls 16 Clearance and Ventilation 16 Securing and Routing System Cables 16 Installing the Video Card and Video Driver 17 Configuring the Display Settings 17 Connecting the Touch Monitor 18 Testing the ChassisTouch FPD 19 Installing TouchWare Software 19 Calibratin...

Страница 4: ...stems Proprietary Information Chapter 4 Maintenance and Troubleshooting Maintaining Your Touch Monitor 27 Touch Screen Care and Cleaning 27 Monitor Installation Problems 28 Troubleshooting the Touch Screen 29 Power Management 29 Regulatory Agency Approvals 30 ...

Страница 5: ... Important Safety Information Read and understand all safety information before using this product Follow all instructions marked on the product and described in this document Pay close attention to the following installation warnings and safety precautions Intended Use The 15 1 and 17 ChassisTouch flat panel display FPD touch monitors have been designed and tested to replace an existing monitor a...

Страница 6: ...erter output is at high voltage Do not use non conforming replacement parts Do not place wet or damp objects on the monitor Do not expose the monitor to rain or other sources of water steam or moisture Do not place foreign objects on the monitor or its cables Do not remove the cover or back of the monitor To avoid the risk of glass breakage which may result in minor or moderate injury Handle the m...

Страница 7: ...ll the monitor in a manner or location with awkward accessibility Extended use may result in muscle tendon or fixed posture strains It is recommended you take periodic breaks from continuous use Service and Repair Indicators Do not attempt to service this unit yourself Removing the display cover may expose you to dangerous voltage or other risks Unplug the display from the power outlet and refer s...

Страница 8: ... Information on additional peripherals Technical Support is available Monday through Friday 8 am to 8 pm US Eastern Standard Time 9 am to 5 pm throughout Europe Limited service Saturdays Sundays and holidays You can contact 3M Touch Systems Technical Support US only Eastern Standard Time by calling the hot line or sending a fax Technical Support Hot Line 978 659 9200 Technical Support Fax 978 659 ...

Страница 9: ...td 5th Floor Victoria Center 15 Watson Road North Point Hong Kong Phone 852 2333 6138 Fax 852 2333 6861 Italy MicroTouch Systems Srl C so Milano 19 20052 Monza MI Italy Phone 39 039 2302230 Fax 39 039 2302370 Japan 3M Touch Systems Japan K K Bellevue Mizonokuchi Building 3F 3 2 3 Hisamoto Takatsu ku Kawasaki shi Kanagawa 213 Japan Phone 81 44 811 1191 Fax 81 44 811 1138 Korea MicroTouch Systems In...

Страница 10: ......

Страница 11: ...een sizes The flat panel display uses active matrix thin film transistor AM TFT liquid crystal display technology The 15 1 monitor supports a full screen resolution of 1024 x 768 the 17 monitor supports a full screen resolution of 1280 x 1024 Note The ChassisTouch FPD does not have a power LED Each monitor has four buttons for using the on screen menu and adjusting the video display Refer to Chapt...

Страница 12: ...els and the video addressability sometimes called resolution Native Video Resolution A flat panel display should be used only at the resolution dictated by the number of pixels on the panel For example the 15 1 ChassisTouch monitors have 1024 pixels across the screen and 768 lines of pixels down the screen and can accurately display one resolution 1024 x 768 at full screen The 17 ChassisTouch moni...

Страница 13: ...quire a personal computer PC These touch monitors are not supported on Macintosh computers The requirements for your PC are as follows Your PC must have an available RS 232 serial communication COM port You connect the touch screen to this port Your PC must have a unique interrupt request IRQ available to the COM port that the touch screen will use The touch screen cannot share an IRQ with another...

Страница 14: ...es and accessories SVGA video cable RS 232 serial communication cable AC DC power supply 12V DC output AC power cable 3M J U L Y 2 0 0 1 3M Touch Systems IN CLU DES To uc hW are So ftware To uc h Sc reen Driv ers Doc um en tatio n Ins talla tio n Guide s R eferen ce Guide s U ser Guide s Diagn os tic Util iti es CD with touch screen software documentation and utilities hardware kit includes mounti...

Страница 15: ...brackets are slotted allowing the chassis to slide in and out You can also rotate the brackets to various positions Both units have the 100mm VESA mounting pattern on the back case to allow for arm mount capability Suggested Mounting for the 15 1 ChassisTouch Note Do not mount the chassis unit directly from the rear of the cover Always use the holes and brackets provided Do not drill additional ho...

Страница 16: ... for proper ventilation Always maintain adequate ventilation to protect the display from overheating and to ensure reliable and continued operation Securing and Routing System Cables You must be sure to secure all cable connections Shaking and vibration especially during shipment may dislodge components that are improperly connected Be sure to tighten all cable screws Use the cable tie and cable m...

Страница 17: ...o card must support one of the display modes specified in Table 1 If you select an unsupported video mode the monitor will stop working or display unsatisfactory picture quality Table 1 Applicable Display Mode and Refresh Rate Display Mode Refresh Rate VGA 640 x 480 60 72 75 SVGA 800 x 600 56 Hz 15 1 only 60 72 75 XGA 1024 x 768 60 70 75 SXGA 1280 x 1024 17 only 60 75 Configuring the Display Setti...

Страница 18: ... the image using the monitor controls described in this chapter For more information on adjusting the desktop area resolution color depth or refresh rate refer to the user manual that came with your video card Connecting the Touch Monitor To connect the ChassisTouch FPD monitor 1 Turn off your computer You should always turn off the computer before connecting or disconnecting a device 2 Connect on...

Страница 19: ...nformation on using the on screen menu to adjust the video display Installing TouchWare Software TouchWare software includes the touch screen driver and control panel that enables your touch screen to work with your computer When you install the CD TouchWare will automatically load the correct driver for your system 3M Touch Systems currently supports touch screen drivers for the following PC oper...

Страница 20: ...uch Systems Proprietary Information To calibrate the touch screen open the touch screen control panel and select Calibrate Follow the directions displayed on the screen For more information on calibration refer to the online help or the user documentation ...

Страница 21: ...osition of the image This chapter presents guidelines for adjusting the video display and describes how to use the available monitor controls to adjust the image to your liking Before you make any adjustments Be sure to set the controls under your normal lighting conditions Display a test image or pattern whenever you adjust the video Controls for Adjusting the 15 1 Video Display Your 15 1 Chassis...

Страница 22: ...ay the options again OSD Controls for the 15 1 Monitor Pressing MENU will pull up the On Screen Display OSD menu as shown below On Screen Display for the 15 1 Monitor Auto Adjust To perform an Auto Adjust press SELECT Brightness Selecting the Brightness option will allow you to adjust the brightness of the display Adjust the brightness using the UP and DOWN buttons and press SELECT to confirm the ...

Страница 23: ...setting so that the vertical bars of noise are replaced by either an even amount of noise across the whole screen or the noise disappears completely Any remaining noise can be eliminated by adjusting the Fine Phase Setting Fine Phase Setting If the phase of your monitor is not fine tuned you may observe unstable horizontal noise lines and cross talking stretching from the edge of small windows on ...

Страница 24: ...ption at the bottom of the main OSD menu Controls for Adjusting the 17 Video Display Your 17 ChassisTouch FPD monitor has four controls for adjusting the video display MENU Displays a menu of on screen display OSD controls Move to the relevant icon and press MENU again the Status Bar at the bottom will change to red Pressing MENU again saves the current settings and the Status Bar returns to green...

Страница 25: ...se bars of noise are usually adjusted out when an Auto Configuration is performed If the bars of noise are still present this setting can be adjusted manually Adjust this setting so that either the vertical bars of noise are replaced by an even amount of noise across the whole screen or the noise disappears completely Any remaining noise can be eliminated by adjusting the Clock Phase Setting Phase...

Страница 26: ...lor balance and level for your display By adjusting a single color you can make the picture look warmer biased towards red or cooler biased towards blue Adjusting all three levels will make colors appear more or less striking Video Level Select This setting allows you to alter the contrast of display to take account of VGA cards that use a higher signal voltage level Video Mode TV is not supported...

Страница 27: ...nformation Do not install the display in a place where ventilation may be hindered Always maintain adequate ventilation to protect the display from overheating and to ensure reliable and continued operation Touch Screen Care and Cleaning The touch screen requires very little maintenance 3M Touch Systems recommends that you periodically clean the glass touch screen surface Typically isopropyl alcoh...

Страница 28: ...that the video cable is connected properly and securely to the monitor and the computer Check that no pins are bent in the video cable connector Check that the video card is firmly seated in the card slot in your computer Check that the video input from the video card falls within the refresh rate of the display Refer to Table 1 for details Check that your computer is using a supported display mod...

Страница 29: ...each the edges of the screen Calibrate the touch screen for the current video resolution and operating system Cursor is not located directly underneath your finger Open the touch screen control panel and make sure all cursor offsets vertical edge horizontal are turned off Calibrate the touch screen for the current video resolution and operating system Cursor is extremely jittery or erratic Stabili...

Страница 30: ...iving antenna Move the equipment away from the receiver Consult the dealer or an experienced radio television technician for additional suggestions You are cautioned that any change or modification to the equipment not expressly approved by the party responsible for compliance could void your authority to operate such equipment This Class B digital apparatus meets all requirements of the Canadian ...

Страница 31: ...Chapter 4 Maintenance and Troubleshooting 3M Touch Systems Proprietary Information 31 ...

Страница 32: ...y to cause harmful interference in which case the user will be required to correct the interference at his own expense This Class A digital apparatus meets all requirements of the Canadian Interference Causing Equipment Regulations Cet appareil numérique de la classe A respecte toutes les exigences du Règlement sur le matériel brouilleur du Canada Properly shielded and grounded cables and connecto...

Отзывы: