background image

3D


S


SMARTone


INSTALLATION

N


AND


OPERATION


Place


Only


is


pos

Once


The


in


Alway


Avoid

There


It


is


b

film


in


printer


load


one


sheet


ssible


more


tha

printed


take


ca

nk


will


be


wet


o

ys


keep


film


pri

d


stacking


the


p

e


is


a


drying


fram

est


to


load


the


with


print


(mat

of


film


at


a


tim

n


one


sheet


wi

are


not


to


dama

on


the


surface


a

nted


surface


up

rinted


sheets.


me


built


into


th

film


sheet


in


th

tte)


side


facing


me.


If


multiple


s

ll


be


pulled


thro

age


film


surface

and


needs


a


few

pwards.


he


top


of


the


pr

he


manner


show

forward.


sheets


are


load

ough


the


printe

e.


w


minutes


to


dr

rinter.


wn


here.


20


ed


it


er.


ry.


Содержание 3D SMARTone Phone CaseDecoration System

Страница 1: ...te a wide range of phone case models A sheet of A5 film is printed in the WP 4015 printer any image can be printed A blank phone case and a sheet of A5 film are loaded into the SMARTone The SMARTone process transfers the image from the printed sheet into the phone cover After just a short time to cool the case is ready for use ...

Страница 2: ...e for decoration Section 5 Page 7 The Control Panel and powering on Section 6 Page 8 Decorating a part Section 7 Page 12 Troubleshooting EPSON WP 4015 PRINTER SET UP AND OPERATION Section 8 Page 14 Installing the Epson WP 4015 Printer Section 9 Page 15 Printer preparation and settings Section 10 Page 19 Film Handling and making a print Section 11 Page 21 Printing from Adobe Photoshop Appendix 1 Pa...

Страница 3: ... stored after r Tone with a jig lammable liqui ttempt to refill dge if it is dama kin use soap and es irrigate thor of the print he ter on the fron operate the eq the equipment es ON ot ways use gloves ys use gloves sconnecting fro voltage supply wear cotton glov o the gloves pic parts easily Yo will be handling e at a low cost be used for han ple should lift t hts directly to an el in the SMARTo ...

Страница 4: ...PRINTER Epson Workforce Pro WP 4015 DN Size Width 460mm Height 380mm Depth 425mm Weight 11Kg Voltage 110 240V 50 60Hz Current max 0 5A Power max 22W Packed dimensions Width 620mm Height 480mm Depth 520mm Weight 15Kg Interface USB 2 0 Driver Windows XP Windows 7 Ink set 4 Colour cartridge Print resolution max 4800x1200 dpi Print speed 1 min A5 sheet approx Ink cartridge capacity Black 49ml Yellow M...

Страница 5: ...outlet 4 Preparing the SMARTone Before powering on you should fix the required support jig into the SMARTone drawer Samsung Galaxy S3 Jig A jig is available for each blank part model The jig provides support for the phone cover during decoration It also ensures the correct position of the image on the case The correct jig must be used for the part to be decorated eg you must use a Samsung Galaxy S...

Страница 6: ...firmly You can sw Wearing th right and f Press The b e place as it wil g correctly with nly one way it w mly into place y to left to lock wap out the jig hick gloves dis fit the new jig in the NEST WAR button will turn l remain hot fo h the locking pin will go around k at any time lodge the jig by nto place RM button on red until the jig or some time ns make sure you y pushing it to t the screen g...

Страница 7: ...wer and jig up to operating temperature Initial warm up will take around 15 minutes The SMARTone will not run a decoration cycle unless it is at operating condition Once at operating condition the SMARTone will maintain this so that it is ready to use even if you leave it idling for an extended period of time To ensure that the press is always ready keep the drawer closed when not in use ...

Страница 8: ...is is used to clamp the film into place Raise it to load film When the frame is down it rests against a silicon foam seal Take care not to cause damage to the seal replacements can be fitted easily if necessary Clip the blank phone case onto the jig The top of the part should always go to the left hand side camera holes are normally located at the top Extra care should be taken to ensure that the ...

Страница 9: ...he corner of the film that is to be used for registration as shown in the illustration to the left It is recommended that a similar mark is used if you are making your own templates Close the frame Push the drawer firmly closed As soon as the film is loaded close the drawer The film may distort if this procedure is not done quickly Press the Cycle Start button The SMARTone will now take care of ev...

Страница 10: ... a buzzer will sound and the drawer can be opened Remove the film and unclip the part SMARTone part removal tool is recommended The part will cool quickly and can then be used packaged for sale straightaway The SMARTone is ready for its next cycle Either load the next part or close the drawer to keep warm The keep warm cycle starts 2 minutes after the drawer is closed if the start button has not b...

Страница 11: ...nge between cycle programs Press Prog Select on the screen The Program Selection menu will appear Use the arrows to choose the program you require then press Process to return to the main screen You can now continue as normal using the program you have selected ...

Страница 12: ...should be cleaned off adequately The decoration looks weaker than expected and or appears blotchy The ink on the film is not dry Each print will require some drying and there is a handy drying frame on top of the SMARTone for this purpose Film should be placed in this drying frame print side up with the long edge of the film facing away from the operator i e the film is clipped into the tray bowin...

Страница 13: ...r away e SMARTone in ks including Ep MARTone inks N AND OPERATI EPSON W pson WP 4 ccording to inst stable flat surfa environment 1 from sources o nks pson own brand may damage th ON WP 4015 PR 4015 Print tructions suppl ace 15 30C 50 of dust d are not comp he printer RINTER SE ter lied with the pr RH patible with the ET UP AND rinter e decoration pro D OPERAT ocess ION 13 ...

Страница 14: ...inter for firs st time L O R I N C I N Load inks Open front cove Remove ink cart nsert according NB green chip is loca Close the cover nk loading will NB Do not turn off p er tridges from pa g to instructions ated at top of cartri and allow the take approx 5 m printer during this p ackaging s on cover idge printer to load minutes process the inks 14 ...

Страница 15: ...n w cassette purpose tray at over forward ock in place self centering A5 in tray and p be flat and not aper into the fr check the printi e load paper a e output tray to t the print tray check to ensure off printer if tu down the colou ower button will be printed t the rear ush guides unt t bowed by the ront cassette ng nd return casse o catch printed will not get kno e ink is loaded c urned on ur ...

Страница 16: ...zzle button if black is affected press the black nozzle button NB Nozzle checks and cleaning can also be run from driver software Once the printer is set up load the driver software following the instructions in the Epson documents USE USB CONNECTION Accept the default settings Note decline any requests for registration or updates from Epson Windows XP Windows 7 Once the driver is installed it mus...

Страница 17: ...e Rear MP Tray 2 Document Size A5 3 Orientation Portrait 4 Paper type plain paper 5 Quality Quality Other settings should be default Configure More Options page like this 1 High speed unchecked 2 Mirror Image checked 3 Edge Smoothing checked 4 Color Correction Custom Then click Advanced ...

Страница 18: ...This method is for printing via Photoshop In Color Correction select No Color Adjustment Then click OK to close color correction Finally click OK to close the preferences dialogue These settings will now be active when printing from an application ...

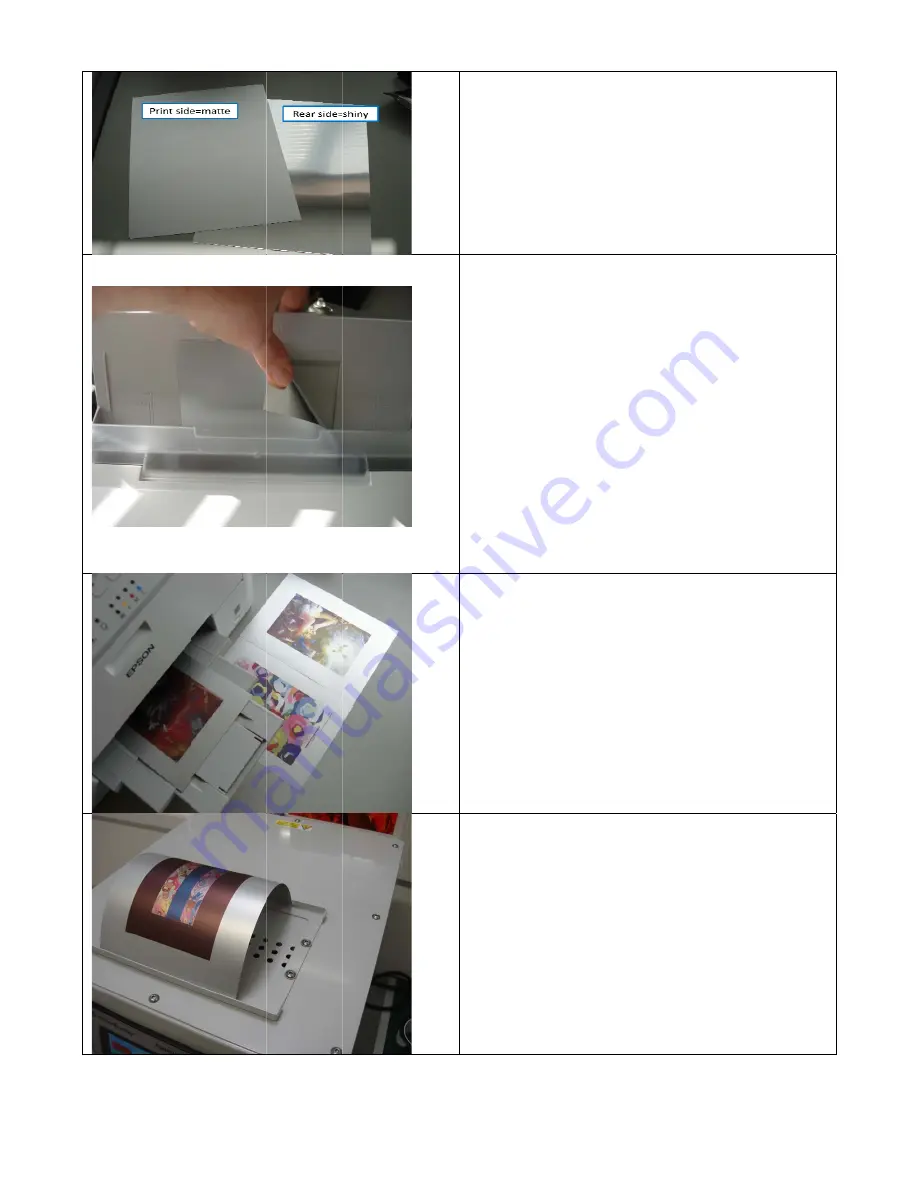
Страница 19: ... To install the ICC profile Right click on file and click Install Profile from menu The profile is then copied into the operating system 10 Film Handling and making a print Store film in packet and re seal when not required Avoid touching the printing area of the film surface It is only possible to print on the matte side of the film ...

Страница 20: ...acking the p e is a drying fram est to load the with print mat of film at a tim n one sheet wi are not to dama on the surface a nted surface up rinted sheets me built into th film sheet in th tte side facing me If multiple s ll be pulled thro age film surface and needs a few pwards he top of the pr he manner show forward sheets are load ough the printe e w minutes to dr rinter wn here 20 ed it er ...

Страница 21: ...3D SMARTone INSTALLATION AND OPERATION 21 ...

Страница 22: ...ent 3 Select Color Handling Photoshop Manages Colors 4 Select Printer Profile SMARTone Epson 4015 profile NB scroll down list 5 Select Rending Intent Perceptual 6 Either click Done to exit and save settings or press Print To print Enter the print dialogue Check principle setting are applied as above Check orientation of image is correct in preview Here the print orientation is WRONG Click the icon...

Страница 23: ...ation in Photoshop and keep the print setting constant Press Print button in Photoshop Press the Print button in Photoshop The print dialogue box will open Confirm that the Epson WP 4015 is the target printer If necessary check the preferences are set correctly The number of copies can also be set here Load a sheet of film in to the printer ...

Страница 24: ...loaded the feed light will illuminate on the printer In this case load a sheet and press the feed button The print will then continue If multiple copies are being made allow each sheet to complete before loading the next Use the feed button until all the copies are completed ...

Страница 25: ...with Service Pack 1 1GB of RAM 1GB of available hard disk space for installation additional free space required during installation cannot install on removable flash storage devices 1024x768 display 1280x800 recommended with 16 bit color and 256MB 512MB recommended of VRAM OpenGL 2 0 capable system DVD ROM drive Broadband Internet connection may be required for software activation validation of su...

Отзывы: