background image

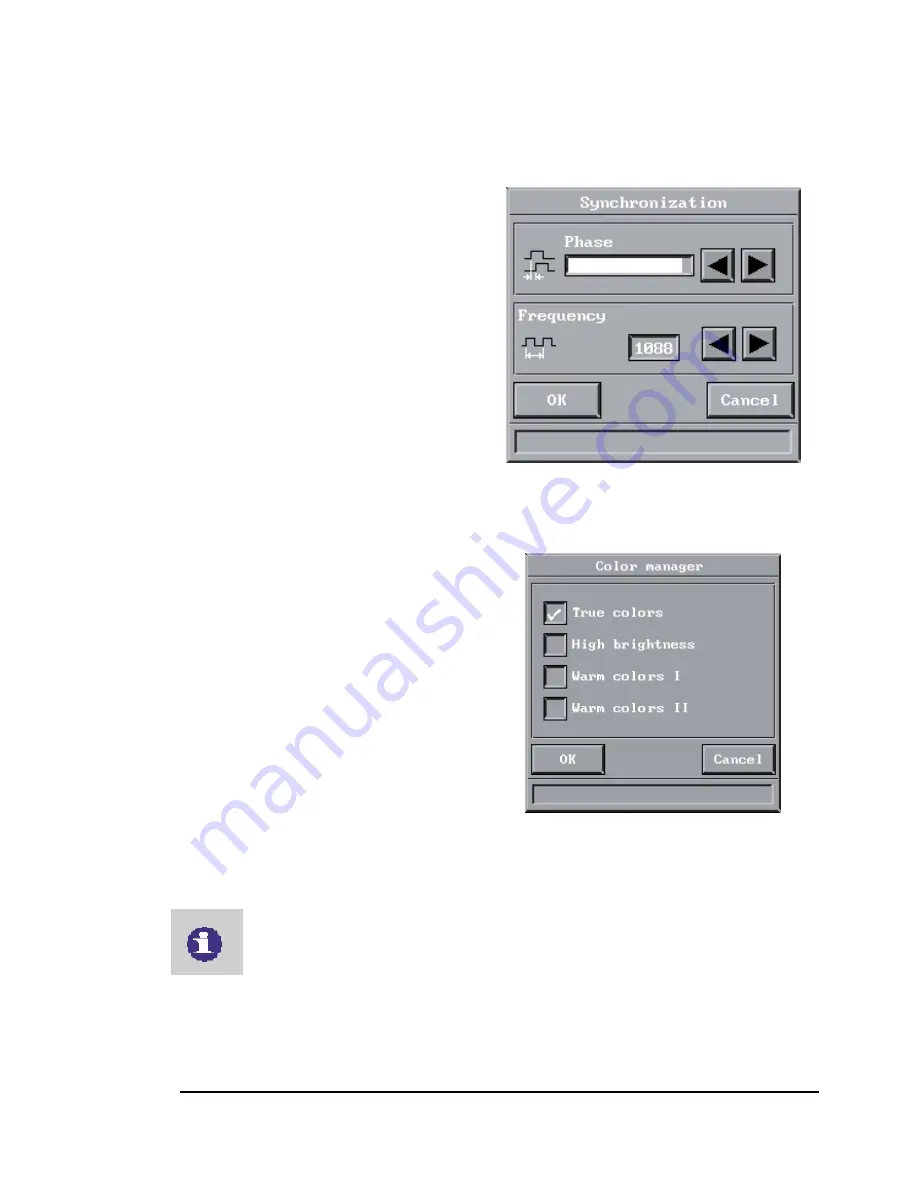
7.3.4 Synchronisation 

adjustments 


It is possible to adjust the synchronisation in 
Computer mode by adjusting the Phase and 
the Frequency. The synchronisation will be set 
by the automatic set-up function. Manual sync 
adjustments should typically not be required. 


7.3.5 Colour 

manager 


The colour manager is designed to give you 
maximum performance from your projector, 
independent of ambient light conditions. In the 
colour manager menu you can choose 
between four pre-defined Colour settings. 


7.4 Product 

information 


Click on the product information icon in order to get information about the 
product and company. 
 
Select Exit to leave the menu 


24


Содержание CompactView X10

Страница 1: ...CompactView X10 USER MANUAL VERSION 2 ...

Страница 2: ...3D Perception CompactView X10 Projector and accessories CompactView X10 Communication cable EVC Cable Figure 1 CompactView X10 and accessories 2 ...

Страница 3: ...PACTVIEW X10 10 5 1 Connecting a single projector 10 5 2 Connecting Projectors in a Chain 11 6 USING THE COMPACTVIEW X10 PROJECTOR 12 6 1 Different program modes for the COMPACTVIEW X10 projector 12 6 2 COMPACTVIEW X10 Remote Control 13 6 3 Using the touch panel on the COMPACTVIEW X10 projector 15 6 4 Adjusting the height and angle of the COMPACTVIEW 10 projector 16 6 5 Adjusting Focus Zoom on the...

Страница 4: ... take a few minutes to make sure that your COMPACTVIEW X10 projector contains all the necessary parts see figure 1 1 1 1 Cables for control through CompactDesigner software Communication cable 2m 6ft Spiral cable with RJ12 connectors EVC cable 3 x Power cable Europe U S A and U K 1 1 2 Other accessories Please refer to our website at www 3d perception com 1 2 Insert batteries in the remote control...

Страница 5: ...n the warranty card may void your warranty NOTE PLEASE USE CAUTION WHEN TRANSPORTING THE UNIT WARNING TAMPERING WITH OR OPENING THE COMPACTVIEW X10 CAN BE DANGEROUS FOR REPLACEMENT OF THE LAMP SEE THE INSTRUCTIONS SUPPORT WITH THE REPLACEMENT LAMP LEAVE MAINTENANCE TO AUTHORISED 3D PERCEPTION SERVICE PERSONNEL PLEASE CONTACT YOUR VALUE ADDED RESELLER WITH ANY SERVICE OR MAINTENANCE QUESTIONS YOU M...

Страница 6: ...0 projector and then the image generator The image should now be projected from the COMPACTVIEW X10 projector 3 2 Connecting a Computer Graphics Source to the CompactView X10 Projector The procedure for connecting a computer graphics source to the COMPACTVIEW X10 projector is as follows 1 Make sure that the computer graphics source and the COMPACTVIEW X10 projector are switched off 2 Connect the V...

Страница 7: ...Control chain out Control chain in Enhanced video connector Figure 3 Connection Panel 7 ...

Страница 8: ...tre geometry is downloaded to the projectors for easy calibration of geometry soft edges and hot spot compensation 4 2 About CompactDesigner CompactDesigner whilst offering all the same facilities as CompactControl also assists in the designing of Projection Theatres based on known room measurements specifics of projectors and screen geometry Many of the processes are automated The designer may in...

Страница 9: ... The set up program requires you to enter a valid software license serial number The first time you run the set up program the serial number will be set to a dummy value CV0000 0 0000 00000000 00000000 Use this default value to calculate the machine ID The serial number is based on a unique ID of the target computer To obtain a full license you will need to run the set up program once to calculate...

Страница 10: ... the projectors Control chain in input The supplied 6 lead cable Figure 4 plugs into the PC s serial port using an adapter Figure 5 3 Connect the projector to AC power and switch on Figure 3 Connection panel 4 Start CompactDesigner or CompactControl depending on your software configuration If the software has not yet been installed on the target machine it will have to be installed first See chapt...

Страница 11: ... cable connects to the PC through the supplied adapter 9 pin to RJ 12 The other end plugs into the Control Chain in port on the first projector From the first projector another 6 lead cable connects between the Control Chain out port on the first projector to the Control Chain in port on the second projector This chain can be extended up to the theoretical limit of 255 projectors in a single chain...

Страница 12: ...a picture will be shown on the screen 6 1 3 Quick mode Quick mode is used with the interactive remote control quick key You assign functionality for the quick key on the remote control in the quick menu see section 7 2 5 When clicking on the Quick key you will be able to switch between all the functions you have selected in this menu 6 1 4 Menu mode In menu mode the menu system is activated and yo...

Страница 13: ...beside the lens as this will prevent the communication between the remote control and the COMPACTVIEW X10 projector To ensure smooth operation the combined distance from the remote control to the screen and back to the projector should not exceed 10 meters 33 ft If the distance via the screen is longer you should point the remote control directly towards the IR receiver The remote control works wi...

Страница 14: ...re in menu mode and press the menu key you will return to normal mode Zap The two zap keys can be programmed to perform an assigned function To assign a function to the zap keys select the Zap icon from the menu The zap keys can be programmed to do the same function See section 7 2 5 for further explanations of the zap menu Quick When pressing the Quick key you can switch between all selected func...

Страница 15: ... and video image Contrast The Contrast key is used to control the contrast in data and video image Figure 9 The keys on the touch panel on the COMPACTVIEW X10 Stand by The stand by key will set the COMPACTVIEW X10 projector in stand by mode The lamp will turn off and the fans will run for a little while cooling the projector before stopping To return to normal mode press the Stand by key once more...

Страница 16: ...ll feet underneath the product NOTE The COMPACTVIEW X10 projector should never be left with an angle of more than 15 degrees over a longer period of time This will shorten the lifetime of the lamp FOCUS 6 5 Adjusting Focus Zoom on the COMPACTVIEW X10 projector To adjust focus turn the outer part of the lens 1 To adjust zoom turn the inner part of the lens 2 16 ...

Страница 17: ... Stand by This function sets the projector in stand by mode Auto set up Auto set up will do automatic set up of the projector Horizontal and vertical position Sampling clock Phase Chooses between available video formats and NTSC PAL auto detection Video option only Source Video option only You can connect three different sources to the COMPACTVIEW X10 projector one computer source and two video so...

Страница 18: ... assignment Lamp hours 7 2 1 Picture orientation NOTE Although picture orientation is possible from the set up menu it is strongly recommended that this function be performed from within the CompactDesigner software The picture orientation menu is used for rotating and mirroring the picture Normal Normal is used when the projector is standing on a table projecting a picture on a screen Mirror Mirr...

Страница 19: ...ected in this menu In this example the first time you click on the quick key you will activate the volume function A volume bar will be displayed at the bottom of the projected image where you can adjust the volume up and down You adjust the bar by either pressing the pressure sensing pad right or left or you may use one of the two zap keys on the remote control To accept the adjustment and termin...

Страница 20: ...n assigns the functions to the Zap 2 key Volume Not applicable Pointer Not applicable Blank Activates blank mode by pressing the Zap key First click will activate Blank mode and second click will deactivate it Mute Not applicable Computer Selects Computer as source Video Optional Selects video sources Both Zap keys can be programmed to select Video video input 1 or 2 Tuner Not applicable TV channe...

Страница 21: ...lated lamp time when you have changed lamp 7 3 Control panel menu In the control panel you have access to menus for adjusting picture and audio settings The icons Picture positioning and Synchronisation Adjustments are only visible if PC source is active 7 3 1 Picture control Select the picture control menu for adjusting brightness saturation and tint 21 ...

Страница 22: ...rightness and contrast will be available Optional When PAL SECAM video is selected brightness contrast and saturation will be available Optional All options will be available for NTSC video Select OK to save your changes and exit or select Cancel to exit without saving your changes Selecting Default restores factory settings 22 ...

Страница 23: ...ing Adjust vertical and horizontal position of the picture on the screen with the two sliders Select OK to save your changes and exit or select Cancel to exit without saving your changes 7 3 3 Audio control Not applicable 23 ...

Страница 24: ...stments should typically not be required 7 3 5 Colour manager The colour manager is designed to give you maximum performance from your projector independent of ambient light conditions In the colour manager menu you can choose between four pre defined Colour settings 7 4 Product information Click on the product information icon in order to get information about the product and company Select Exit ...

Страница 25: ...act your 3D Perception Value Added Reseller for maintenance The 3D Perception projector lamp is designed to give you 2000 hours performance In the unlikely event that you should have to change the lamp you will find complete instruction on how to replace the lamp included in the spare lamp kit 25 ...

Страница 26: ...until a satisfactory image is achieved 5 The power saver or screen saver on the PC or other image generator is turned on Turn off the power saver and screen saver on the image generator 6 The image is displayed on the laptop screen and not the projector Activate the external port on the laptop by pressing the required key combination on your computer 7 The CompactView X10 projector is not connecte...

Страница 27: ...c noise may influence the remote control Turn off sharp fluorescent tubes mobile phones etc that are near the projector No Image Appears Possible causes and remedies 1 The 3D Perception projector has not been switched on Check the ON OFF switch at the back 2 For Notebooks The external RGB port may need to be manually activated Please consult the notebook operating manual for how to operate 9 1 Fur...

Страница 28: ...t Ratio 500 1 ANSI Full on off typical Projection Lens Carl Zeiss Zoom Lens Vertical Frequency 48Hz 100Hz Horizontal Frequency 15KHz 80KHZ Dimensions 13 2 ins W x 8 86 ins D x 5 72 ins H 335 mm W x 225 mm D x 145 mm H Weight 10 2 lbs 4 6 kg Geometry Processing 100 Megapixels second full signal rate Non linear mapping Fully digital image re sampling Soft edge blending Fully digital in all direction...

Страница 29: ...Image Width v Throw Distance Chart The following diagram illustrates the relationship between image width and throw distance for a flat screen 29 ...

Страница 30: ...applicable to any other third party or user including any one who purchases a used 3D Perception projector Any person asserting a claim under this limited warranty must establish to 3D Perception satisfaction the date of purchase and that the 3D Perception projector was purchased new Other warranty and liability limitations Aside from this standard published warranty 3D Perception makes no warrant...

Страница 31: ...pect it and advice the Customer of the disposition if any to be made thereof Failure to give timely written notice of any claim shall bar any remedy Technical advice 3D Perception or its authorised personnel may furnish technical advice with reference to the use of the 3D Perception projector but there is no obligation to furnish such advice If any advice or assistance is furnished it shall be giv...

Страница 32: ...mation 3D PERCEPTION AS Tel 47 66 98 70 70 Solbråveien 41 Fax 47 66 98 70 71 P O Box 455 e mail sales info 3d perception com N1373 Asker Norway e mail tech support support 3d perception com www 3d perception com 32 ...

Отзывы: