


Centurion Installation Manual Ver 2.7
Page 15
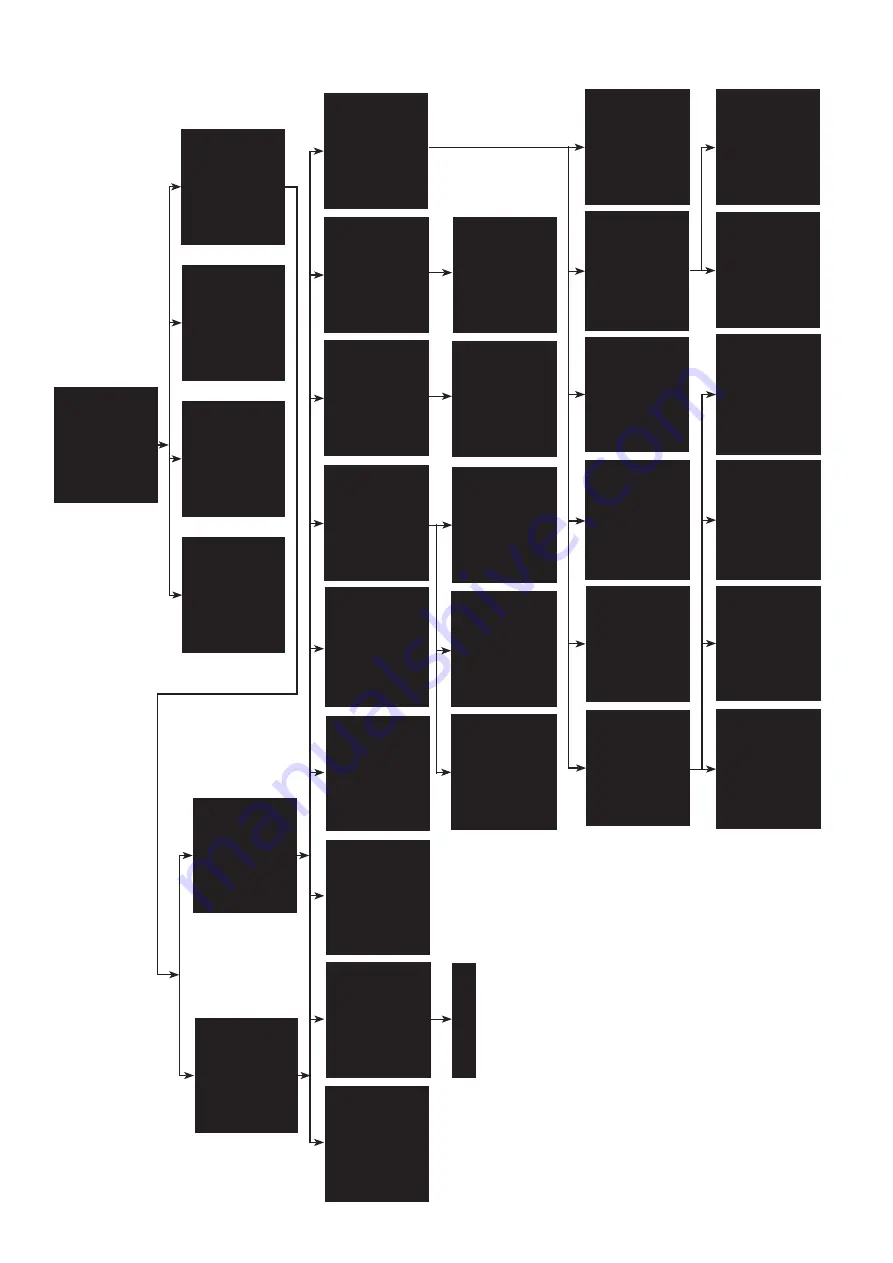
8 Centurion OSD
OSD (On Screen Display) is accessed by defining/programming preset 6 or 95.
•
Use the joystick up, down, left and right to navigate the menu.
•
Use the joystick zoom in to highlight/select an option.
•
Use joystick left and right to increment/decrement numbers.
Tour 001 item ...
PreDelSpd
Old................. New
................
0 1 2 3 4 5 6 7 8 9 Accept Item Accept Final Item Clear item Return Exit
DEFINE MIMIC
Mimic Number 001
Start Recording Return Exit
DEFINE PRESET
Preset Number ...
0 1 2 3 4 5 6 7 8 9 Accept Entry Clear Entry Return Exit
DEFINE HOME FUNCTION
Action T
our
Number 001 Delay Minutes 010 Delay Seconds 000
Accept Changes Return
PRIV
ACY
ZONE MENU
Define Privacy Zone Seek Privacy Zone Remove Privacy Zone
Return Exit
SER
VICING
Power Reset Dome Factory Reset Dome
Centurion Software V
ersion
Return Exit
Define T
our
Define Mimic Define Preset Define Home Function
Return
Define T
our
Define Mimic Define Preset Define Home Function Settings Menu Text Field Menu Servicing Privacy Zone Menu Preset Mapping Return
SEEK PRESET
Preset Number ...
0 1 2 3 4 5 6 7 8 9 Accept Entry Clear Entry Return Exit
ST
ART T
OUR
Tour Number 001
Start T
our
Return Exit
ST
ART MIMIC
Mimic Number 001
Start Mimic Return Exit
DOME SETTINGS MENU
Pin Number ...
0 1 2 3 4 5 6 7 8 9 Accept Entry Clear Entry Return Exit
DOME MENU
Seek Preset Start T
our
Start Mimic
Dome Settings Menu
Exit
8.1 PIN Number
Operators PIN: 360 or 426 or 180 Controllers PIN: 1379 or 9731 Engineers PIN: 5498
TEXT FIELD EDIT
--------------------------------------- 0123456789 :ABCDEFG HIJKLMNOPQRSTUVWXYZ
X Position: 000 Y Position: 000 TEXT Display: OFF Accept Entry Clear Entry Return
PRESET MAPPING
Presets 01 to 07 Presets 08 to 14 Presets 15 to 21
Return
General Settings Pelco Settings Night1 Settings Night2 Settings Lamps Settings Shutter Settings
Return
W
ARNING
All Stored Data W
ill Be
Permanently Erased
Continue
Return Exit
DEFINE PRIV
ACY
ZONE
Privacy Zone ...
0 1 2 3 4 5 6 7 8 9 Accept Entry Clear Entry Return Exit
SEEK PRIV
ACY
ZONE
Privacy Zone ...
0 1 2 3 4 5 6 7 8 9 Accept Entry Clear Entry Return Exit
REMOVE PRIV
ACY
ZONE
Privacy Zone ...
0 1 2 3 4 5 6 7 8 9 Accept Entry Clear Entry Return Exit
FINISH MIMIC BY
DEFINING
ANY
PRESET
No.
ACTION SEEK
01 a) none NO 02 b) none NO 03 c) none NO 04 d) none NO 05 e) none NO 06 f) none NO 07 g) none NO Accept Changes Return
Controller level
Engineer level
Digital Zoom ON White Balance OUTDOOR Line Lock ON Line Phase +056 Video Gain 002 Video Lift 000 W
ide Dynamic OFF
Accept Changes Return
Auto Flip SEMI Proportional OFF Freeze Presets ON Zoom Speed 007 OSD Preset Six
YES
Upright Mount ON Aperture(day) 010
Accept Changes Return
W
iper Rest (s) 000
W
iper ON time (h) 000
W
iper ON time (m) 000
W
iper ON time (s) 000
W
iper Permanent OFF
FV T
ext Control OFF
AF
AI When PTZ ON
Noise Reduct (day) 0 Accept Changes Return
White Lamps
YES
White When
Alarm ON
White T
imeout ON
White T
imeout (m) 001
Auto Dimming
YES
FV White Lights a)YES
Accept Changes Return
Low Light
Angle 000
Low Light V
alue 100%
Accept Changes Return
Preset Define On Pelco D Response NO
Accept Changes Return
Aux1 a) auto focus Aux2 b) digital zoom Aux3 c) auto iris Aux4 d) ir Aux5 e) wiper Aux6 f) washer Aux7 g) osd Aux8 h) backlight Accept Changes Return
Col/Mono Change: Dark Mono On 020 Mono Off 013 1=day 7=dusk 20=dark Brightness Normal
Accept Changes Return
Illumination IR Lamp Intensity 100% Camera Mono External Lighting
Yes
Aperture 3 Noise Reduction 0 Low Light Focus ON Night Presets OFF Accept Changes Return
Lamps1 Lamps2
Return
Fast Shutter OFF
Fast Shutter Speed g:1/1000
Slow Shutter 1/3 sec
Accept Changes Return
General1 Settings General2 Settings General3 Settings General4 Settings
Return
Lamps
Shutter
Night 2
Night 1
Pelco
General
General 1
General 2
General 3
General 4
Lamps 1
Lamps 2


