Centurion Installation Manual Ver 2.7
Page 1
© 360 Vision Technology Ltd.
Centurion
Installation/Configuration Manual
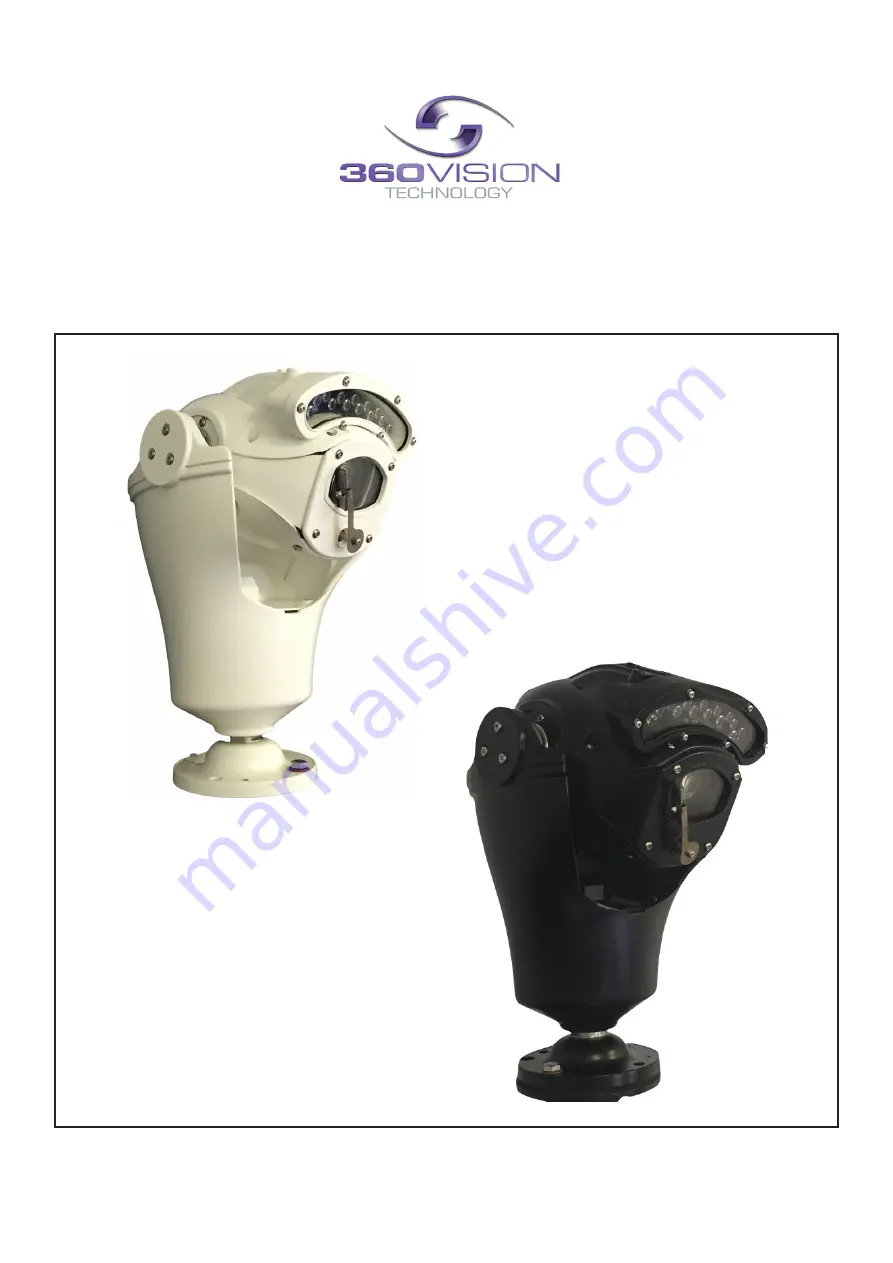
Страница 1: ...Centurion Installation Manual Ver 2 7 Page 1 360 Vision Technology Ltd Centurion Installation Configuration Manual ...
Страница 2: ...ing 5 4 Connections 7 4 1 Standalone Alarmcard Setup 9 4 2 RS422 RS485 Converter 12 5 Connections to Centurions with HMA 13 6 Basic Twisted Pair RS485 Data Wiring 14 7 Centurion Protocol Address setup 14 8 Centurion OSD 15 8 1 PIN Number 15 9 OSD Operation Navigation 16 10 Special Presets 20 11 Important Care of Painted Surfaces 21 12 Storage and Handling 21 13 Warranty 21 ...
Страница 3: ...a signals and power should only be made using a pre made Centurion Composite cables 9 Use only 360 Vision Centurion power supplies These have suitable terminals for all the wires in the Centurion composite cable 10 Please handle the Centurion with care as improper handling may cause damage within this unit 2 Housing Dimensional Drawing Centurion No Lamps MUST NOT BE REPRODUCED OR SHOWN TO DO NOT S...
Страница 4: ...PROVED ENGINEER MATERIAL FINISH WITH LIGHTS SCALE 0 4 MOUNTING BASE Weight 7 5kg Centurion HMA with LED Array MUST NOT BE REPRODUCED OR SHOWN TO DO NOT SCALE ALL DIMENSIONS IN MM REMOVE ALL SHARP EDGES SHEET D C B A D C B A 4 3 2 1 4 3 2 1 A3 DESCRIPTION SCALE PERMISSION OF THE AUTHOR ANY THIRD PARTY WITHOUT THE DIRECT WRITTEN C COPYRIGHT PROTECTED AND THIS DRAWING AND ALL COPIES ARE PART NUMBER 1...
Страница 5: ...visiontechnology com 125 OUTSIDE DIAMETER 9 x4 ON 101 6 4 INCH PCD USE M8 BOLT FOR FIXING TO POLE 60 M8 x4 ON 101 6 4 INCH PCD FIX PREDATOR USING M8x30 HEX HEAD BOLTS x4 STAINLESS STEEL M8 SPRING LOCK WASHER x4 STAINLESS STEEL 73 M20x1 5P M20x1 5P 73 M20x1 5P 8 0 x4 ON 101 6 4 INCH PCD FIX PREDATOR USING M8x30 HEX HEAD BOLTS x4 STAINLESS STEEL M8 SPRING LOCK WASHER x4 STAINLESS STEEL 5 3 0 125 OUT...
Страница 6: ...Centurion Installation Manual Ver 2 7 Page 6 360 Vision Technology Ltd Weight 2 5kg Centurion PMB Bracket Please use the appropriate fixings to suit the weight of the camera housing used ...
Страница 7: ... should not be allowed to pool around the connector as this will increase the risk of contamination and corrosion which may cause poor connections The connector on the base of the Centurion is rated IP68 when it is correctly connected and the locking ring is tight Centurion 12 way connector pin out Socket 12 pin socket solder side view fitted by 360 Vision to the composite cable Coax Screen B Grey...
Страница 8: ...nput Voltage 100 240VAC 50 60Hz Input current 2 1A Output Voltage 30V DC Output Current 6 2A Use pre made cable PRED 3M PRED 10m PRED 25m or PRED 40m to connect to Centurion NOTE All wires in composite cable must be connected CENT PSU SM 255 x 180 x 100mm Enclosure Dimensions Analogue Version Wiring To Analogue Controller 30Vdc PINK 30Vdc GREEN 30Vdc GREY 30Vdc WHITE 30Vdc BROWN 30Vdc BLACK Coax C...
Страница 9: ...the latest alarm has highest priority The Centurion will seek the preset that corresponds with the new alarm When the contacts become inactive the Centurion will seek the preset that corresponds with the previous highest priority alarm that is still active When all alarms inputs are inactive the alarm timer starts After the timer expires the Alarm PCB sends a command to the Centurion to end the al...
Страница 10: ...27 28 29 30 31 32 1 2 3 4 5 6 7 8 ON 1 2 3 4 5 6 7 8 ON 1 2 3 4 5 6 7 8 ON 1 2 3 4 5 6 7 8 ON 1 2 3 4 5 6 7 8 ON 1 2 3 4 5 6 7 8 ON 1 2 3 4 5 6 7 8 ON 1 2 3 4 5 6 7 8 ON 1 2 3 4 5 6 7 8 ON 1 2 3 4 5 6 7 8 ON 1 2 3 4 5 6 7 8 ON 1 2 3 4 5 6 7 8 ON 1 2 3 4 5 6 7 8 ON 1 2 3 4 5 6 7 8 ON 33 34 35 36 37 38 39 40 41 42 43 44 45 46 47 48 1 2 3 4 5 6 7 8 ON 1 2 3 4 5 6 7 8 ON 1 2 3 4 5 6 7 8 ON 1 2 3 4 5 6...
Страница 11: ...t current 2 1A Output Voltage 30V DC Output Current 6 2A ALARM INPUTS CON1 e g Connect A1 to COM to activate Alarm 1 ALARM RELAY OUTPUT CON3 Volts Free 0 5A 125Vac max 1A 24Vdc max CENT XALARM PSU SM A Use pre made cable PRED 3M PRED 10m PRED 25m or PRED 40m to connect to Predator NOTE All wires in composite cable must be connected 255 x 180 x 100mm Enclosure Dimensions 30Vdc PINK 30Vdc GREEN 30Vd...
Страница 12: ...9600 baud Off Off On Off Pelco P 4800 baud On Off On Off Pelco P 2400 baud Off On On Off Alarm Settings 7 8 Normal Operation Off Off No Pre alarm No White Light On Off Forced White Light Off On No Pre alarm White Light Timer On On CON4 Settings 4 2 RS422 RS485 Converter RS422 Tx Termination LK2 Use CON4 for RS422 Tx RS422 Rx Termination LK1 Use CON2 for RS422 Rx RS485 Pre wired CON3 for RS485 to c...
Страница 13: ...e M8x25 long hex head bolts Use a spanner 13mm to remove the three bolts Each bolt is fitted with a split spring lock washer a plain metal washer which prevents the split washer from damaging the fibre washer and a fibre washer which prevents the paint on the hinged part from being damaged unnecessarily Open the hinge taking care that the gasket is not damaged and support the weight of the Centuri...
Страница 14: ...urion Software Version PRO Protocol being used for telemetry e g 360 Vision Technology Ltd CAM Camera RS485 ID e g Cam 1 S or L Short or Long cable run Use the utility to set whether the coax used to send video is under or over 300m Second Line Shows the Centurion Software Version loaded into the camera To change the above settings in the camera 360 Predator utility software a USB RS485 cable PRED...
Страница 15: ...gs Shutter Settings Return WARNING All Stored Data Will Be Permanently Erased Continue Return Exit DEFINE PRIVACY ZONE Privacy Zone 0 1 2 3 4 5 6 7 8 9 Accept Entry Clear Entry Return Exit SEEK PRIVACY ZONE Privacy Zone 0 1 2 3 4 5 6 7 8 9 Accept Entry Clear Entry Return Exit REMOVE PRIVACY ZONE Privacy Zone 0 1 2 3 4 5 6 7 8 9 Accept Entry Clear Entry Return Exit FINISH MIMIC BY DEFINING ANY PRES...
Страница 16: ...abelled above PREDELSPD PRE is preset position DEL is delay in seconds and SPD is speed at second This is how the camera will be programmed to move to a preset for a period of time at a set speed All nine figures must be added into the item Figures must be added in three i e preset 21 will be added as 021 Example of an item point 021005100 Move to preset 21 for 5 seconds at 100 sec Highlight ACCEP...
Страница 17: ...est time for the wiper See also Special Presets page 20 Wiper On Time h m s Input a time period for the wiper operation See also Special Presets page 20 Wiper Permanent Enable or disable the permanent wiper time period FV Text Control Used on systems using Forward Vision protocol Will add ANPR text on screen when camera is put into fast shutter mode AF AI When PTZ Auto focus iris will activate whe...
Страница 18: ...t Use if a white light timer is required Default is on White Timeout m Set white light timer for automatic switch off Auto Dimming When selected the camera will reduce the lamp power when looking in scenes where there is too much light FV White Lights Used when using Forward Vision protocol can be used to select what lamps are controlled from the lamp command Lamps 2 Low Light Angle Sets angle whe...
Страница 19: ...y zone before going into the camera OSD You cannot manually move the camera once in the OSD Use the zoom to set the size of the privacy zone Privacy zone will cover the whole scene viewed when set Define Privacy Zone Used to set a privacy zone Seek Privacy Zone Used to seek a privacy zone Remove Privacy Zone Used to remove a privacy zone Preset Mapping Use this option to re map a function to a pre...
Страница 20: ...lour Night Focus Range When it is dark Seek 69 Ambient Seek 70 IR Wiper Seek 81 Double Wipe Seek 86 Stop Seek 82 Permanent Intermittent Wipe Seek 83 Permanent Fast Wipe Seek 84 Timed Intermittent Wipe Seek 85 Timed Fast Wipe De Fog Seek 87 On Seek 88 Off Set Privacy Zone Seek 91 Scene being viewed Clear Privacy Zone Seek 92 Privacy zones being viewed Clear Privacy Zone Seek 93 All privacy zones Wh...
Страница 21: ...kaging which is used for despatch from the factory they should not be stacked to a height of more than two Centurions When Centurions are being stored before installation they should be kept in the transit packaging and located in a dry indoor environment preferably between 1 C and 35 C which is dry and dust free Humidity should such that water vapour is non condensing Centurions can be allowed to...
Страница 22: ...Centurion Installation Manual Ver 2 7 Page 22 360 Vision Technology Ltd ...