| 1" Metal Blinds Deluxe
3
NOTE: An end mount is recommended only when there is no
alternative mounting surface available.
You will be using your blind with mounting brackets attached
to the headrail to mark the position of the brackets inside
your window casing (no template required). Bolt the inside
mount brackets to each end mount bracket with the nuts and
bolts provided to create a left hand bracket and a right hand
bracket. Use appropriate holes as shown below.
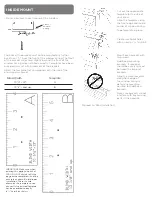
• For Blind width of 10
1
/
2
"
to 13" use second and
fourth holes of the end
mount bracket.
• For Blind width of 13
1
/
8
"
and over use first and
third holes of the end
mount bracket.
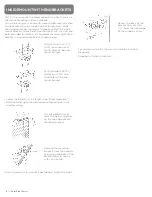
• Once the blind is level,
mark the wall or molding
on the top edge of each
mounting bracket.
• Remove the mounting
brackets from the headrail
by pushing the back of the
bracket forward and up
with your thumb.
Attaching brackets to headrail is described in “Blind Installation”.
For maximum stability the screws should be installed
diagonally.
Proceed to “Blind Installation”.
INSIDE MOUNT WITH END BRACKETS
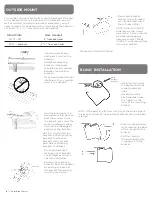
• Recess the back of the
bracket no more than
1
3
/
4
" from the front edge
of the window casing.
• Lower the blind to its full length. (see “Blind Operation”)
• Hold the blind up to the desired mounting position in the
window casing.
1
3
/
4
"


