


Installation manual 2N® IP Force
41
/
118
•
•
•
•
What You Need:
Plasterboard flush mounting box, Part No.
9151002
Hole: 118 x 237 mm
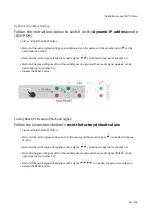
Flush Mounting – Hollow Bricks
What You Need:
Brick flush mounting box, Part No. 9151001
Hole: (132 x 223 x 83) mm
Suppose you intend to install
your
2N
®
IP Force
unit into a wall made of
hollow bricks. Note that the external side of the bricks gets damaged by
cutting and the dowels cannot practically be fixed into the thin internal part
of the bricks. Therefore, use the brick flush mounting box and follow the
instructions included therein.
Содержание IP Force 9151101W
Страница 1: ...Installation manual 2N IP Force v 2 18 www 2n com...
Страница 49: ...Installation manual 2N IP Force 49 118 2N IP Force Connectors PCB Version 555v3...
Страница 50: ...Installation manual 2N IP Force 50 118 2N IP Force Connectors PCB Version 555v4...
Страница 65: ...Installation manual 2N IP Force 65 118...
Страница 66: ...Installation manual 2N IP Force 66 118...
Страница 67: ...Installation manual 2N IP Force 67 118 Module settings Refer to the Configuration Manual for details Connection...
Страница 70: ...Mounting guide...
Страница 72: ...Installation manual 2N IP Force 72 118...
Страница 73: ...Module setting...
Страница 78: ...Installation manual 2N IP Force 78 118...
Страница 79: ...Installation manual 2N IP Force 79 118...
Страница 80: ...Module setting...
Страница 83: ...Active output...
Страница 85: ...Installation manual 2N IP Force 85 118...
Страница 86: ...Installation manual 2N IP Force 86 118...
Страница 87: ...Module setting...
Страница 89: ...Security Relay...
Страница 94: ...Installation manual 2N IP Force 94 118 Connection...
Страница 98: ...Installation manual 2N IP Force 98 118...
Страница 99: ...Installation manual 2N IP Force 99 118...
Страница 112: ...Installation manual 2N IP Force 112 118 Flush mounting Plasterbo ard mounting Flush mounting with box...
Страница 118: ...Installation manual 2N IP Force 118 118...


