Installation manual 2N® LTE Verso
178
/
213
•
•
•
Function:
The
2N
®
Security Relay
is
a device installed between an intercom (outside the
secured area)
and the electric lock (inside the secured area).
The
2N
®
Security
Relay
includes a
relay that can
only be activated if the valid opening code is received from the intercom.
Specifications:
Passive switch: NO and NC contacts, up to 30 V / 1 A AC/DC
Switched output:
Where the security relay is fed from the intercom, 9 to 13 V DC is available on the output
depending on the power supply (PoE: 9 V; adapter: source voltage of minus 1 V) / 400 mA
DC.
Where the security relay is fed from an external power supply, 12 V / 700 mA DC is available
on the output.
Dimensions: (56 x 31 x 24) mm
Weight: 20 g
Installation:
Install
the
2N
®
Security
Relay
onto
a two-wire cable between the intercom and
the electric
lock
inside the area to be secured (typically behind the door). The device is
powered and
controlled
via this two-wire cable and so can be added to an existing installation.
Thanks to
its compact
dimensions, the device can be installed into a standard mounting box.
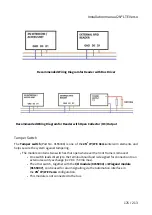
Connection:
Connect
the
2N
®
Security
Relay
to
the intercom as follows:
To the intercom active output (OUT1)
Connect the electric lock to
the
2N
®
Security
Relay
output
as follows:
Содержание LTE Verso
Страница 1: ...Installation manual 2N LTE Verso v 1 6 www 2n com ...
Страница 73: ...Installation manual 2N LTE Verso 73 213 Flush mounting box mounting plasterboard ...
Страница 74: ...Installation manual 2N LTE Verso 74 213 ...
Страница 75: ...Installation manual 2N LTE Verso 75 213 Flush module mounting ...
Страница 76: ...Installation manual 2N LTE Verso 76 213 ...
Страница 77: ...Installation manual 2N LTE Verso 77 213 ...
Страница 78: ...Installation manual 2N LTE Verso 78 213 Surface module mounting ...
Страница 79: ...Installation manual 2N LTE Verso 79 213 ...
Страница 80: ...Installation manual 2N LTE Verso 80 213 ...
Страница 81: ...Installation manual 2N LTE Verso 81 213 2 2 2 Two Modules Boxes Flush mounting box mounting classic bricks ...
Страница 83: ...Installation manual 2N LTE Verso 83 213 ...
Страница 84: ...Installation manual 2N LTE Verso 84 213 Flush mounting box mounting plasterboard ...
Страница 85: ...Installation manual 2N LTE Verso 85 213 ...
Страница 86: ...Installation manual 2N LTE Verso 86 213 Flush module mounting ...
Страница 87: ...Installation manual 2N LTE Verso 87 213 ...
Страница 88: ...Installation manual 2N LTE Verso 88 213 ...
Страница 89: ...Installation manual 2N LTE Verso 89 213 Surface module mounting ...
Страница 90: ...Installation manual 2N LTE Verso 90 213 ...
Страница 91: ...Installation manual 2N LTE Verso 91 213 ...
Страница 93: ...Installation manual 2N LTE Verso 93 213 ...
Страница 96: ...Installation manual 2N LTE Verso 96 213 Flush mounting box mounting plasterboard ...
Страница 97: ...Installation manual 2N LTE Verso 97 213 ...
Страница 98: ...Installation manual 2N LTE Verso 98 213 ...
Страница 99: ...Installation manual 2N LTE Verso 99 213 Flush module mounting ...
Страница 100: ...Installation manual 2N LTE Verso 100 213 ...
Страница 101: ...Installation manual 2N LTE Verso 101 213 ...
Страница 102: ...Installation manual 2N LTE Verso 102 213 ...
Страница 103: ...Installation manual 2N LTE Verso 103 213 ...
Страница 104: ...Installation manual 2N LTE Verso 104 213 Surface module mounting ...
Страница 105: ...Installation manual 2N LTE Verso 105 213 ...
Страница 106: ...Installation manual 2N LTE Verso 106 213 ...
Страница 107: ...Installation manual 2N LTE Verso 107 213 ...
Страница 108: ...Installation manual 2N LTE Verso 108 213 2 2 4 Three Modules Box Flush mounting box mounting classics bricks ...
Страница 109: ...Installation manual 2N LTE Verso 109 213 ...
Страница 111: ...Installation manual 2N LTE Verso 111 213 Caution Break off the side protrusions when the walling material has hardened ...
Страница 112: ...Installation manual 2N LTE Verso 112 213 Flush mounting box mounting plasterboard ...
Страница 113: ...Installation manual 2N LTE Verso 113 213 ...
Страница 114: ...Installation manual 2N LTE Verso 114 213 Flush module mounting ...
Страница 115: ...Installation manual 2N LTE Verso 115 213 ...
Страница 116: ...Installation manual 2N LTE Verso 116 213 ...
Страница 117: ...Installation manual 2N LTE Verso 117 213 ...
Страница 118: ...Installation manual 2N LTE Verso 118 213 Surface module mounting ...
Страница 119: ...Installation manual 2N LTE Verso 119 213 ...
Страница 120: ...Installation manual 2N LTE Verso 120 213 ...
Страница 121: ...Installation manual 2N LTE Verso 121 213 ...
Страница 123: ...Installation manual 2N LTE Verso 123 213 ...
Страница 124: ...Installation manual 2N LTE Verso 124 213 ...
Страница 126: ...Installation manual 2N LTE Verso 126 213 ...
Страница 127: ...Installation manual 2N LTE Verso 127 213 Flush mounting box mounting plasterboard ...
Страница 128: ...Installation manual 2N LTE Verso 128 213 ...
Страница 129: ...Installation manual 2N LTE Verso 129 213 Caution Break off the side protrusions when the walling material has hardened ...
Страница 130: ...Installation manual 2N LTE Verso 130 213 ...
Страница 131: ...Installation manual 2N LTE Verso 131 213 Flush module mounting ...
Страница 132: ...Installation manual 2N LTE Verso 132 213 ...
Страница 133: ...Installation manual 2N LTE Verso 133 213 ...
Страница 134: ...Installation manual 2N LTE Verso 134 213 ...
Страница 135: ...Installation manual 2N LTE Verso 135 213 ...
Страница 136: ...Installation manual 2N LTE Verso 136 213 Surface module mounting ...
Страница 137: ...Installation manual 2N LTE Verso 137 213 ...
Страница 138: ...Installation manual 2N LTE Verso 138 213 ...
Страница 139: ...Installation manual 2N LTE Verso 139 213 ...
Страница 140: ...Installation manual 2N LTE Verso 140 213 2 2 6 Tamper and I O Module ...
Страница 142: ...Installation manual 2N LTE Verso 142 213 2 2 8 Example of Mounting Plate Installation Wall installation ...
Страница 143: ...Installation manual 2N LTE Verso 143 213 ...
Страница 144: ...Installation manual 2N LTE Verso 144 213 Glass surface installation ...
Страница 145: ...Installation manual 2N LTE Verso 145 213 ...
Страница 185: ...Installation manual 2N LTE Verso 185 213 ...
Страница 197: ...Installation manual 2N LTE Verso 197 213 Mounting Adhesive Mount Cable length 2 m ...
Страница 203: ...Installation manual 2N LTE Verso 203 213 ...
Страница 204: ...Installation manual 2N LTE Verso 204 213 1 module Flush mounting ...
Страница 205: ...Installation manual 2N LTE Verso 205 213 2 modules 3 modules ...
Страница 206: ...Installation manual 2N LTE Verso 206 213 2 x 2 modules 3 x 3 modules ...
Страница 207: ...Installation manual 2N LTE Verso 207 213 1 module ...
Страница 213: ...Installation manual 2N LTE Verso 213 213 ...

