1Wing XBow2 Скачать руководство пользователя страница 3


1Wing 

[email protected]


Martin Stobbe 

www.onewing.de


Am Kuchelberg 2 
82266 Inning am Ammersee 

General information 

 tips&tricks 

The build instructions are setup in a way that the XBow may be build in two evening sessions and 
curing happens overnight. Final steps may be completed on the third day. 


Especially with flying wings, accurate CG and slop-free linkages are absolutely critical to 
achieve best performance and handling. Please use the described cross-linkages and no 
RDS/IDS systems. 


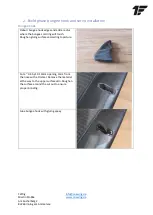
Following the overall concept of an extremely robust model, it is not recommended to install 
8mm wing servos. Slop or broken gears during hard landings is just a matter of time. 


KST X10mini in servo frames with counter bearing are highly recommended. 


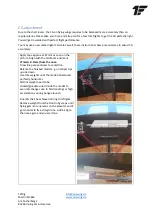
The recommended antenna position, behind the wing has proven to be very reliable. Any 
other antenna installation may induce risk of control link issues. 


During build, please make sure to put the wing on a soft surface to avoid scratches. 


Please put tape around all areas where you are working on to avoid damage to the surfaces. 


We highly recommend 24h gluing epoxy (Uhu Endfest, Araldite, etc.). Thickening (e.g. with 
Thixo) may help with proper installation of the control horns.  


Any glue remains on carbon surfaces should be removed immediately e.g. with Q-tips and 
Alcohol (Isopropanol). Acetone may render the clear carbon surfaces matte. 


There are very different clear tape qualities. We highly recommend 

Tesa Kristall


Magnetic switches (e.g. Zepsus Nano) make your life easier. 


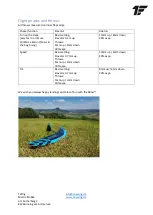
Clear carbon surfaces heat up significantly in direct sunlight. Installed electronics and battery 
cells may get damaged. Please protect your model when not in use.  


Flying wings without fuselage should be best launched with a little unconventional grip. 
Thumb on top, four fingers below the wing. Please see the video: 
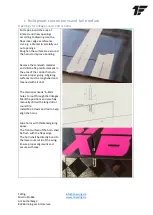
https://youtu.be/J36w8RoruNk


Content of this kit 

1.


Wing 

2.


Tail 

3.


Carbon tubes for tail boom interface:  

1x 10x9x8mm 
1x 9x8x38mm 
1x 8x6x38mm 

4.


Tail boom (1 spare) 

2x 10x9x100mm 

5.


2x carbon control horns 

6.


Carbon bungee hook 

7.


3x 60g self-adhesive weight 

8.


Carbon sheet material for hatches 

Содержание XBow2

Страница 1: ...1Wing info onewing de Martin Stobbe www onewing de Am Kuchelberg 2 82266 Inning am Ammersee Build instructions XBow ...

Страница 2: ...this kit are no toys Please follow local law and make sure to have suitable insurance 1Wing is not able to ensure proper build and safe operation and thus does not take liability for any material or non material damage resulting from using their products Version history 14 06 2020 V0 9 Pre release 15 06 2020 V0 91 Auswiegen bebildert 24 06 2020 V0 92 Schwerpunkt und Ausschläge geändert Anlenkungsa...

Страница 3: ...ace to avoid scratches Please put tape around all areas where you are working on to avoid damage to the surfaces We highly recommend 24h gluing epoxy Uhu Endfest Araldite etc Thickening e g with Thixo may help with proper installation of the control horns Any glue remains on carbon surfaces should be removed immediately e g with Q tips and Alcohol Isopropanol Acetone may render the clear carbon su...

Страница 4: ...nding Remove the sandwich material and silicone flap reinforcement in the area of the control horns to ensure proper gluing All gluing surfaces must be roughened and Cleaned with alcohol The main spar needs 6 8mm holes to rout through the linkages Mark the positions and carefully manually drill with a long drill or round file Install M2 5 clevis and rod to help align the horns Glue horns with thic...

Страница 5: ...lean with alcohol Apply thickened gluing epoxy to the wing opening Make sure to put some epoxy to the radii as well to reinforce the area Glue 8mm tube into 9mm tube Glue the 10mm tube to the 9mm tube in a way that 12mm remain for the actual connection to the tail boom Put epoxy to the remaining roughened tube area as well and slide the tube into the wing opening Remove excessive epoxy with alcoho...

Страница 6: ...e hook Deburr bungee hook edges and add a radius where the bungee cord ring will touch Roughen gluing surfaces according to picture Cut a 3 4 by 12 13mm opening 3mm from the nose with a Dremel Remove the material al the way to the upper surface skin Roughen the surface around the cut out to ensure proper bonding Glue bungee hook with gluing epoxy ...

Страница 7: ...p Clevis s need to be cut out to allow required throws Put the servos to the planned positions and cut linkages to the appropriate length Servos need to be slid in from center opening Treat servo surfaces with release agent an install them to the servo frames Roughen and clean servo frame and wing gluing areas Apply gluing epoxy to all gluing surfaces Install linkages and secure servos in position...

Страница 8: ...installed with 4 5 tight wraps with Tesa Kristall clear tape During hard landings this allows the tail to rotate and prevents damage The carbon sheet is laminated in a mold Please use the designated positions of the openings to get perfectly rounded hatches following the original surface RC and servo openings may be copied to tape with a pencil Cut out the template with scissors and apply to the c...

Страница 9: ...CG accurately Apply tape approx at 87mm as seen on the picture Align with the tail boom and mark 87mm 0 5mm from the nose Draw line perpendicular to centerline Balance the finished model e g on caliper tips upside down Use trim weights until the model is balanced perfectly horizontal All trim weight need to be sticked glued secured inside the model to avoid CG changes due to hard landings or high ...

Страница 10: ...slope very fast on roll use 10 8mm aileron throws in the beginning Basic setting Elevator 1mm up Throws 6mm up 5mm down 30 expo 13mm up 8mm down 30 expo Speed Basic setting Elevator 0 7mm up Throws 6mm up 5mm down 30 expo 10mm up 6mm down 30 expo DS Basic setting Elevator 0 7mm up Throws 5mm up 3mm down 30 expo 8mm up 4mm down 30 expo We wish you always happy landings and a lot of fun with the XBo...

Отзывы: