


P. 6
Fxbox 2.0 User Manual
1/22/19
3:54 PM
v. 2.0
Copyright ©1010music LLC 2019
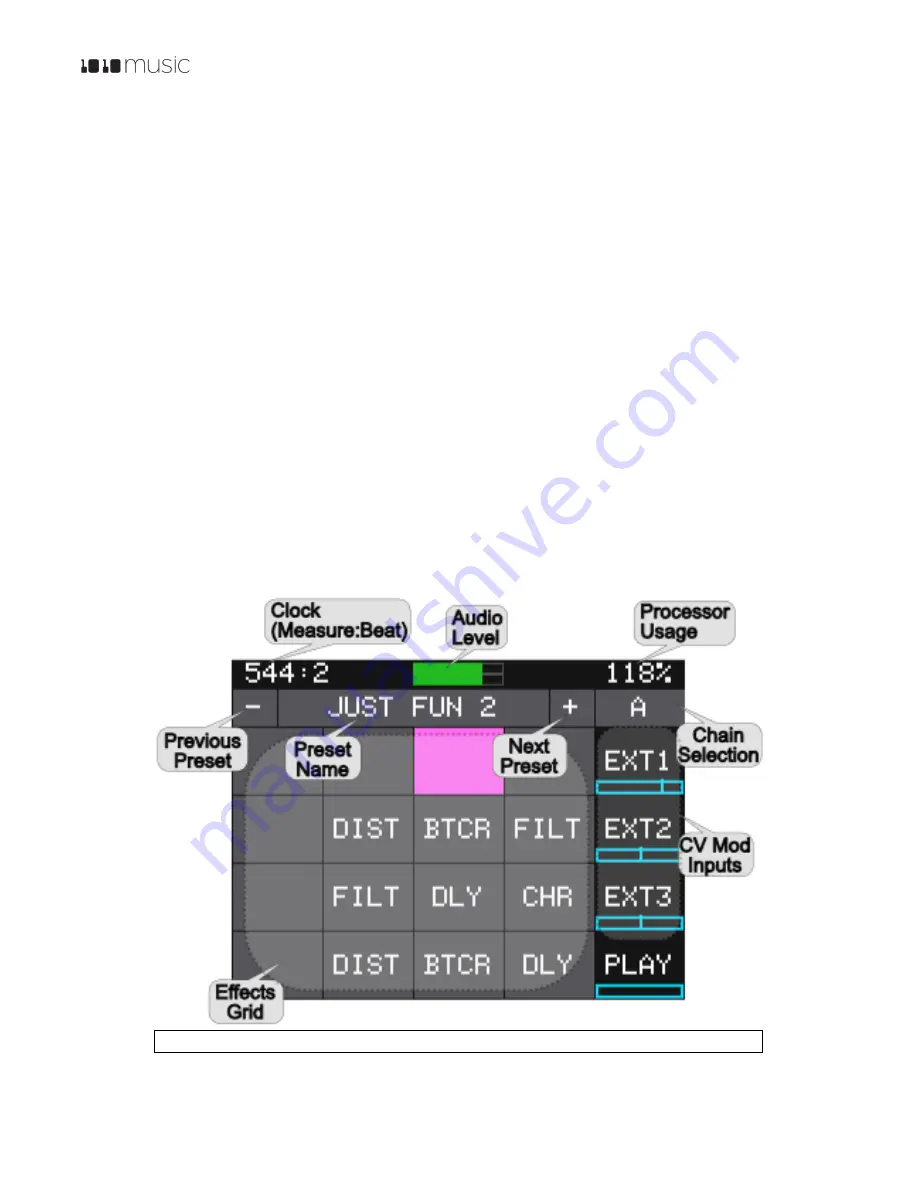
Main Screen Overview
The fxbox Main screen shows a grid of up to 16 effects that have been selected for the current effects chain. The effects are
applied by the signal processing chain in the order displayed in the grid, starting in the top left corner and moving from left
to right, and top to bottom. Each grid square will show a blue bar across the bottom when that effect is active. The name
above the grid is the name of the currently selected preset. Touch the
+
and
–
icons on either side of the preset name to
navigate through the list of presets in alphabetical order, or touch the name of the preset to scroll through the list of presets
and access other preset management features.
The
A
or
B
button to the right of the preset name indicates which effects chain is currently displayed. Touch this letter to
access the Chain Management screen to switch to the other chain or to configure the inputs to the chains. Above the preset
name, in the top left corner is the running clock in the format measure:beat. Reset the measure counter by powering down
the module, stopping the CV clock input for a few seconds, or sending a MIDI Start signal.
To the right of the clock display you will see a bar graph and a percentage. The bar graph represents the levels of the
incoming audio signals: the top bar represents In1, and the bottom bar is In2. When this graph turns red, the signal is
overdriving the system and could result in clipping. The percentage number represents the current processor usage. Fxbox
gives you a lot of flexibility in choosing how to combine the effects to get the sound you want. However, some combinations
could start to overdrive the processor. If this percentage approaches or exceeds 100%, you should consider disabling one or
more effects in order to avoid potential audio glitches.
Down the right side of the Main screen there are three boxes that correspond to the top three external inputs that can be
used as modulation signals. The blue bar at the bottom of these cells shows the current state of the CV input, with 0V at the
middle of the graph. Below these external modulator cells is the
Play
button that controls the effects sequencer. The CV
input associated with the Play button can be used to trigger playback and can be used as EXT4 for modulation. The CV
inputs for the column of cells just to the left of the EXT1-3 and Play buttons can also be used as modulation signals.
Figure 3: Main Screen Overview


