background image

14

15

Device and Installation

1. Installation

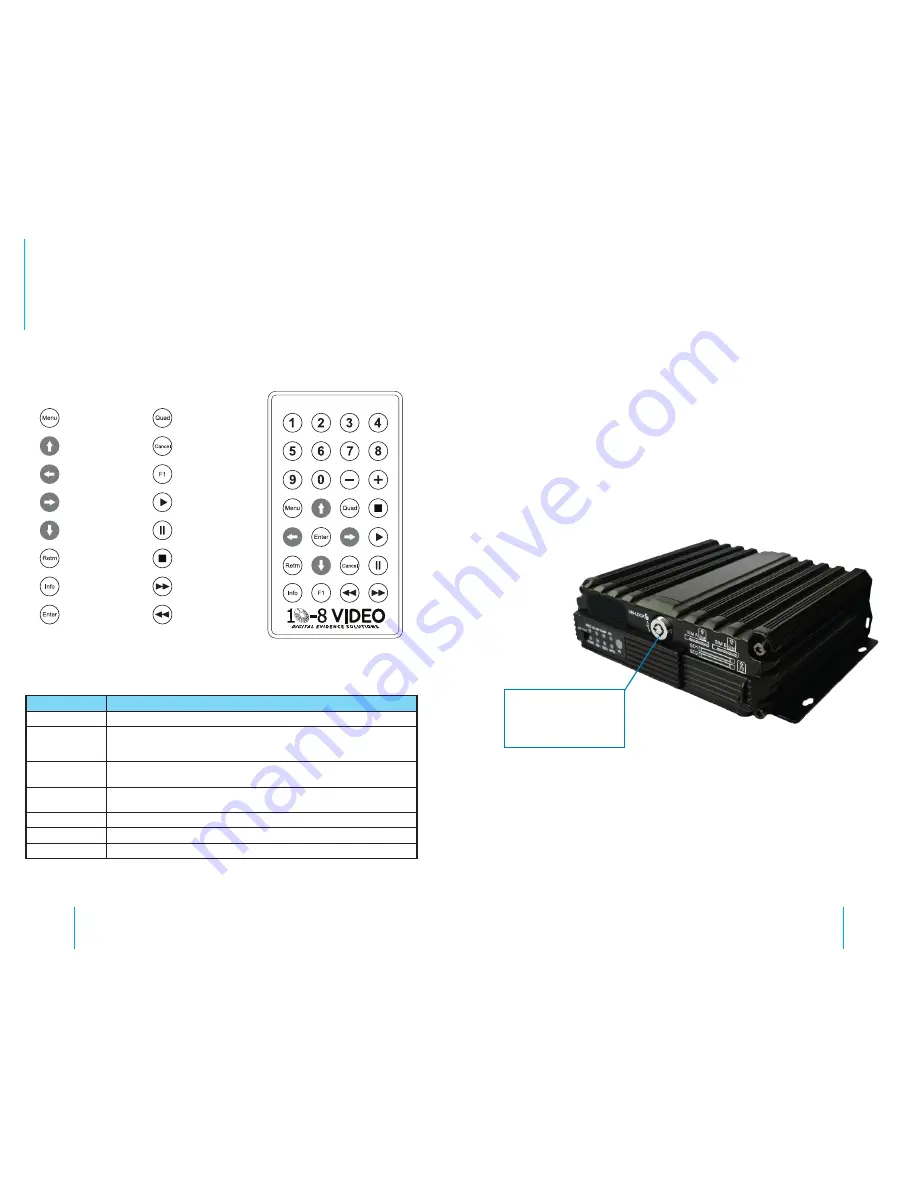
FIG. 2

DVR Remote

FIG. 3

Electronic Lock

DVR Remote Control

Menu

Up

Left

Right

Down

Return to Previous

Menu

Information

Enter/Select

2 Camera

Split Screen

Cancel

SD Card Info

Play

Pause

Stop

Fast Forward

Rewind

Button

Function

Info

Check Information

Quad  

1,2,3,4

While in the monitor view use the Quad button to switch between the quad (4) 

view(four views at once) and a single view. You can press 1/2/3/4 to display chan

-

nel 1,channel 2, channel 3, and channel 4 respectively while in single view mode.

Retrn

Return to the previous menu and finally exit from the setup menu to the monitoring 

interface.

PLAY

Press this button to start playing (search the video file to be played and select, then 

press the button to play it)

Fast Forward

Forward in four (4) modes: 2X, 4X, 8X, 16X

Rewind

Rewind in four (4) modes: 2X, 4X, 8X, 16X

F1

The F1 button starts a functionality test

Hardware: Installation

As  indicated  on  the  panel, 

use  the  supplied  key  to  turn 

the  electric  lock  clockwise  to 

unlock and open the protective 

cover.

Turn the electric lock located on the front panel counter-

clockwise to unlock it and open the protective cover.

Step 1: 

Open the protective cover.

Содержание HD4SD

Страница 1: ...2016r1 Installation User Manual 10 8 HD4SD 4 Ch Dual SD HD MDVR ...

Страница 2: ...nce Solutions reserves the right to make changes in specifications at any time and without notice The information provided by this document is believed to be accurate and reliable However no responsibility is assumed by 10 8 Video Digital Evidence Solutions for its use nor any infringements of patents or other rights of third parties resulting from its use No license is granted under any patents o...

Страница 3: ...ic Setup Interface 31 Step 3 Channel Mode 32 Step 4 Sub Stream Setup WiFi Option Only 34 Step 5 Recording Schedule 35 Alarm Setup 36 Step 1 Enter the Alarm Setup interface 36 Step 2 Sensor Setup 37 Step 3 Speed Setup 38 Step 4 G Sensor Setup 39 Step 5 Temperature Setup NOT currently used 40 Step 6 Motion Detection Setup NOT currently used 41 Step 7 Linkage Setup 42 Software Configuration Configura...

Страница 4: ...ation to prevent a short circuit 2 Power off the device before connecting any peripheral 3 Do NOT touch the power supply or device with wet hands 4 Do NOT spray any liquid on the device to prevent an internal short circuit or fire 5 Do NOT place any other device directly on top of the camera s 6 Do NOT disassemble the housing without authorization to avoid damage electrical shock or possible death...

Страница 5: ... in case of power failure Built in 3G 4G network GPS WiFi optional Supports two 2 SD cards each 128 GB capacity Scales well with 1 RS485 interface and 2 RS232 interfaces 8V 36V wide voltage supply 12V POE power supply supported Good shock resistance easy installation and 360 installation supported High low temperature resistant operates from 13 F to 158 F Technical Specifications Item Parameter De...

Страница 6: ...ze vehicle information in the file CMS The centralized management software can preview upload and center command issuance and parameter configuration Software Upgrade This device can be upgraded through its USB 2 0 interface and the CMS Electrical Specifications Item Parameter Description Power Supply 8 36V 8V 36V Check that the power supply is working within this range before use if it is supplie...

Страница 7: ...12 13 System Schematic NOTE Actual camera appearance may vary from illustration Introduction to Mainframe FIG 1 DVR Mainframe FIG 2 DVR Mainframe Schematic ...

Страница 8: ...channel 4 respectively while in single view mode Retrn Return to the previous menu and finally exit from the setup menu to the monitoring interface PLAY Press this button to start playing search the video file to be played and select then press the button to play it Fast Forward Forward in four 4 modes 2X 4X 8X 16X Rewind Rewind in four 4 modes 2X 4X 8X 16X F1 The F1 button starts a functionality ...

Страница 9: ...28GB for each Then insert the SIM card if equipped with its face up and the cut forward into the SIM slot and press it into place Note the front and back face when inserting the SIM card Depending upon the device s communication configuration install the related SIM card for either the 3G or 4G capabilities if you have purchased one of these options After all the SD cards and SIM cards are install...

Страница 10: ...the device horizontally will ensure it will work even under extreme conditions A horizontal mounting will help protect it against water humidity and condensation collecting in the housing and causing a motherboard short circuit Depending upon your device s options connect the corresponding GPS 3G 4G and or WiFi antenna s to their corresponding interface s see FIG 2 on the rear panel of the MDVR Ke...

Страница 11: ... to negative pulses 5 The wire that connects the power cable harness to the vehicle s battery should be a minimum diameter of φ1 5mm or above Connect the 6 pin white plug to the 6 pin power input port on the rear panel of the MDVR The red and black cables are directly connected to the battery of the vehicle i e positive terminal and negative terminal respectively or to the main power The yellow ca...

Страница 12: ...t to 12v wire that will be Hot when emergency lights are activated Connect to an unused switch in the controller box or if needed a manual switch with 12v This is to allow the officer to activate recording as needed without emergency equipment activated Connect to the green trigger lead coming from the wireless mic charge cradle Blue Mic Trigger Orange Lights Orange Manual SW Orange Wireless Mic T...

Страница 13: ...gs The setup has seven 7 options including General Record Alarm Tools Peripherals Search and System Info as shown in FIG 10 The following section will individually introduce individual settings Software General Setup FIG 10 Setup Menu FIG 11 Basic Setup General Options Menu From the Setup menu select the General option and press the ENTER button to enter the General interface where you can set you...

Страница 14: ... Info Setup Menu DVR Setup General DVR Setup General To ensure your option changes are saved when you are done move your cursor to the Save button and then press the Enter button 1 The report can be found in the CMS client only when the mileage statistic is enabled 2 To ensure your option changes are saved when you are done move your cursor to the Save button and then press the Enter button From t...

Страница 15: ... the US FIG 14 Security Setup Menu FIG 15 Display Setup Menu 1 You can add or delete a user or set user permissions 2 To ensure your option changes are saved when you are done move your cursor to the Save button and then press the Enter button 1 When viewing videos on the screen you can choose whether to have the date time speed HDD temperature vehicle number I O alarm state and GPS information on...

Страница 16: ...thod Step 1 Enter the Recording Setup Interface Step 2 Record Basic Setup Interface FIG 16 Recording Setup Menu FIG 17 Recording Basic Setup Interface 1 When the alarm record option is selected you can set the pre record time alarm record delay time alarm output time and alarm lock time When timing record is selected you MUST set the recording schedule for details see Step 5 2 It s recommended to ...

Страница 17: ... GND 4 V IN Connection Mode Connection Diagram Model 10 8 HD4SD Connection of a single analog camera 4 ways of D1 960H 720P AHD video inputs available Mixed connection of analog and network cameras Max 4 ways of 720P AHD video inputs 1 way of IPC HD video inputs available with connection to a switch also possible Step 3 Channel Mode To ensure your option changes are saved when you are done move yo...

Страница 18: ... be selected Step 4 Sub Stream Setup WiFi Option Only Step 5 Recording Schedule DVR Setup Recording DVR Setup Recording You can set each sub stream to a fixed bit rate CBR or Variable Bit Rate VBR 16 384bit s rates are available 96bit s is the default 1 Either CIF or QCIF is optional for sub stream resolution Currently the maximum CIF real time transmission capabilities are only available via a 3G...

Страница 19: ...ress the ENTER button to enter the sensor alarm options Set the alarm Enable to ON and name the sensor as required Step 1 Enter the Alarm Setup interface Step 2 Sensor Setup DVR Setup Alarm DVR Setup Alarm You can select the video monitoring channel corresponding to this sensor When the alarm is triggered the monitor will automatically pop up this channel and magnify the video image on this screen...

Страница 20: ...s high during braking turning acceleration or collision the sensors will indicate that the threshold value has changed quickly Step 3 Speed Setup Step 4 G Sensor Setup This setting will trigger a recording when the vehicle reaches the set speed Low speed is not used in normal use The G sensor alarm requires calibration when initially set Stop the vehicle on a flat level surface to set it To ensure...

Страница 21: ...ection setting interface 2 Select the first block yellow and then the motion block will change to blue after you press the Enter button confirming its placement 3 Select the second block and press the Enter button The rectangular area formed by the diagonal of these two blocks is shown 4 Press Return to return to the previous menu and press the Save button Step 5 Temperature Setup NOT currently us...

Страница 22: ...on to return to the Alarm Setup menu and then select the Linkage Setup interface This device provides two alarm outputs You can select none output 1 output 2 from the linkage setup menu 12V of high level is generated to drive other optoelectronic devices when the related alarm is triggered For detailed connection methods please refer to the alarm input output cable connection section Step 7 Linkag...

Страница 23: ...DVR to its factory settings Step 1 Configuration Management Software Configuration Software Configuration FIG 28 Accessing the Configuration Interface Configuration Press the RETURN button to return to the Setup Menu and then select the Tools icon Then select the Format icon to enter the Format interface Here you can select the storage medium to be formatted and press the Format button Step 2 Form...

Страница 24: ...here is a log that can be searched for by selecting date time and log type Press the RETURN button to return to the Setup Menu and then select the Search icon to enter the Record Search interface You can play the video files that appear in the search results The calendar days with a green background indicate that there is a log that can be searched by selecting the date time record type and relate...

Страница 25: ...tton on your remote control or enter the setup menu to display the system information using the System Info icon Software System Information Software System Information FIG 32 System Information Workflow System Information This page left intentionally blank ...

Страница 26: ...ailable when it is not within the specified recording time frame 3 Check if the HDD is properly contacted and the HDD on the front panel is lit up 1 Check if the GPS module is indeed present also check if the HDD is installed and properly contacted 2 Check if the GPS antenna is properly contacted and if the antenna is broken The antenna is recommended to be placed in an area having a strong signal...

Страница 27: ...te troubleshooting 1 Check if the device information displays dial up If it does then the traffic for the SIM card may be used up Replace it with a new SIM card 2 Check if the device number has been changed If it has your vehicle information will be reported again to the server 3 If card replacement does not solve the problem check if the device 3G module is faulty Q The device is online but a vid...

Страница 28: ...obe As Needed Test electrical circuits 5 Display Special Tool For device debugging 6 Wire Stripper As Needed For stripping wires 7 Screwdriver As Needed For device maintenance 8 Allen Wrench As Needed For device maintenance 9 Tape Measure As Needed For measurement 10 Cutting Pliers As Needed For cutting 11 Pincer Pliers As Needed For cutting 12 Electric Screwdriver As Needed For device maintenance...

Страница 29: ..._____ Enter Serial Number Here Revision Upgrade Change Description Issue Date Revised By Notes Item Power cord Self Tapping Screws ACC Cable Wire Clips Item Tie Straps Electrical Tape Fire Resistant Cable Housing 10 8 HD4SD Additional Parts Needed Not Included ...

Отзывы: