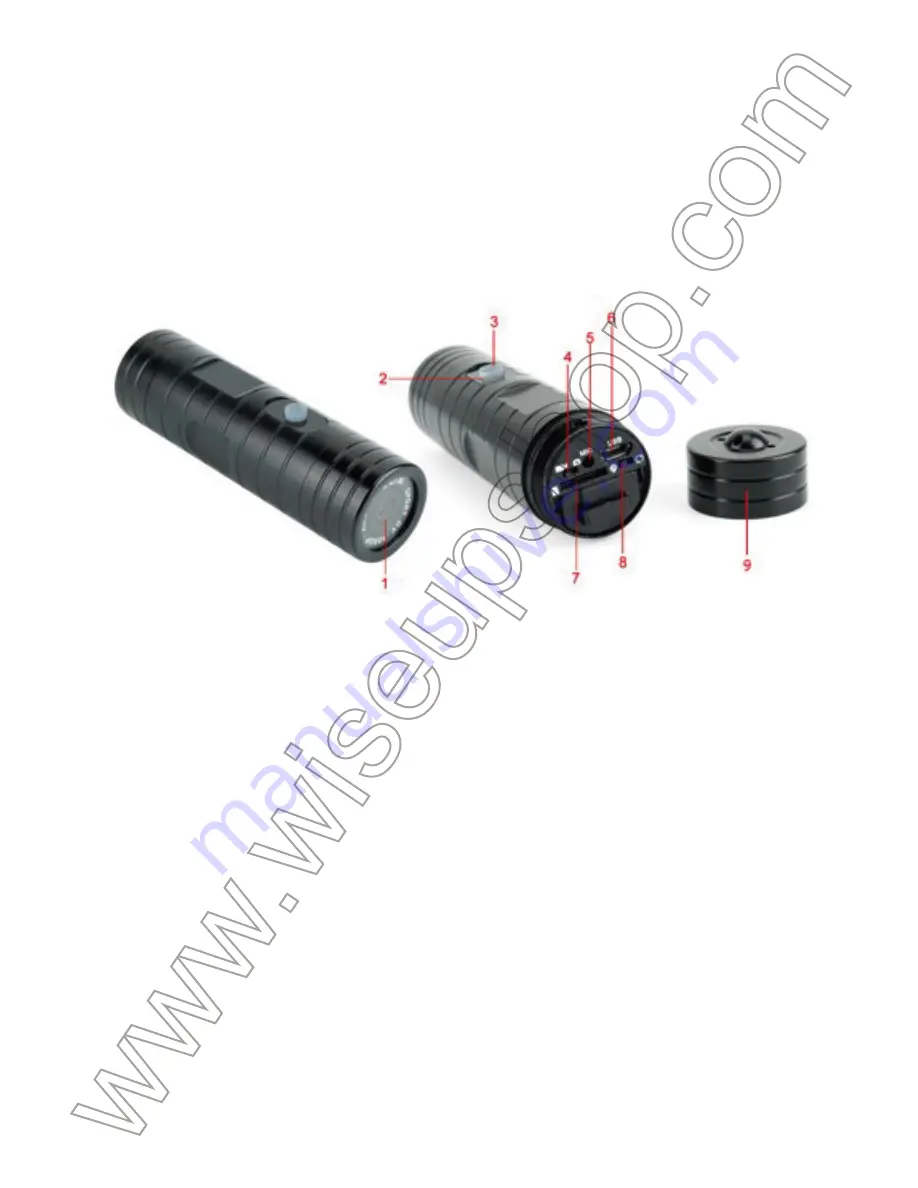
background image

Sport 10

User Guide

I. Product Overview
 

1.Camera Lens
2.Indicator Light
3.Power Button
4.Mode Switch
5.Microphone
6.USB Port
7.Micro SD Card Slot
8.USB Mode Switch
9.Cover

II. What’s in the Box


1. Bike Handlebar Mount
2. Buckle Clip Mount
3. Curved Mount Adhesive Pads
4. AC110-230V to DC 5V Charging Adapter
5. Rubber Seals
6. Scope Mount Ring
7. Backup Waterproof Cover
8. Flat Mount Adhesive Pads
9. Cleaning Cloth
10. Waterproof Action Camera
11. Lanyard
12. USB Cable
13. Helmet Strap Mount 

III. Mounting Instruction

3.1. HELMET STRAP MOUNT

3.1.1. Buckle up the Scope Mount Ring around the sports camera. 

3.1.2. Push the Buckle Clip Mount into the Helmet Strap Mount.  

3.1.3. Screw the Scope Mount Ring onto the Buckle Clip Mount and attach the 
strap to your bike helmet.


3.2. BIKE CAMERA MOUNT

3.2.1. Buckle up the Scope Mount Ring around the sports camera (See 3.1.1).
3.2.2. Push the Buckle Clip Mount into the Bike Handlebar Mount.
 

3.2.3. Screw the Scope Mount Ring onto the Buckle Clip Mount, unscrew the 
bolt on the Bike Handlebar Mount, then install the whole device on your bike 
handlebar and screw the bolt back.


3.3. SURFBOARD CAMERA MOUNT

3.3.1. Buckle up the Scope Mount Ring around the sports camera (See 3.1.1).
3.3.2. Remove one release liner of the double-side adhesive tape and stick the 
tape on the flat mount pad. Push the Buckle Clip Mount into the flat mount 
adhesive pad.

3.3.3. Screw the Scope Mount Ring onto the Buckle Clip Mount, remove the 
other release liner of the double-side adhesive tape and stick the whole device 

on a surfboard.


3.4. MOTORCYCLE HELMET CAMERA MOUNT

3.4.1. Buckle up the Scope Mount Ring around the sports camera. (See 3.1.1)
3.4.2. Remove one release liner of the double-side adhesive tape and stick the 
tape on the curved mount pad. Push the Buckle Clip Mount into the curved 
mount adhesive pad.


3.4.3. Screw the Scope Mount Ring onto the Buckle Clip Mount, take off the 
other release liner of the double-side adhesive tape and stick the whole device 
on a motorcycle helmet.


IV. Camera Operation

>> Please make sure your camera battery is fully recharged before using.
>> Please make sure the Micro SD card (4GB-32GB) has been formatted 

already and is securely fitted into the camera’s SD card slot, or the camera will 
not work. A SDHC Class 10 Micro SD card is recommended. If no Micro SD card 
is fitted into the camera, the indicator light will turn blue and be off in 2 seconds, 
then it will flash red 8 times and turn off again, the camera will shut down 
automatically. 

[Note]:


The camera will shut down automatically if it is in standby mode without any 

operation more than 2 minutes.

4.1. VIDEO RECORDING

4.1.1. Slide the Mode Switch to the video recording position       .
4.1.2. Power on the camera by pressing the Power Button for 2 seconds. The 
camera will vibrate once; the indicator light will flash blue once and then be solid 
blue, indicating the camera has entered into standby mode.
4.1.3. Press the Power Button once to record video. The indicator light will keep 
flashing blue.
4.1.4. Press the Power Button once again to stop recording video. The camera 
will vibrate once and the indicator light will be solid blue, indicating the camera is 
back to standby mode.
4.1.5. Power off the camera by pressing the Power Button for 2 seconds again. 
The camera will vibrate once, the indicator light will flash blue once and then turn 
off.

[Note]:

1). A video file will be generated and saved every 3-6 minutes automatically.
2). The camera can record videos continuously for 3.5 hours on a full charge.
3). Video Format: AVI                                  Video Resolution: 1920x1080P
4). Loop recording is supported.

4.2. CAMERA/STILL PHOTOGRAPHY

4.2.1. Slide the Mode Switch to the camera position     .
4.2.2. Power on the camera by pressing the Power Button for 2 seconds. The 
camera will vibrate once; the indicator light will flash blue once and be solid red, 
indicating the camera has entered into standby mode.

4.2.3. Press the Power Button once. The camera will take a picture every 3 
seconds automatically and the indicator light will flash red once every 3 seconds.
4.2.4. Press the Power Button once again to stop taking photos continuously. 
The camera will vibrate once and the indicator light will be solid red, indicating 
the camera is back to standby mode.
4.2.5. Power off the camera by pressing the Power Button for 2 seconds again. 
The camera will vibrate once, the indicator light will turn blue and then turn off. 

[Note]: 

Picture Format: JPG                         Picture Resolution: 3264x2448


4.3. RECORDING AND CHARGING SIMULTANEOUSLY

4.3.1. Slide the Mode Switch to the video recording position       and slide the 
USB Mode Switch to the charging and recording position    .
4.3.2. Connect the camera to a power bank or an outlet power supply by using 
the USB cable and charging adapter provided.
4.3.3. The camera will be powered on and then start recording automatically. 
The camera will vibrate once, the blue indicator light will flash once and then 
keep flashing.
4.3.4. Press the Power Button once to stop recording video. The camera will 
vibrate once and the indicator light will be solid blue, indicating the camera is 
back to standby mode.

V. Video/Image Files Uploads

5.1. Option One: Using a Card Reader

5.1.1. Power off the camera, remove the Micro SD card and insert it into a card 
reader.
5.1.2. Insert the card reader into a proper PC computer USB port.
5.1.3. The card reader will be recognized as a removable disk drive.
5.1.4. All the files can be accessed in the drive.

5.2. Option Two: Using the USB cable

5.2.1. Power off the camera and slide the USB mode switch to the data transfer 
position    .

5.2.2. Connect the camera to a proper PC computer USB port by using the USB 
cable provided. The indicator light will flash blue once and then keep flashing 
red.
5.2.3. The camera will be recognized as a removable disk drive.
5.2.4. All the files can be accessed in the drive.

VI. Setting Time/Date Stamp and Video Length

6.1. Power off the camera, remove the Micro SD card and insert it into a card 
reader.
6.2. Insert the card reader into a proper PC computer USB port.
6.3. Removable disk drive folder appears.
6.4. Click on the drive in the root directory and inside the root directory, create a 
file named “time.txt”.
6.5. Write the current date, time and desired video length in the “time.txt” file with 
the correct format: for example: 2016.04.12 14:24:32 Y 3. 
"Y" means the time stamp on the video is enabled; "3" means each video length 
will be 3 minutes.
If you don’t need the time stamp, change "Y" into "N" in the “time.txt” file (For 
example: 2016.04.12 14:24:32 N 3). 
If you want to extend video clip's duration time, change 3 into 4, 5 or 6 in the 
“time.txt” file. (For example: 2016.04.12 14:24:32 N 6).
6.6. Save this file and restart the camera. The system will upgrade the program 
automatically.

VII. Charging Only

7.1. Remove the Micro SD card from the camera.
7.2. Connect the camera to an outlet AC power supply by using the USB cable 
and the DC5V charging adapter provided.
7.3. The indicator light will keep flashing red during the charging process.
7.4. It will take 2.5 hours to obtain a full charge.
7.5. The indicator light will be solid red when the camera is fully recharged.

Summary of Contents for Sport 10

Page 1: ...Sport 10 User Guide I Product Overview 1 Camera Lens 2 Indicator Light 3 Power Button 4 Mode Switch 5 Microphone 6 USB Port 7 Micro SD Card Slot 8 USB Mode Switch 9 Cover...

Page 2: ...ip Mount 3 Curved Mount Adhesive Pads 4 AC110 230V to DC 5V Charging Adapter 5 Rubber Seals 6 Scope Mount Ring 7 Backup Waterproof Cover 8 Flat Mount Adhesive Pads 9 Cleaning Cloth 10 Waterproof Actio...

Page 3: ...2 Push the Buckle Clip Mount into the Helmet Strap Mount 3 1 3 Screw the Scope Mount Ring onto the Buckle Clip Mount and attach the strap to your bike helmet 3 2 BIKE CAMERA MOUNT 3 2 1 Buckle up the...

Page 4: ...MERA MOUNT 3 3 1 Buckle up the Scope Mount Ring around the sports camera See 3 1 1 3 3 2 Remove one release liner of the double side adhesive tape and stick the tape on the flat mount pad Push the Buc...

Page 5: ...he curved mount pad Push the Buckle Clip Mount into the curved mount adhesive pad 3 4 3 Screw the Scope Mount Ring onto the Buckle Clip Mount take off the other release liner of the double side adhesi...

Page 6: ...the Power Button once to record video The indicator light will keep flashing blue 4 1 4 Press the Power Button once again to stop recording video The camera will vibrate once and the indicator light w...

Page 7: ...osition 4 3 2 Connect the camera to a power bank or an outlet power supply by using the USB cable and charging adapter provided 4 3 3 The camera will be powered on and then start recording automatical...

Page 8: ...e txt file with the correct format for example 2016 04 12 14 24 32 Y 3 Y means the time stamp on the video is enabled 3 means each video length will be 3 minutes If you don t need the time stamp chang...

Page 9: ...Sport 10 Benutzerhandbuch I Produkt bersicht 1 Kameraobjektiv 2 Kontrollleuchte 3 Netzschalter 4 Modusschalter 5 Mikrofon 6 USB Anschluss 7 Mikro Sd Einbauschlitz 8 USB Modus Schalter 9 Abdeckung...

Page 10: ...ebogene Befestigungsklebepads 4 AC110 230V zum DC 5V aufladenadapter 5 Gummidichtungen 6 Montieren Sie den Ring 7 Unterst tzungs wasserdichte Abdeckung 8 Flachstecker Klebepads 9 Reinigungstuch 10 Was...

Page 11: ...die Schnallenhalterung in die Helmhalterung 3 1 3 Schrauben Sie den Scope Mount Ring auf die G rtelschnalle Clip Mount und befestigen Sie den Gurt an Ihrem Fahrradhelm 3 2 FAHRRAD KAMERA MONTAGE 3 2 1...

Page 12: ...en Sie die Schraube zur ck 3 3 SURFBOARD KAMERA MONTIERUNG 3 3 1 Schlie en Sie den Scope Mount Ring um die Sportkamera siehe 3 1 1 3 3 2 Entfernen Sie eine Abdeckfolie des doppelseitigen Klebebandes u...

Page 13: ...rtkamera Siehe 3 1 1 3 4 2 Entfernen Sie eine Abdeckfolie des doppelseitigen Klebebandes und kleben Sie das Klebeband auf die gew lbte Montageunterlage Dr cken Sie die Schnallen Clip Halterung in die...

Page 14: ...position 4 1 2 Schalten Sie die Kamera ein indem Sie den Netzschalter 2 Sekunden lang dr cken Die Kamera wird einmal vibrieren Blinkt die Kontrollleuchte einmal blau und leuchtet dann blau was bedeute...

Page 15: ...ndem Sie den Netzschalter 2 Sekunden lang erneut dr cken Die Kamera wird einmal vibrieren die Anzeige leuchtet blau und schaltet sich dann aus Anmerkung Abbildungs Format JPG Abbildungs Entschlie ung...

Page 16: ...ra wird als Wechseldatentr ger erkannt 5 2 4 Auf alle Dateien kann im Laufwerk zugegriffen werden VI Einstellung Zeit Datum Stempel und Video L nge 6 1 Schalten Sie die Kamera aus entfernen Sie die Mi...

Page 17: ...ualisiert das Programm automatisch VII Nur aufladen 7 1 Entfernen Sie die Micro SD Karte von der Kamera 7 2 Schlie en Sie die Kamera ber ein USB Kabel und den mitgelieferten DC5V Ladeadapter an eine N...

Page 18: ...emploi I Aper u du produit 1 Objectif de la cam ra 2 Voyant lumineux 3 Bouton d alimentation 4 Commutateur de mode 5 Microphone 6 Port USB 7 Emplacement pour carte m moire sd 8 Commutateur de mode US...

Page 19: ...he 3 Adh sifs de Montage Courbure 4 Adaptateur de charge AC110 230V DC 5V 5 Joints en caoutchouc 6 Bague de Fixation 7 Cache tanche de secours 8 Adh sifs pour Montage Plat 9 Tissu de nettoyage 10 Cam...

Page 20: ...boucle d attache dans le support de sangle de casque 3 1 3 Vissez la bague de montage de la port e sur le support de boucle d attache et attachez la sangle votre casque de v lo 3 2 SUPPORT DE CAM RA D...

Page 21: ...on de v lo et vissez le boulon en arri re 3 3 SUPPORT DE CAM RA SURF 3 3 1 Bouclez le Bague de montage autour de la cam ra de sport voir 3 1 1 3 3 2 Retirer une doublure de la bande adh sive double fa...

Page 22: ...doublure de la bande adh sive double face et coller la bande sur le pad de montage courbe Poussez le Boucle d Attache Clip dans le coussin adh sif de montage courbe 3 4 3 Visser l anneau de montage d...

Page 23: ...secondes la cam ra vibre une fois Le t moin lumineux clignote en bleu une fois puis devient bleu continu indiquant que la cam ra est entr en mode veille 4 1 3 Appuyez une fois sur le bouton d aliment...

Page 24: ...ne fois le voyant devient bleu et s teint Note Format d image JPG R solution de l image 3264x2448 4 3 ENREGISTREMENT ET CHARGEMENT SIMULTAN 4 3 1 Faites glisser le s lecteur de mode sur la position d...

Page 25: ...etirez la carte m moire sd et ins rez la dans un lecteur de carte 6 2 Ins rez le lecteur de carte dans le port USB d un ordinateur appropri 6 3 Le dossier du lecteur de disque amovible s affiche 6 4 C...

Page 26: ...r CA en utilisant le c ble USB et l adaptateur de charge DC5V fourni 7 3 Le t moin lumineux clignote en rouge pendant le processus de charge 7 4 Il faudra 2 5 heures pour obtenir une charge compl te 7...

Page 27: ...Sport 10 Guida utente I Descrizione del Prodotto 1 Camera Lens 2 Spia 3 Pulsante Potenza 4 Interruttore Modalit 5 Microfono 6 Porta USB 7 Slot per scheda micro SD 8 Interruttore modalit USB 9 Coprire...

Page 28: ...e adesivi 4 AC110 230V di adattatore di ricarica DC 5V 5 guarnizioni di gomma 6 supporto di portata dell anello 7 copertura impermeabile Backup 8 Pad piatto Adhesive Mount 9 panno di pulizia 10 Macchi...

Page 29: ...la fibbia clip Monte nel casco cinghia Monte 3 1 3 Avvitare il supporto di portata dell anello sulla fibbia clip Monte e applicare la cinghia per il casco moto 3 2 BIKE CAMERA MOUNT 3 2 1 Allacciate...

Page 30: ...ul manubrio della bici e avvitare il bullone posteriore 3 3 SURF CAMERA MOUNT 3 3 1 Allacciate le cinture il supporto di portata anello intorno alla macchina fotografica di sport vedi 3 1 1 3 3 2 Rimu...

Page 31: ...pporto di portata anello intorno alla macchina fotografica di sport Vedi 3 1 1 3 4 2 Rimuovere una carta protettiva del nastro biadesivo e attaccare il nastro sul tappetino di montaggio curvo Spingere...

Page 32: ...video 4 1 2 Accendere la fotocamera premendo il pulsante di accensione per 2 secondi La fotocamera vibrer una volta la spia lampeggia una volta blu e poi essere blu fisso indicando la telecamera entr...

Page 33: ...ia diventa blu e poi si spegne Nota Formato immagine JPG Risoluzione dell immagine 3264x2448 4 3 REGISTRAZIONE ECONTEMPORANEAMENTE L ORICARICA 4 3 1 Far scorrere il selettore di impostazione sulla pos...

Page 34: ...zza 6 1 Spegnere la fotocamera rimuovere la scheda Micro SD e inserirla in un lettore di schede 6 2 Inserire il lettore di schede in una porta USB del computer corretta PC 6 3 appare cartella sul disc...

Page 35: ...presa di alimentazione CA utilizzando il cavo USB e l adattatore di carica DC5V fornito 7 3 La spia continua a lampeggiare rosso durante il processo di carica 7 4 Ci vorranno 2 5 ore per ottenere una...

Page 36: ...el Usuario I Descripci n del Producto 1 Lente de la c mara 2 Indicador luminoso 3 Bot n de encendido 4 Interruptor de modo 5 Micr fono 6 Puerto USB 7 Ranura para tarjeta micro SD 8 Interruptor de modo...

Page 37: ...as adhesivas de montaje curvadas 4 AC110 230V a la CC 5V que carga el adaptador 5 Banda de Goma 6 Montaje del alcance del anillo 7 Cubierta impermeable de reserva 8 Monte adhesivos Pads Plano 9 Pa o d...

Page 38: ...hebilla en el soporte de la correa del casco 3 1 3 Atornille el anillo de montaje de alcance en el sujetador de hebilla y sujete la correa a su casco de bicicleta 3 2 MONTAJE DE LA C MARA DE LA BICI...

Page 39: ...lar de la bicicleta y atornille el perno hacia atr s 3 3 MONTAJE DE LA CAMARA DE SURF 3 3 1 Cierre el anillo de montaje de alcance alrededor de la c mara deportiva v ase 3 1 1 3 3 2 Retire un revestim...

Page 40: ...ontaje Scope alrededor de la c mara deportiva V ase 3 1 1 3 4 2 Retire un revestimiento de liberaci n de la cinta adhesiva de doble cara y pegue la cinta en la almohadilla de montaje curvada Empuje el...

Page 41: ...c mara presionando el bot n de encendido durante 2 segundos La c mara vibrar una vez La luz indicadora parpadear en azul una vez y ser azul fijo indicando que la c mara ha entrado en modo de espera 4...

Page 42: ...c mara vibrar una vez la luz indicadora se volver azul y luego se apagar Nota Formato de la imagen JPG Resoluci n de la imagen 3264x2448 4 3 GRABACI N Y CARGA SIMULT NEAMENTE 4 3 1 Deslice el interru...

Page 43: ...o 6 1 Apague la c mara retire la tarjeta Micro SD e ins rtela en un lector de tarjetas 6 2 Inserte el lector de tarjetas en un puerto USB adecuado de la computadora de la PC 6 3 Aparece la carpeta de...

Page 44: ...uente de alimentaci n de CA de salida utilizando el cable USB y el adaptador de carga DC5V proporcionado 7 3 La luz indicadora parpadear en rojo durante el proceso de carga 7 4 Se tardar 2 5 horas par...

Page 45: ...Sport 10 I 1 2 3 4 5 6 USB 7 SD 8 USB 9...

Page 46: ...II 1 2 3 4 AC110 230V DC 5V 5 6 7 8 9 10 11 12 USB 13...

Page 47: ...III 3 1 3 1 1 3 1 2 3 1 3 3 2 3 2 1 3 1 1 3 2 2...

Page 48: ...3 2 3 3 3 3 3 1 3 1 1 3 3 2...

Page 49: ...3 3 3 3 4 3 4 1 3 1 1 3 4 2 1 3 4 3...

Page 50: ...IV 4GB 32GB SD SDHC 10 2 8 2 4 1 4 1 1 4 1 2 2 4 1 3 1 4 1 4 4 1 5 2 1 3 6 2 3 5 3 AVI 1920x1080P 4 4 2 4 2 1 4 2 2 2...

Page 51: ...4 2 3 1 3 3 4 2 4 4 2 5 2 JPG 3264x2448 4 3 4 3 1 USB 4 3 2 USB 4 3 3 4 3 4 1 V 5 1 1 5 1 1 5 1 2 USB 5 1 3 5 1 4 5 2 2 USB 5 2 1 USB 5 2 2 USB USB...

Page 52: ...3 5 2 4 VI 6 1 6 2 USB 6 3 6 4 time txt 6 5 time txt 2016 04 12 14 24 32 Y 3 Y 3 3 time txt Y N 2016 04 12 14 24 32 N 3 time txt 3 4 5 6 2016 04 12 14 24 32 N 6 6 6 VII 7 1 7 2 DC5V USB AC 7 3 7 4 2 5...

Reviews: