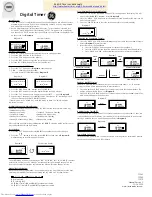
background image

WAREMA Controls

WAREMA Comfort Timer

Operating and installation instructions

(Keep for future use)

Valid from 1st December 2011

890202_b

Summary of Contents for Comfort Timer

Page 1: ...WAREMA Controls WAREMA Comfort Timer Operating and installation instructions Keep for future use Valid from 1st December 2011 890202_b...

Page 2: ...lation instruc tions Head office WAREMA Renkhoff SE Hans Wilhelm Renkhoff Strasse 2 D 97828 Marktheidenfeld Main Germany Postfach 13 55 D 97822 Marktheidenfeld Main Germany Phone 49 0 9391 20 0 Fax 49...

Page 3: ...display mode 17 Notes on operation display 18 Explantion of symbols 19 Programming 21 Setting the time date 22 Setting the product 23 Train 25 Time switch control 26 Dawn dusk control 31 Software vers...

Page 4: ...ammable weekly timer Random operation Dawn dusk control using a dawn dusk sensor or astro pro gram Automatic conversion between summer winter time Integrated EWFS receiver Carry out the following step...

Page 5: ...danger potential they have the following hierarchic structure DANGER warns of an immediately threatening dangerous situ ation Possible consequences may include serious injuries and even death personal...

Page 6: ...devices and is intended for interior installation The approval of the manufacturer must be obtained for uses outside of the purposes listed here The con sequences of unintended use may include person...

Page 7: ...tions The WAREMA Comfort Timer has been safely designed and constructed by our company All required settings are made at initial commissioning Modification of the unit parameters is only required if t...

Page 8: ...ce or store any items in the motion area of automatically operated mechanisms e g ladder to the house wall with articu lated arm awning WARNING Danger conditions malfunctions and property dam age to t...

Page 9: ...this please refer to the Wiring diagrams chapter Lay the relevant lines Do not use lines of a larger size than specified It is advisable to use con duits when laying the motor line Mount and wire the...

Page 10: ...rces e g radiators chimney walls in the vicinity Avoid any position where direct sunlight will shine onto the device as this can affect the legibility of the display Work through the points given belo...

Page 11: ...ontrol panel and the power unit must be removed Do not fit the control panel onto the power unit in an unas sembled state Connect the lines in accordance with the wiring diagram connecting the spring...

Page 12: ...3 Wall mounting Use appropriate anchors and screws for mounting The screw heads must be screwed in flush to the mounting plate otherwise the control panel will not fit correctly If preferred the devi...

Page 13: ...ction cable If the wire are connected incorrectly the brightness evaluation function will not work Insert the connecting cable around the strain relief through the relevant hole in the enclosure The c...

Page 14: ...he right to carry out improvements Disassembly For disassembly grip the time switch on points 1 and 2 Then remove the device from the wall holder in direction 3 Please refer to the following diagrams...

Page 15: ...15 890202_b en 16 11 2011 We reserve the right to carry out improvements 80 0 mm 80 0 mm 54 0 mm Dimensions Fig 6 Dimensions...

Page 16: ...e reserve the right to carry out improvements Wiring diagram L C X1 X2 1 2 N 1 2 3 1 2 3 1 2 3 PE N M 1 PE N L Plug and socket connection H05RR F4G0 75mm2 black 230 V AC 50 Hz 6 A power cable from cus...

Page 17: ...2 Up button raises the sun protection 3 Stop button stops a move command 4 Down button lowers the sun protection 8 Function buttons button Switches the time switch control on and off button Switches t...

Page 18: ...next few pages Please refer to these pages if you need ad ditional help with any of the symbols displayed Mo Menu S 1 2 3 Fig 9 The display in display mode 1 Display of the current weekday 2 Display...

Page 19: ...n active Setting the automated random function Dawn dusk control via astro active Dawn dusk control via sensor active Upward movement Setting the time to raise the sun protection Downward movement Set...

Page 20: ...leced in descending order When this button is pressed an up move ment is triggered When this button is pressed the set values are increased if the but ton is held down the values increase more quickly...

Page 21: ...ckly Values that can be changed are always displayed flashing You can then change the value using the buttons or If you want to save your settings press the button and the set value will stop flashing...

Page 22: ...13 Summer winter time conversion The changeover is carried out in menu 13 Change the current settings using the or buttons and save using the button On The timer switches over automatically between s...

Page 23: ...dio time mode setting This setting means the blind can be turned by pressing the button briefly and lock mode can be started with the run time when the button is held down Menu 17 Setting the product...

Page 24: ...ian blinds for example the slats are turned or with roller blinds these are moved to view ing slits in lengthwise direction Menu 19 Setting the turn time Press or hold the Menu button followed by the...

Page 25: ...but ton Other transmitters can be trained in menus 8 10 To delete a transmitter open the transmitter you want to delete in menus 7 10 Use the or buttons to set the display and save using the button T...

Page 26: ...ay to Friday Mo Fr For an entire calendar week together Monday to Sunday Mo Su For the weekend together Saturday and Sunday Sa Su The settings for the time switch control are carried out in menus 01 t...

Page 27: ...kdays flashes on the display Save the setting using the button The following settings are avail able Mo A single weekday The following time switch commands are only set for that one day Sa Su The foll...

Page 28: ...00 Tip If no lower move command is required you will need to set the value in menus 02 and 03 comes before 00 and after 23 Menus 04 to 05 Setting a raise switch time Press the button until menu 04 ap...

Page 29: ...ect the com mand ON and save using the button Example OFF The automated random function is switched off ON The sun protection will be raised and lowered randomly between 30 minutes earlier and 30 minu...

Page 30: ...r an entire calendar week Mo Tu We Th Fr Sa Su overwrite all switch times for individual days Settings made for a working week Mo Fr overwrite all switch times for individual days Mo Tu We Th Fr The s...

Page 31: ...d You can also set whether or not the move com mand is to be brought forward or extended by up to 60 minutes difference time menu 22 For this function the date time and location must be set correctly...

Page 32: ...k control Switching on the dawn dusk control Press the button Depending on the setting menu 21 either the symbol for dawn dusk control with astro function or the symbol for dawn dusk control with dusk...

Page 33: ...it figure will be shown on the display Please set your location using the or buttons For Germany the first digit is a zero and the other digits are the first two digits of your postal code Exam ple Fo...

Page 34: ...ion is low ered 30 minutes after sunset you need to set 30 Then save using the button Examples The difference function is switched off Positive number The sun protection is only lowered after sunset T...

Page 35: ...ue after which you want the roller shut ter to be lowered Menu 23 Setting the dusk limit value Press or hold the Menu button followed by the button until menu 23 appears Use the or buttons to set a du...

Page 36: ...ht from a street light would enough to block the movement because the limit value will always be reached With the setting 15 on the other hand the sun protection will be lowered at the dusk point bein...

Page 37: ...0 appears The software version will be shown Loading the factory settings You can load the factory parameters in menu 25 All parameters are overwritten with the factory settings Menu 25 Press or hold...

Page 38: ...g to honour warranty claims for product damage In this case li ability for consequential harm to persons or damage to property will also be excluded Follow also the instructions in the operating manua...

Page 39: ...2 MHz Range environment without interference 30 m Enclosure Dimensions in mm W x H x D 80 x 80 x 54 Degree of protection type safety class Degree of protection IP 30 Safety class II Test standards DIN...

Page 40: ...r silver 1002 225 Optional accessories White AP housing 1002 226 Silver AP housing 1002 223 Cover panel green 317 452 EWFS hand held transmitter 1K 1002 551 EWFS hand held transmitter 8K 1002 552 EWFS...

Page 41: ...AREMA Comfort Timer Switch commands are only carried out sporadically Fault due to third party transmitter Switch off third party transmitter e g baby monitor Distance between transmitter and re ceive...

Page 42: ...dawn dusk control inef fectual Dusk sensor is con nected incorrectly Connect the sen sor as described in the Installation section With dusk sensor Sun protection is no longer being raised in the morn...

Page 43: ...ement times of the WAREMA Comfort Timer do not match the pro grammed times Random function is activated Switch off random function menu 06 Automatic conver sion between sum mer winter time is switched...

Page 44: ...India Calcutta 139 India Delhi 140 Indonesia Jakarta 141 Iraq Baghdad Code Country Town 142 Iran Tehran 143 Ireland Belfast 144 Ireland Dublin 145 Iceland Reykjavik 146 Israel Jerusalem 147 Israel Te...

Page 45: ...Barcelona 209 Spain Madrid 210 Sri Lanka Colombo 211 South Africa Cape Town 212 South Africa Johannesburg 213 South Korea Seoul 214 Taiwan Taipei 215 Thailand Bangkok 216 Czech Republic Prague 217 Tu...

Page 46: ...imes ON OFF OFF 07 Train transmitter 106 08 Train transmitter 09 Train transmitter 10 Train transmitter 11 Set clock Hours 12 Set clock Minutes 13 Activate deactivate automatic summer winter time swit...

Page 47: ...47 890202_b en 16 11 2011 We reserve the right to carry out improvements Notes...

Page 48: ......

Reviews: