Viega 8350.33, Instructions For Use Manual
The Viega 8350.33 is an exceptional plumbing fixture designed to deliver top-notch performance and durability. Enhance your plumbing system with ease by following the step-by-step guidance provided in the comprehensive Instructions For Use Manual. Download the manual for free at manualshive.com and unlock the full potential of your Viega 8350.33.
Share
Download


Reviews:
No comments
Related manuals for 8350.33

FANTOM 69202
Brand: Olympia Pages: 2

SLP 68RS
Brand: Sanela Pages: 6

SLP 49S
Brand: Sanela Pages: 6

SLP 03KZ 01033
Brand: Sanela Pages: 8

WECCO SH8V3 6000237502
Brand: Sanela Pages: 6

SANIMARIN 31
Brand: SFA Pages: 44

Bi-Pot 34
Brand: Fiamma Pages: 12

1530
Brand: Gustavsberg Pages: 4

eco
Brand: URIMAT Pages: 4

TIGER WORM TOILET
Brand: Oxfam Pages: 15

OVE K-19950W
Brand: Kohler Pages: 5

VacuFlush
Brand: Dometic Pages: 8
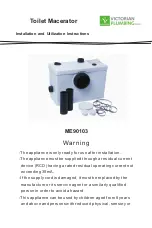
ME90103
Brand: Victorian Plumbing Pages: 7

USWN925 Series
Brand: Toto Pages: 11

TCF801 Series
Brand: Toto Pages: 36

K-3398
Brand: Kohler Pages: 20


