

This sheet covers the installation of the Valerus™ Application Servers, Recording Servers (NVRs)
and Client Viewing Stations. This system should only be installed by a qualified technician using
common hand tools and approved materials in accordance with the National Electrical Code
ANSI/NFPA 70, state and local wiring codes.
These units meet requirements for an FCC Class A computing device. Vicon requires the use of line
conditioners, voltage regulators and uninterruptible power supply (UPS) systems in the electrical power
service.
There will be a folder that contains Vicon Valerus documentation on the desktop.
Refer to Vicon’s website to assure you have the most current
documentation,
www.vicon-security.com/products/valerus-vms/
.
Refer to the full Valerus manual XX285, for information on
setting up and using Valerus.
Note: Mother boards are subject to change; the current rear panel
may differ slightly but will be similar.
VALERUS HARDWARE/SOFTWARE
QUICK START USER’S GUIDE
SOFTWARE INSTALLATION
Running the Application for the First Time
Being a fully web-based solution, browse to the Valerus
Application/Web Server. Either enter the IP address or,
if your network has defined server names, browse to
that computer’s name. The Application Server can be
either a dedicated unit or a Recording Server defined
as an All-In-One unit that runs both the Application
and Recording Server for the system.
If a dedicated Application Server (Model VLR-APPSRV)
was purchased, this is the Application Server. If the
system only includes one or multiple Recording
Server(s), one of the Recording Servers must be defined
as an All-In-One server from the Valerus Launcher.
The Valerus Launcher can be accessed from the
Windows Start menu.
Two icons will be on the desktop
after installation. Click the “Play Me” icon to watch a
clip on Valerus installation. The “Docs” folder contains
all pertinent Valerus documentation.
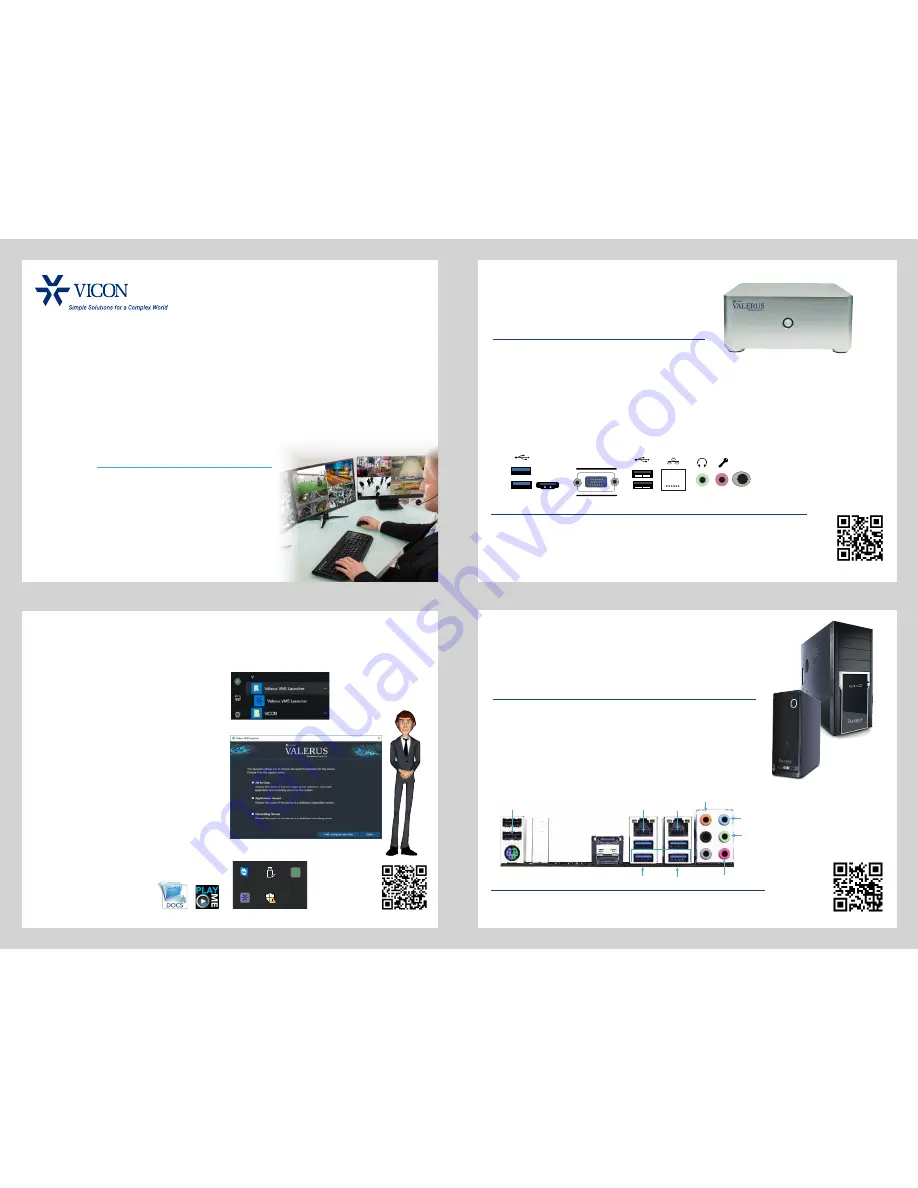
MINI DESKTOP SERVER
Scan for more information
Front Panel
Power button -
Used to power on the unit.
Rear Panel
Network Port:
A
standard RJ-45 connector used to connect to a LAN/WAN.
USB Ports:
Used to connect to USB devices such as a mouse, keyboard, printer, flash drive, etc.
HDMI:
Connect to a monitor with an HDMI connection.
VGA:
Connect monitor with a VGA connection.
Speaker Out, Mic In Jacks:
Used to connect audio devices and microphones.
Power Receptacle:
Used to connect the provided external power cable.
Mounting
The desk or table must provide a surface of suitable strength for the unit’s weight. In addition, there must be area left around the cabinet
to provide suitable airflow for cooling. Do not place heavy items on the cover.
VGA
HDMI
DC 12V
Power Button:
Used to power on the unit.
USB Ports:
Used to connect to USB devices such as a mouse, keyboard, printer, flash drive, etc.
Audio Ports:
For microphone and speaker.
Network Port:
A standard RJ-45 connector used to connect to a LAN/WAN.
USB Ports:
Used to connect to USB devices such as a mouse, keyboard, printer,
flash drive, etc.
HDMI:
Connect to a monitor with a HDMI connection.
Speaker Out, Mic In Jacks:
Used to connect audio devices and microphones.
Power Receptacle:
Used to connect the provided power cable.
DESKTOP SERVERS
USB
(2; 2.0/1.1)
Network
(RJ-45 not used)
Network
RJ-45
Speakers OUT
Line IN
Line OUT
USB
(4; 3.0/2.0)
MIC
Scan for more information
Scan for more information
Mounting
The desk or table must provide a surface of suitable strength for the unit’s weight. In addition, there must be
area left around the cabinet to provide suitable airflow for cooling. Do not place heavy items on the cover.
Rear Panel Connections
Front Panel Controls and Connections
Mid Tower
Desktop Server Tower
CLICK on the Valerus VMS Launcher
to display the following screen.
Vicon, Valerus and their logos are registered trademarks of Vicon Industries, Inc.
Product specifications are subject to change without notice. Copyright ©2018 Vicon Industries Inc.
All rights reserved. Vicon part number 8009-8285-10-00.
All other trademarks used in this publication are the property of their owners.


