


2. Programming CURRENT TIME (Time Setup)
a. Press the “SET” button once to enter into Time Setup
mode. The icon “SET TIME” will flash.
b. Press the “SET” button again to select the “SET TIME”
mode. With the initial setup, the “12” and “AM” will
flash. NOTE: When changing the Current Time
programming after the initial setup, the “12” may be
replaced by a different hour number.
c. Using the “-” and “+” buttons, advance the hour, paying
special attention to the AM and PM.
d. Press “SET” to save the hour and activate the minutes.
The “00” will flash and either the “AM” or “PM” will be
solid. NOTE: When changing the Current Time
programming after the initial setup, the “00” may be
replaced by different minute numbers.
e. Using the “-” and “+” buttons, advance the minutes.
f. Using the “DAY” button, select the current day of
the week.
g. Press the “ON/OFF” button to save settings or wait
about 10 seconds and the programmed time will be
automatically saved.
3. Programming ON/OFF EVENTS (Event Setup)
a. Press the “SET” button once to enter into Time
Setup mode. The icon “SET TIME” will flash.
b. Press the “+” button to change to the Event Setup
mode. The icon “SET PROGRAM” will flash. The
number “1” will appear in the lower left corner. By
continuing to press the “+” button, it will cycle through
all 8 potential programs. Stop on the program to be
set up.
c. Press the “SET” button to select the “SET PROGRAM”
mode for the program number chosen (1 - 8). The hour
and “AM” or “PM” will flash. With the initial setup the
hour/colon will appear as “- :” on the LCD screen.
NOTE: When changing the ON Event setting after the
initial setup, the dash representing the hour may be
replaced by an actual number.
d. Using the “-” and “+” buttons, enter the hour of the
desired ON time, paying special attention to the AM
and PM.
e. Press the “SET” button to save the hour and activate
the minutes. The minutes represented by either a “--”
or “00” and the “AM” or “PM” will be solid. NOTE:
When changing the ON Event setting after the initial
setup, the dashes or “00” representing the minutes
may be replaced by numbers.
f. Using the “-” and “+” buttons, enter the minutes of the
desired ON time.
g. Using the “DAY” button, enter the desired day(s) of
week for programming to be ON. Choose any
individual day or blocks of days including MO-FR,
SA-SU, or MO-SU.
h. Press the “SET” button to save the ON
programming. With the initial setup the hour/colon
will appear as “- :” on the LCD screen. NOTE: When
changing the OFF Event setting after the initial
setup, the dash representing the hour may be
replaced by an actual number.
i. Using the “-” and “+” buttons, enter the hour of the
desired OFF time, paying special attention to the AM
and PM.
j. Press the “SET” button to save the hour and
activate the minutes. The minutes represented by
either a “--” or “00” and the “AM” or “PM” will be
solid. NOTE: When changing the OFF Event setting
after the initial setup, the dashes or “00”
representing the minutes may be replaced by
numbers.
k. Using the “-” and “+” buttons, enter the minutes of
the desired OFF time.
l. Using the “DAY” button, enter the desired day(s) of
week for programming to be OFF. Choose any
individual day or blocks of days including MO-FR,
SA-SU, or MO-SU.
m. Press the “ON/OFF” button to save settings, or wait
about 10 seconds and the programmed Events will
be automatically saved.
n. Repeat Step 3 to program up to 8 different ON/OFF
Events.
4. REVIEWING, CHANGING and DELETING Events
a. Press the “SET” button once to enter into Time
Setup mode. The icon “SET TIME” will flash.
b. Press the “+” button to change to the Event Setup
mode. The icon “SET PROGRAM” will flash. The
number “1” will appear in the lower left corner. By
continuing to press the “+” button, it will cycle
through all 8 potential programs. Stop on the
program desired.
c. Press the “SET” button to select the “SET
PROGRAM” mode for the program number chosen
(1 - 8).
d. TO REVIEW THE EVENTS, continue to press the
“SET” button and it will cycle through the program
chosen, one setting at a time.
PROGRAMMING INSTRUCTIONS
WA
AV
7-DAY TIMER
ITEM #0608803
MODEL #UTTND002
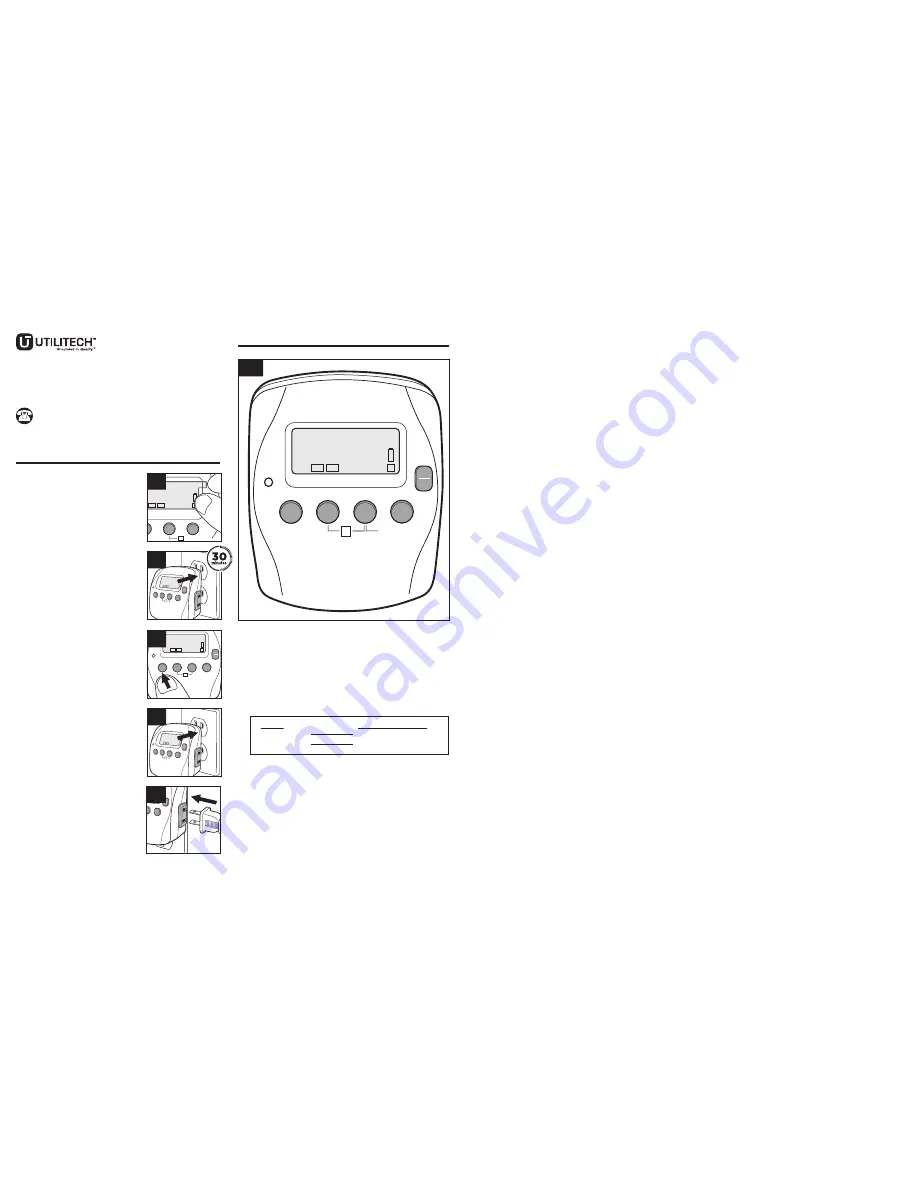
INITIAL SETUP
1. Locate the tab at the top
right of the sticker and pull
to remove sticker from the
face of the screen.
2. Plug the timer into any
outlet for 30 minutes to
charge the internal battery.
3. Unplug and program timer.
4. Plug programmed timer
into an electrical outlet.
Timer will rest against
outlet at a slight upward
angle, making it easier to
see and operate.
5. Attach one device to
the timer. Plug the device
into the outlet on the side
of the timer.
Call customer service at 1-866-994-4148,
8 a.m. - 6 p.m., EST, Monday - Thursday,
8 a.m. - 5 p.m., EST, Friday.
AB141039
SET
DAY
On
Off
+
-
Reset
Random
R
12
:
00
00
8
OFF
ON
SET
TIME
SET
PROG
AM PM
R
MO TU WE TH FR SA SU
1. Entering SETUP MODES
NOTE: There are 2 different setup modes: Time
Setup, where the current time of day should be
entered, and Event Setup, where up to 8 ON/OFF
events are programmed to control attached devices.
The icons for these two events display as follows on
the timer LCD screen:
SET PROG will have a number 1 through 8 after it,
indicating the program being set up.
a. Press the “SET” button once to enter into setup
mode. The icon “SET TIME” will flash.
b. Press the “-” or “+” buttons to move between
“SET TIME” and “SET PROG 1 - 8”.
c. When the desired mode is flashing, press “SET”
to select.
Mode
LCD Screen Icon
Time Setup
SET TIME
Event Setup
SET PROGRAM
1 - 5
P
E
E
AD
SET
Reset
Random
R
On
Off
- +
DAY
12
:
00
00
8
OFF
AM PM
R
MO TU WE TH FR SA SU
SET
TIME
SET
PROG
ON
2
On
Off
DAY
+
R
12
:
00
00
OFF
AM PM
R
TU WE TH FR SA SU
ON
1
SET
DAY
On
Off
+
-
Reset
Random
R
12
:
00
00
8
OFF
AM PM
R
MO TU WE TH FR SA SU
SET
TIME
SET
PROG
ON
3
On
Off
+
DAY
:
00
00
AM PM
R
WE TH FR SA SU
5
SET
Reset
Random
R
On
Off
- +
DAY
12
:
00
00
8
OFF
AM PM
R
MO TU WE TH FR SA SU
SET
TIME
SET
PROG
ON
4


