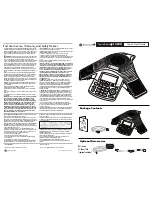
background image

SP

-

115C

User Guide

Summary of Contents for SP-115C

Page 1: ...SP 115C User Guide ...

Page 2: ... IS PREDICTABLE 10 INFRARED EQUIPMENT AND SAFETY 11 ELECTRICAL EQUIPMENT 11 BATTERY AND PARTS 12 INSIDE THE PACKAGE 13 HANDSET DESCRIPTION 14 CELLULAR PHONE 15 IN THE BEGINNING 15 INSTALIMENT OF SIM CARD 15 BATTERY CHARGE 17 PHONE ON OFF 18 START 18 STAND BY SCREEN 20 CALLS 25 MAKING A CALL 25 ANSWERING THE PHONE 25 WHOLE MENUS 26 COMMON SCREENS AND SYSTEM IN VARIOUS MENUS 27 INPUT PHONE NUMBER 27...

Page 3: ...ER EVENT OPTIONS 44 ALARM CLOCK 46 CALCULATOR 47 WORLD CLOCK 48 SETTING WORLD CLOCK 48 GAME 49 4 CAMERA 50 TAKE PICTURE 51 OTHER OPTIONS 52 FIND PHOTO 52 RESOLUTION 52 PHOTO ALBUM 53 IMAGE MANAGEMENT 53 MEMORY 54 5 PHONEBOOK 55 HOW TO ENTER PHONEBOOK 56 FIND ENTRY 57 ADD ENTRY 58 GROUP SEARCH 59 SPEED DIAL 60 MEMORY 61 COPY TO PHONE ALL 62 DELETE ALL 63 OWN NUMBER 64 SERVICE NUMBER 65 ...

Page 4: ...LPAPER 79 IDLE SCREEN 80 GREETINGS 81 BACKLIGHT 82 CONTRAST 83 9 SETTINGS 84 SECURITY 85 HOW TO APPLY OR CANCEL PASSWORD 85 3 TIMES OF WRONG PASSWORD INPUT 86 CHANGE PIN 1 2 87 SETTING FDN ENVIRONMENT 88 SIM LOCK 89 NETWORK 90 CALL WAITING 91 CALL FORWARDING 91 CALL RESTRICTION 92 CALLER ID 93 SELECT MODE 93 PREFEFFED 94 SOUND 95 VOLUME 96 RINGER 96 ALERT MODE 96 KEY TONE 97 ERROR TONE 97 CONNECT ...

Page 5: ...ents 5 POWER ON SOUND 97 POWER OFF SOUND 97 LANGUAGES 98 TIME DATE 99 ANY KEY ANSWER 101 MINUTE MIND 102 KEYPAD LOCK 103 RESET SETTINGS 104 DIRECTIVES OF EUROPEAN UNION 105 DECLARATION OF CONFORMITY 106 WARRANTY 107 ...

Page 6: ...ituated near the electronic switch for hands to reach easily when the battery is charged Do not put the phone in high temperature environment which may cause defects on the phone The warranty on this phone will be invalid if it is repaired by an unauthorized person And its maker does not take responsibility for the breakdown caused afterward Never extract the battery from the phone while turned on...

Page 7: ...7 For Safe Operation Menu 1 Calls 2 STK 3 Organizer 4 Camera 5 Phonebook 6 Messages 7 Games 8 Display 9 Settings ...

Page 8: ...e radio frequency as recommended by European Union board of directors The limit specified above is a frequency allowable in general as a world standard World standard value was developed based on thorough and regular scientific researches and estimation examination by an independence research institution The limit is a standard to search for safety of all regardless of age or present state of heal...

Page 9: ...al RED services are available for this phone For these services however customers are required to join the exchange service For further information on How To Join see below Please remember that using a mobile phone during driving is prohibited Follow the rules as applicable in each country Stop the car in a safe place if you need to answer or use the phone Please always remember the following befo...

Page 10: ... Places Where Explosion Is Predictable In such places as gas stations or chemical factories where explosion is predictable the use of any electric wave equipment is illegal and prohibited Turn off the phone and avoid the use near any gas station Safety In Hospital The mobile phone since designed to transmit electric waves can disturb functions of electric or medical appliances Remember to turn the...

Page 11: ...ose products wearing heart pulsimeter is desired to keep at least 15cm away from the phone to avoid the electric wave If applicable problems still occur as before to the person with heart pulsimeter then the phone shall be turned off The phone can disturb functions of some kind of microphones In this case please contact the manufacturing factory of such microphones for further information Since th...

Page 12: ...to recharge the battery may be different according to several factors such as capacity left type of battery and charger and so on For the better performance of recharge keep suitable temperature The battery although completely recharged can be discharged of itself as the time elapses Unplug the switch of the charger if not used For effective operation of the phone please stand the phone always len...

Page 13: ...13 Handset Battery User Manual User Manual Charger Inside The Package ...

Page 14: ...14 Earpiece LCD Screen Navigation Camera Key Right Selection Key END Power Key Send Key MIC Left Selection Key Earjack Handset Description Camera ...

Page 15: ...tion company may have installed already Note If DIGITAL mobile is used installation state of the SIM card will be displayed If the SIM card is not installed a confirmation paragraph will be displayed 1 Remove the battery after pulling the hook outward with DIGITAL mobile turned off The battery since adhered to the cover will come out as one component ...

Page 16: ...his moment make sure the corner of card fits well on the rim of the hole so to insert the card checking the remaining aspect Insert SIM card as shown in the following figure 3 As for the two holes make sure the cover on the rear fits well to insert the battery Finally keep pressing the lower of the cover till it sounds Tic 4 Pull the hook and insert the cover and the battery Cellular Phone ...

Page 17: ...veral seconds before returning to the previous step your phone is available even during the battery is charged If the phone is turned off display of Battery is being charged will be continuously displayed 2 If the charge is completed the screen will be as shown in the figure To remove the charger hold and press the both ends to extract Cellular Phone ...

Page 18: ...ne when kept in a pocket or luggage Start If PIN enable setting on after the phone is turned on you will be required to input 4 digit password Input correct password and press Select Key In case the phone has been off for long you may be asked to make sure if date and time are correct Note If password is not input only emergency call will be available with SOS Key ...

Page 19: ...they are not correct press edit Key If the date is correct press Select Key If the date is not correct input new date using the number on the Key pad and then if the time is not correct input new time and then press OK Key ...

Page 20: ...nd the menu will not be displayed during this duration After this duration the speed will be back to normal Stand by screen is displayed when the phone is available to answer or use to call Central Part If the phone is not available yet for services bumpy paper type of background is displayed where main menus are displayed here too Lower Part On the top time On the bottom day month year Cellular P...

Page 21: ...of the direction Key in stand by screen state so to display the Messages menu Press the lower of the direction Key in stand by screen state so to display the Special menu Press the left of the direction Key in stand by screen state so to display the Phonebook menu Press the right of the direction Key in stand by screen state so to display the Game menu Press the OK Key in stand by screen state so ...

Page 22: ...in stand by screen state and the call Key next Keep on pressing one number among 2 and 9 and a call to the number as input will be made In the following table various functions are described as applicable when number keys are pressed for short or long in stand by screen state They are company mode and individual mode where a relevant SIM card mode will appear if any password is input in stand by s...

Page 23: ...No 2 speed dial 3 No 3 speed dial 4 No 4 speed dial 5 No 5 speed dial 6 No 6 speed dial 7 No 7 speed dial 8 No 8 speed dial 9 No 9 speed dial 0 No 1 Symbol Symbol Manner Mode Symbol lock keypad Dual SIM card Dual SIM card has 2 passwords and 2 relevant modes respectively ...

Page 24: ...s available sound only vibrate only sound after vibrate sound with vibrate silence Roaming State Displayed while user is in other service area or receiving a call abroad New Message This will be displayed when a new message is received New Multimedia Message Displayed when a multimedia message received New Voice Message Displayed when a new voice message is received Battery Battery charging level ...

Page 25: ... Key and then press End Key Press End Key to finish the call In the stand by state of the phone input number to display the following screen If the inputted phone number is displayed just press Save Key and specify a save folder If SIM card or the memory of the phone is displayed automatically specify a related type of the phone too Refer to the user manual for more detailed procedures Answering T...

Page 26: ...table Icon Menu Description Calls To look through call record and voice messages sent and received Special To use the Function in the SIM card Organizer To use calendar calculator downloading program information on various events meeting birthday etc Camera To deal with camera and image album Phonebook To save phone numbers Messages To read and write text messages Games To select new video games D...

Page 27: ...o the upper line to prepare a space for the next numbers to input During inputting number the screen will be as shown below In order to insert a number between numbers just entered use the direction Key up down left right to move the cursor Press Clear Key to delete the number on the left of the cursor Writer Writer is used to input phone number text or number All kinds of writers phone number num...

Page 28: ...ous Key to go back to the previous step of the screen Press direction Key up down left right to move the cursor to the direction as designated Writer Of Number It is used to input password 1 password 2 and call restricted password Press the following keys to make use of its functions specified Use the keys 0 to 9 to press such number 0 to 9 as applicable Key has no function Key is used to display ...

Page 29: ...letter input In case with Multi Input accompanied this will change the text if once input by user to small letters automatically In case with Smart Input accompanied this will make the first letter be a capital letter and the rest be small letters automatically In case with Number Input 1 number input is available fast Press number 0 to 9 to display 0 to 9 as applicable and press Key to display th...

Page 30: ...t Input In the Expected Input method the method is underlined In case with the two accompanied it will be displayed as below Note Keep on pressing Key in text writer to change to other input method Multi Input Expected Input and Numeric mode Note Keep on pressing Key in text writer to change to symbol input mode ...

Page 31: ... a B b C c 2 Á á À à Ç ç 3 D d E e F f 3 É é È è 4 G g H h I i 4 Í í Ì ì 5 J j K k L l 5 6 M m N n O o 6 Ñ ñ Ó ó Ò ò 7 P p Q q R r S s 7 8 T t U u V v 8 Ú ú Ü ü 9 W w X x Y y Z z 9 0 Space 0 Smart Input This makes fast text input available With the improved technology of Press and Expect a function to expect is realized making use of the dictionary prepared in the language specified In this way th...

Page 32: ...elect those special characters If you select the special character Press select Key to input applicable character Characters available are as follows All the input methods and all the languages available in DIGITAL Mobile have been summarized in the following table Input Type Input Method Mark Language Multi Input Capital AB English Spanish Small ab Capital Small Ab Number 1 Smart Input Capital AB...

Page 33: ...nd by state to display options on main menu 2 Use the direction Key to select a Calls icon 3 Press select Key The Calls option in principal menu will be displayed Missed Calls Received Calls Dialed Calls All Clear Call Log Call Timer 1 Calls ...

Page 34: ... desired and press option Key to display new menu with the following options Send Message Sends a message Short or multimedia to selected number Save Allows you to add new contact to address book conveniently You should specify where to save information and details of contact name phone type etc as described previously in address book options Delete Deletes selected number from call list which nee...

Page 35: ...ll desired and press option Key to display new menu with the following options Send Message Sends a message Short or multimedia to selected number Save Allows you to add new contact to address book conveniently You should specify where to save information and details of contact name phone type etc as described previously in address book options Delete Deletes selected number from call list which n...

Page 36: ...y the following information Select a call desired and press option Key to display new menu with the following options Send Message Sends a message Short or multimedia to selected number Save Allows you to add new contact to address book conveniently You should specify where to save information and details of contact name phone type etc as described previously in address book options Delete Deletes...

Page 37: ...s option Key to display new menu with the following options Send Message Sends a message Short or multimedia to selected number Save Allows you to add new contact to address book conveniently You should specify where to save information and details of contact name phone type etc as described previously in address book options Delete Deletes selected number from call list which needs your confirmat...

Page 38: ...y state press menu Key to display main menu option 2 Use the direction Key to select Calls menu then press select 3 On Calls screen Select Clear Call Log and press select to display the following information Delete Missed Deletes all calls in absence saved Delete Received Deletes all received calls saved Delete Dialed Deletes all sent calls saved Delete All Deletes all the lists of calls saved ...

Page 39: ... Calls screen Select Call Timer and press select to display the following information 5 Press Back Key to go out of this screen 6 Press Reset Key and select desired option on the menu below to set the counter to 0 Zero Last Call Erases the time used for the last call Received Call Erases the accumulated time used for calls received Dialed Call Erases the accumulated time used for calls sent Reset ...

Page 40: ...40 2 STK 1 In stand by state press menu Key to display main menu option 2 Use the direction Key to select STK menu then press select Note It displays the menu that the SIM card could supports ...

Page 41: ...lect Events option and press OK to display the screen where you can add delete or execute an event Follow the procedures below to apply this function 1 On option screen select Add event and press Select 2 Go to the screen where you can select the type of event to specify Alarm Clock Sets an alarm for time Alert Meeting Sets an alarm for meeting Birthday Sets an alarm for birthday Memo Sets an alar...

Page 42: ... to input event date Default is the present date of the phone input numbers directly on the key pad so to specify the date 6 Now Start and End time when the phone operates the alarm of desired event shall be set Use the phone Key directly or Up Down Key to input 7 Now how many times the event will be repeated shall be specified where the following options are available Select a desired option and ...

Page 43: ... a Visual Uses blinking light to operate the alarm b Ring visual Uses sound and light to operate the alarm Select a desired alarm type and press Select to finish all the procedures The following icons will be displayed on the icon bar of the upper screen when you specify the alarm The screen of event alarm is as shown below Note The sound of the time alarm is different from that of the event alarm...

Page 44: ... Next and Previous option Keys will be displayed Today Leads you directly to present event With this option specified select Option and press Select Other Event Options You can execute other operation on calendar menu Select Event option on the displayed screen and press Select Then choose Select and press Select to display the event list arranged based on specified date and its operation time See...

Page 45: ...o you where event options are available however some are not mentioned yet Add Event You can add a event Go To Goes to the date designated on calendar in order to see the event set on the date described Delete Past Events Deletes all the events which happened before today Select this option and press OK Then you will be asked to confirm Delete All Events Deletes all the events specified which will...

Page 46: ...splay main menu option 2 Use the direction Key to select Organizer menu then press select 3 Select Alarm Clock on Organizer menu and press select Key Alarm Select On or Off Time Setting time with number key AmPm Select Am or Pm Today Select Once Monthly Weekly or Daily ...

Page 47: ...ecimal point Use key to make a negative number After desired number is input press up down Navigation key to input the signs of x and Input the first number and then the second number to calculate Te get the result of the calculation press left select Key You can use the acquired result to apply to other calculation with up down navigation key Keys This calculator does not support simultaneous mul...

Page 48: ...y to display main menu option 2 Use the direction Key to select Organizer menu then press select 3 Select World Clock on Organizer menu and press select Key Setting World Clock Save Set DST Setting DST Date Format Select date format D M Y M D Y or Y M D Time Format Select time format 24Hour or 12Hour Date Setting date Time Setting time ...

Page 49: ...elow to go to Games menu 1 In stand by state press menu Key to display main menu option 2 Use the direction Key to select Organizer menu then press select 3 Select Games on Organizer menu and press select Key Snake Repetez Video Poker Game ...

Page 50: ... built in DIGITAL mobile 1 In stand by state press menu Key to display main menu option 2 Use the direction Key to select Camera menu then press select Take Picture To take a picture with DIGITAL mobile Photo Album Displays list of images taken by the built in camera Memory Total and Used memory ...

Page 51: ...t camera controller is located at the rear central upper of the phone and press OK in the center to take a picture Hot Key In stand by screen press camera key on the center of the direction Key to initializ camera mode Take Picture Note Wait a few seconds for the digital sensor to adjust to digital tone of color when starting camera operation which will make the quality of images excellent Sound s...

Page 52: ...zooming function The maximum zooming is available based on the size related environment specified 5 times of zooming will be available as described Brightness can be adjusted higher or lower If you want to apply this function select left selection Key Effectiveness can be adjusted to each mode eg Normal Black and White Sepia etc If you want to apply this function select right selection Key If you ...

Page 53: ...ly to see save or delete images taken but also to change their names as follows Image Management These images will be arranged in date time sequence On the list select any image you want to work on and press Option to display the following menu Delete Deletes selected images Delete All Deletes all images Rename Writes or edits names of images with name writer Wallpaper Image use to wallpaper Photo...

Page 54: ...54 Memory 1 In stand by state press menu Key to display main menu option 2 Use the direction Key to select Camera menu then press select 3 Select Memory on Camera menu and press select Key 4 Camera ...

Page 55: ...cts are saved in SIM memory and phone memory Besides there are two address books 1 Phone Memory Shows all contacts saved in SIM memory and phone memory 2 SIM Memory Shows double saved contacts in both sides and information saved in SIM memory only A special icon represents each contact In this way SIM contact uses SIM card shaped icon and the next icon is used for phone contact The followings are ...

Page 56: ...sired and press Call Key Or find the entry to call directly on the list Press only the first letter of the contact desired to call to display in alphabetic order all the names which have the letter in front Press option Key up down any Key if selected and kept on pressing the selected one keeps on going up or down to show option list which can be selected The options are as follow Find Entry Add E...

Page 57: ...e contact name to find If written the applicable name with the same characters is displayed Now you may search up and down to find the name on the list For example press No 2 Key to fast reach names with the first character of C If there is no name with such a character the Key will show names with the next character in alphabetical order Find Entry Delete All Own Number Service Numner Smartcom Th...

Page 58: ...this operation you should make it first in SIM or phone address book and then copy the contact to address book next Select In phone memory to make contact in address book Select In SIM memory to save contact in card Select option as desired and press Select Key Note Press asterisk to specify phone using capital or small letters or shortcut Key Ab change capital to small 1 number AB all capital ab ...

Page 59: ...up is classified into family friends co workers etc you may use this option conveniently to send the same message to all the members of a specific group as classified Specify groups as applicable to receive group messages Up to 8 groups available Input number with numeric keys and then press OK Key to save this number in memory and to display option screen of type From here select the type of the ...

Page 60: ...ction Key to select Phonebook menu then press select 3 Select Speed Dial on Phonebook menu and press select Key If this option is applied you can make a fast call Select number and then press it to make a fast call thereto in stand by state Individual phone number can be set to each number Key of 2 to 9 ...

Page 61: ...o select Phonebook menu then press select 3 Select Memory on Phonebook menu and press select Key This option is used to confirm the capacity and the condition of SIM card or phone memory On the state window the following information is provided Phone Memory up to 100 available SIM card Memory up to 40 available ...

Page 62: ...enu Key to display main menu option 2 Use the direction Key to select Phonebook menu then press select 3 Select Copy To Phone all on Phonebook menu and press select Key Used to copy selected contact You should copy only the name and number of contact as expected ...

Page 63: ...ss menu Key to display main menu option 2 Use the direction Key to select Phonebook menu then press select 3 Select Delete All on Phonebook menu and press select Key Deletes all contacts saved in selected address book All Phonebook Phone SIM or Group ...

Page 64: ... SIM card Select My Number option on the phone call service menu and press Enter to have access to this function If not informed of this route please ask from the first All the lists of phone numbers belonging to Own Number will be displayed For example cell phone number fax number etc Press Select a Add Adds new phone number onto list b Edit Writes or changes name added to the specific number or ...

Page 65: ...ate press menu Key to display main menu option 2 Use the direction Key to select Phonebook menu then press select 3 Select Service Number on Phonebook menu and press select Key Select service number then press Call Key Service Number ...

Page 66: ...dures below to connect to message menu 1 Press the left selection Key in background screen 2 In the basic menu screen press select Key while Messages icon is selected The options on this menu are as follow New Message Received Messages Sent Messages Unsent Messages Erase Messages Voicemail Settings CB Message Add New Word The following is about text messages multimedia messages and options related...

Page 67: ...end Only Send a message to a specific receiver only Save Only Saves text which is not yet sent in phone memory Send Save Send message then save message in phone memory Text Template Select message Add Picture Allows user to insert picture in a message Add Animation Allows user to insert animation in a message Add Sound Allows user to insert sound in a message 6 Go to Address writer separately spec...

Page 68: ... to display the received message including senders received date and time and its details See the figure below 5 Press option Key to display message option screen Reply Displays Write Text Screen to replay to the message received Write message as desired If you want to know how to write and send text message SMS refer to New Message Forward Delivers the received message to others Input the phone n...

Page 69: ...phone number Call Makes a call to message senders number Press option Key to display the menu where Save address book Make a call Send number using MMS or SMS and Send SMS MMS message are available This icon means that the message in the Inbox is not read yet This icon means that the message in the Inbox is read already ...

Page 70: ... message menu and press select Key Press View Key to confirm the new text message and press Back Key to return to the previous screen Select Open to display the received message including senders sent date and time and its details See the figure below 4 Press option Key to display message option screen Send Resend this message Delete Delete selected Delete All Delete all messages ...

Page 71: ...and press select Key Press View Key to confirm the new text message and press Back Key to return to the previous screen Select Open to display the received message including senders sent date and time and its details See the figure below 4 Press option Key to display message option screen Send Resend this message Delete Delete selected Delete All Delete all messages Unsent Messages ...

Page 72: ...ss menu Key to display main menu option 2 Use the direction Key to select Message menu then press select 3 Select Sent Messages on Message menu and press select Key All Delete all messages Received Box Delete messages in received box Sent Box Delete all messages in sent box Unsent Box Delete all messages in unsent box ...

Page 73: ...o enter the voice box 1 In stand by state press menu Key to display main menu option 2 Use the direction Key to select Message menu then press select 3 Select VoiceMail on Message menu and press select Key you may hear instructions if connected to the number you joined And if any of those is unavailable an error message will be displayed on screen of the phone In case a call is made to voice mailb...

Page 74: ...Settings on Message menu and press select Key Center Number Specifies number of message center It is the phone number of the center for you to call in order to send or receive messages Its service provider shall specify this number previously Reply Path Makes the application of the center on or off as necessary to send or receive messages Status Report Memory ...

Page 75: ...age menu and press select Key Reception Allows you to receive group messages if this option is selected Default is set to off Channels Defines a channel to receive this kind of messages Select a new channel from the list to display on screen and use option Key to execute If you want to add a new channel to list select any channel and press option Key and then Add Input new channel number to number...

Page 76: ...Message Add New Word 1 In stand by state press menu Key to display main menu option 2 Use the direction Key to select Message menu then press select 3 Select Add New Word on Message menu and press select Key ...

Page 77: ...77 7 Games 1 In stand by state press menu Key to display main menu option 2 Use the direction Key to select Games menu then press select Snake Repetez Video Poker ...

Page 78: ... by state press menu Key to display main menu option 2 Use the direction Key to select Display menu then press select Option list of Settings menu is as shown below Wallpaper Idel Screen Security Greetings Backlight Contrast ...

Page 79: ...lpaper option On wallpapers screen select an image 1 In stand by state press menu Key to display main menu option 2 Use the direction Key to select Display menu then press select 3 Select Wallpaper on Display menu and press select Key 8 Display ...

Page 80: ...Select screen mode 1 In stand by state press menu Key to display main menu option 2 Use the direction Key to select Display menu then press select 3 Select Wallpaper on Display menu and press select Key Idle Screen ...

Page 81: ...n menu option 2 Use the direction Key to select Display menu then press select 3 Select Greetings on Display menu and press select Key Set Select on or off Edit This may or may not show text messages Select a proper option and press OK Select On and press OK to input a text message you want to display on the screen of the phone when it is turned on up to 20 characters available After desired text ...

Page 82: ...lay 5 seconds 10 seconds 15 seconds 30 seconds or Always on 1 In stand by state press menu Key to display main menu option 2 Use the direction Key to select Display menu then press select 3 Select Backlight on Display menu and press select Key ...

Page 83: ...ght direction Key to select contrast 1 In stand by state press menu Key to display main menu option 2 Use the direction Key to select Display menu then press select 3 Select Contrast on Display menu and press select Key 8 Display ...

Page 84: ...Minder Keypad Lock Follow the procedures below to get to Setting menu 1 In stand by state press menu Key to display main menu option 2 Use the direction Key to select Settings menu then press select Option list of Settings menu is as shown below Security Network Sound Languages Time Date Any Key Answer Minute Minder Keypad Lock Reset Settings ...

Page 85: ...ss select 3 Select Security on Settings menu and press select Key How to apply or cancel password Password input screen will appear whenever the phone is turned on if password has been specified Correct password shall be input in order to use the phone See the figure below Note Correct password of 4 digits shall be input 9 Settings ...

Page 86: ...just inputted If PUK number is inputted incorrectly all the procedures above shall be repeated Retrying is available for 10 times More than 10 times will make your card keep locked till repaired only by the communication company While the PIN and PUK is input press SOS Key to connect to emergent call In order to make password required whenever the phone is turned on select PIN lock option and pres...

Page 87: ...rect again the phone will be locked 3 A message will be displayed saying Input new PIN Then input new 4 digit password and press Select 4 A message will be displayed again saying Verify new PIN Then input new 4 digit password again and press OK If they are identical your password has been changed If they are not identical for 2 times a message You must enter same PIN will be displayed which means ...

Page 88: ...ve 3 chances only If the third password is incorrect again the phone will be locked Now press OK Key If PIN 2 is correct FDN call mode will operate and allows the call to be connected only to the number in FDN address If you want to cancel this mode follow the same procedures as above Numbers Specifies the number allowed to call when Only FDN mode is set active which will be saved in FDN address b...

Page 89: ...hecked if identical to SIM code saved in the phone if not identical 112 emergency call mode only is available Select Lock SIM option and press Select to specify Lock SIM card SIM Lock setting screen has the following options On Off Note 3 chances are allowed for you to input correct PCK code If all failed PCK will be locked and you shall turn the phone off and then on Note If you try to turn the p...

Page 90: ... press menu Key to display main menu option 2 Use the direction Key to select Settings menu then press select 3 Select Network on Settings menu and press select Key Call Waiting Call Forwarding Call Restriction Caller ID Select Mode Preferred ...

Page 91: ... call forwarding option and press OK to display call waiting screen All Calls Receives all types of calls selected Busy Receives all calls selected even during you are connected with other phone No Answer The service provider shall specify the number of bells to make In absence mode active if call is not answered Unreachable Receives all calls sent even if out of service area Cancel All Cancels al...

Page 92: ...ess book Select this option and press Enter to display details of address book To Other Number If this option selected calls will be sent to designated number number writer will be displayed where up to 21 digits are available Call Restriction This makes calls be sent and received only under the specified conditions All Outgoing Restricts All outgoing calls which is controlled by password Int l Ou...

Page 93: ...ptions Automatic PLMN of desired communication network list can be selected automatically The highest frequency of PLMN will be always selected Manual While this option is selected frequency of available PLMN communication network can be selected by hand If this option is executed Search screen will appear to search for all avail able PLMNs ROM of the phone if reserving PLMN information will displ...

Page 94: ...code preferred Input 5 digits of communication network code and press OK Key The code just specified will be input in front of the communication network code specified prior to this process Move Moves a code onto other list First select a desired code and press option Key Then select Move and press OK On Table of contents screen a location desired on the list shall be specified Press OK Key to fin...

Page 95: ...isplay main menu option 2 Use the direction Key to select Settings menu then press select 3 Select Sound on Settings menu and press select Key Volume Ringer Tone Alert Mode Message Tone Key Tone Error Tone Connect Tone Power On Sound Power Off Sound Sound ...

Page 96: ... melody 1 10 Alert Mode Select Alert Mode on Sound screen and press OK Set the sound mode when the phone operates Ring Only Alerts Ring only with sound when you have a call or and operates the phone Vibrate Only Alerts Ring only with vibration when you have a call or and operates the phone Ring Vibrator Alerts Ring sound with vibration when you have a call or and operates the phone Silent No Alert...

Page 97: ...rated if an error occurs on the phone Default is set on Connect Tone Select Alert Mode on Sound screen and press OK Allows you to apply or cancel the sound function operated whenever your phone is connected to the other Power On Sound Select Power On Sound on Sound screen and press OK Allows you to apply or cancel the sound function operated whenever your phone is power on to the other Power Off S...

Page 98: ... In stand by state press menu Key to display main menu option 2 Use the direction Key to select Settings menu then press select 3 Select Languages on Settings menu and press select Key Auto English Spanish 9 Settings ...

Page 99: ...n Day 2 digits Month 2 digits and Year 4 digits and press Select Key to confirm the change and return to previ ous screen If you want to cancel the change or return to previous screen just press back without pressing Select Date Format Select this option and press Enter to edit Date form displayed on the phone where 3 options are available D M Y Established form day month year M D Y Form in Englis...

Page 100: ... where 2 options are available 24 hours It is an established option where time is displayed 00 00 to 23 59 regardless of AM or PM If you want this option select Option and press Confirm to return to previous screen 12 hours This option is based on 12 hours system where 00 00 to 12 00 of AM and PM before and after noon is displayed If you want this option select Option and press OK to return to pre...

Page 101: ...Key to select Settings menu then press select 3 Select Any Key Answer on Settings menu and press select Key Starts connection if active to any call when any Key on the pad is pressed This option can be made on or off Press Select Key to have access to this option Any Key Answer 9 Settings ...

Page 102: ...menu Key to display main menu option 2 Use the direction Key to select Settings menu then press select 3 Select Minute Mind on Settings menu and press select Key If this is selected the call received will be automatically answered Minute Mind ...

Page 103: ...ss menu Key to display main menu option 2 Use the direction Key to select Settings menu then press select 3 Select Keypad Lock on Settings menu and press select Key Select off 30 seconds 1 minutes 3 minutes 5 minutes or 10 minutes 9 Settings ...

Page 104: ... Settings menu and press select Key If you want to go back to initial environment after some environmental settings have been applied to the phone simply select reset setting option and press Select to display Reset setting to default Select Yes or No as necessary Note If once the initial setting is recovered all the saved environment information will be deleted 9 Settings ...

Page 105: ...ow voltage as amended in 93 68 CEE d Meets the ETSI version for GPRS e Meets the ETSI version 1996 for GSM f Meets the SMG numbers 30 bis 31 31 bis and 32 Technical Specifications Physical Parameters Weight less than 78 grams including standard battery Dimension 83 118 X36X21mm Battery Type Lithium Polymer Capacity 710mAh Load time Maximum 4 hours Standby time DRx Up to 150 hours in standard mode ...

Page 106: ...lated with goods sales DIGITAL has a right to hand over the freight expense caused by delivery to service center to user Conditions For Complete Warranty The quality of the product will be guaranteed by its provider DIGITAL for a period of one year upon purchased against defects or abnormal operation due to faulty materials or workmanship when authorized engineer can repair or change the defective...

Page 107: ... vehicles EXPOSURE TO RF ENERGY Use only the supplied or an approved replacement antenna Do not touch the antenna unnecessarily when the phone is in use Do not move the antenna close to or couching any exposed part of the body when making a call SAFETY INFORMATION FOR RF EXPOSURE Body worn operation This device was tested for typical body worn operations with the back of the phone kept 15 mm from ...

Page 108: ...nna the lower the power output Before a phone model is available for sale to the public it must be tested and certified to the FCC that it does not exceed the limit established by the government adopted requirement for safe exposure The tests are performed in positions and locations e g at the ear and worn on the body as required by the FCC for each model The highest SAR value for this model phone...

Page 109: ...be determined by turning the equipment off and on the user is encouraged to try to correct the interference by one or more of the following measures Reorient or relocate the receiving antenna Increase the separation between the equipment and receiver Connect the equipment into an outlet of a circuit different from that to which the receiver is connected Consult the dealer or an experienced radio T...

Reviews: