Model:
(91025-147) Starburst 3’ lead 12v
(91024-147) Starburst 12v
(91029-147) Starburst 24v
Description: 12V or 24V Solid Brass Wall Washer
Lamp Provided: 35 Watt Astro-Brite Bi-Pin Lamp - 35 Watt Max
35 Watt MR16 Bi-Pin Lamp
ASSEMBLY/INSTALLATION INSTRUCTIONS:
Please read carefully before installing. Save these instructions.
TOOLS REQUIRED
: It is recommended that when installing any low voltage fixture that you have (at a minimum) the following items: voltage
meter, amp probe, wire nuts, and assorted hand tools.
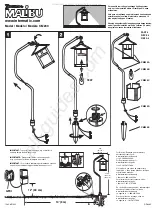
1. Determine fixture location. Attach the provided stake onto the fixture by threading onto fixture until secure. Take care not to twist the wire.
Place the stake in the ground and bury to the top of the neck. Be certain that the fixture is facing the correct direction.
2. Simply pull the 25’ wire lead to your connection point (hub/junction box) and connect the two wires. Even though polarity is not an issue, it
is recommended that you always match the polarity, that is to say put the lettering-to-lettering wires and the ribbed to ribbed wires together.
(NOTE) Avoid aiming fixture directly upward. Whenever possible, set at angle to prevent rain or irrigation water from settling on lens.
(NOTE) While not necessary we do recommend that you attempt to conceal all additional wire, rather than cutting off the excess. This
helps maintain flexibility and even voltage.
3.
IMPORTANT:
To get the maximum benefit of your fixture and to provide your customer with the ultimate state of the art lighting portrait we
have made available the below described lenses. These are intended to allow you to provide the desired level of light. To attach any of the
extra lenses, remove the fixture nose cone by removing the thumbscrew and removing the shroud. Replace lens in rubber gasket with
desired lens and reattach the shroud. The Hex Baffle can be attached to the outside of lens by removing thumb screws, attaching Hex
baffle, and replacing thumb screws.
Lenses
1) CLEAR LENS: Use for maximum light output
2) HEX BAFFLE: (Starburst Only) Use to reduce glare
3) DE-OP (FROSTED) LENS: (Installed) Use to reduce lamp output and soften an object.
4) AX-OP (LINEAR) SPREAD: Use to spread out light for broader coverage
5) VI-OP (DIMPLED) LENS: Use to diffuse and reduce sty ration rings.
6) RUBBER GASKET LENS HOLDER
Important safety and maintenance instructions
1. Use with low-voltage outdoor lighting system only.
2. Lamp is hot when lit! Do not touch when lamp is on!
3. Allow fixture to cool before touching or re-lamping fixture!
4. Keep away from materials, structures or landscapes that may burn!
5. Do not operate fixture if cover shield is damaged or missing.
6. Do not submerse fixture in water.
7. Clean fixture with mild soap. Do not use acid or any other solvent base cleaner.
CAUTION:
DO NOT OVERLOAD CABLE or TRANSFORMER
and maintain polarity at all times.
For 12 volt systems, keep
each fixture between 10.8 and 12 operating volts. For 24 volt systems, keep each fixture between 21.6 and 24.7 operating volts.
Consult with a qualified electrical contractor and local electrical codes before installing any electrical product.