


DIRECT ACCESS USB 2.0 MULTI CONNECT BAY
UK
Introduction
This instruction manual is for users of the TRUST DIRECT ACCESS USB 2.0 MULTI CONNECT BAY.
The bay can be used to read different types of memory card on a PC or a Mac. It also extends the USB
(version 2.0), FireWire (IEEE1394), microphone, speaker and headphones connections, so that these
can be accessed from the front of your system.
TRUST SERVICE CENTRE
24 HOURS: internet
www.trust.com
Office
Open Phone
UK
Mon - fri
8:00 - 16:00
+44-(0)845-6090036
Italia
Lun – ven
9:00 – 17:00
+39-(0)51-6635947
This device meets the essential requirements and other relevant conditions of the applicable European
directives. The Declaration of Conformity (DoC) is available at www.trust.com/13511/ce.
Safety
1. Do not use a liquid cleaning product or a spray to clean the bay. Clean the bay with a damp cloth.
Do not use the bay near water.
2. Do not repair the bay yourself.
Note:
Make sure the audio output, microphone input, FireWire port and USB ports have been
installed on the PC or Mac and that they work correctly before installing and connecting the
bay. If necessary, see the relevant instruction manual.
Note:
Make sure you have installed the latest updates, Windows Service Pack (at least SP1 is
required for Windows XP and at least SP4 is required for Windows 2000), USB driver and
FireWire driver.
Note:
If your computer does not have three USB 2.0 ports and you wish to use all of the bay’s
functions, then we recommend purchasing a USB 2.0 card or hub and connecting the
cables to this (see www.trust.com/13083 for a Trust 5 port USB 2.0 card).
Note:
If your computer has a USB 1.1 port, the bay will work at the USB 1.1 speed. For optimal
use of the bay, we recommend purchasing a USB 2.0 card of hub.
Note:
Read the Quick Installation Guide first.
Installation for Windows users
1. Turn the computer on.
2. Once Windows has started, insert the Trust Installation CD-ROM into your CD-ROM drive. The Trust
Installer will start automatically. If it does not start automatically, select ‘Run’ from the Start menu.
Type [D:\SETUP.EXE] (if necessary, replace the letter D with the letter used to specify your CD-
ROM drive) and click ‘OK’ to start the Trust Installer.
3. Click ‘Install driver’ once the program has started. Follow the on-screen instructions. Restart the
computer after the installation has been completed.
Installation for Mac users
Mac 9.x users:
Turn the Mac on. Insert the Trust Installation CD-ROM into the CD-ROM drive.
The Trust Installer will start automatically. If it does not start automatically,
browse the CD-ROM and open ‘Install OS 9’. Click ‘OK’ and then ‘Install’. Follow
the on-screen instructions. Restart the computer after the installation has been
completed.
Mac 10.x users:
It is not necessary to install a driver for the card reader.
Installing the bay in the computer
1.
Make sure the computer is turned off and the plug has been removed from the plug socket.
2.
Take the metal plate (bracket) with four wires (cable 1).
3.
Connect the red, yellow, blue and black cables to the corresponding colours on the bay.
4.
Open the computer casing.
5.
Open a 5¼” slot and make space at the rear of the computer for the bracket.
6.
Slide the bay into the 5¼” slot and screw it into place. Move the cable and the bay’s bracket to
the rear of the casing and screw the bracket in place.
7.
Take the power cable. Connect the smallest plug to the white power connection on the bay.
8.
Loop the two remaining plugs between the PC or Mac power supply and, for example, the CD-
ROM drive.
9.
Close the computer casing.
10. Connect cable 2 (connector with 6 cables) to the bay’s bracket (see figure 1 and table 2).
Connect the 6 cables. If necessary, read the instruction manual provided with the PC or Mac.
11. Connect the power cable to the computer and start the computer. If you are requested to specify
the location of the driver, select the PC or Mac to automatically search for the driver.
Table 1: Explanation of Cable 1
Colour Name
Description
Blue Audio
Speaker
output
and
microphone
input
Red USB
1
Card
reader
Yellow
USB 2
USB ports
Black 1394
FireWire
port
Metal
Bracket with connector
Metal plate with a 25-pole connector
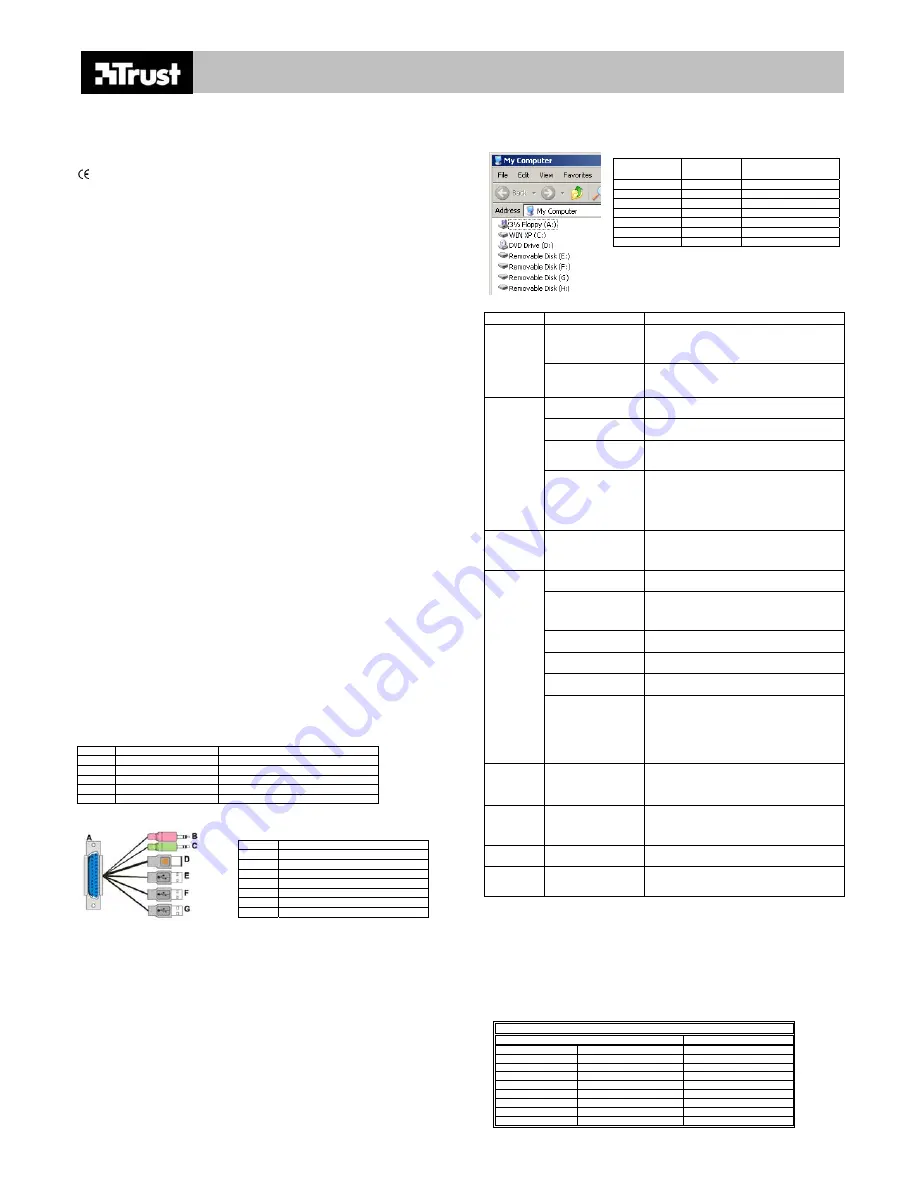
Figure 1: Cable 2
Table 2: Explanation of Cable 2
Cable Function
A
25-pole connector for the bracket
B
Microphone input (pink)
C
Speaker output (green)
D
1394 “FireWire” port
E
Card reader (CARD READER)
F
Top USB port (USB UP)
G
Bottom USB port (USB DOWN)
Explanation of the indicators (LEDs)
Red LED on:
Device receives power.
Green LED flashes:
Card reader is reading from or writing to a card.
Using the audio connection, USB ports and FireWire port
The USB, FireWire, speaker and microphone connections work immediately when a suitable device is
connected to them.
The ‘Safe Removal’ application must be used before disconnecting some USB and FireWire devices
from a computer. See the instruction manual provided with the device for more information.
Using the card reader
1. Insert a memory card into the correct slot. See table 3 for the cards supported by the card
reader.
2. Windows users:
Open My Computer. You can now browse the contents of the card and edit
the data. See figure 2 and table 3 for the necessary drive letter.
Mac users:
A shortcut to the memory card will automatically appear on the desktop.
Open the shortcut to edit the data.
3. All the programs which access the card must be closed before the card can be removed. Wait until
the green LED no longer flashes before removing the card.
Figure 2:
Table 3: Supported cards
Card type
Drive letter
Size in MB (unless
otherwise stated)
CF I
E:
4 – 512
CF II
E:
4 – 2 GB
MD E: 340/512/1
GB
MS / MS Pro
F:
4 – 512
SM G: 4
–
512
SD H:
8
–
512
MMC H: 8
–
512
Note:
The drive letters used in figure 2 depend on your system.
The driver letters are, however, given in this order.
Troubleshooting
Problem
Cause
Possible solution
The audio cables have
not been connected
correctly to the sound
card.
Check the connection made with the sound card. If
necessary, see the instruction manual provided with
the sound card.
No sound is
emitted by
the speakers
or sound is
not recorded
through the
microphone.
The record or play
volume in Windows is too
low.
Increase the volume.
The USB cable has not
been connected correctly.
Connect the cable correctly.
You do not have three
USB ports.
Connect a USB 2.0 card or hub with enough ports.
The USB ports have not
been enabled in the
BIOS.
Enable the ports in the BIOS (see the instruction
manual provided with your PC for instructions on how
to do this).
The USB
connection
does not
work.
The operating system
displays a message
saying that a high-speed
device has been
connected to a low-speed
port.
This message is displayed when a USB 2.0 device is
connected to a USB 1.1 port. Connect the bay to three
USB 2.0 ports. If there are no USB 2.0 ports, purchase
a USB 2.0 card or hub which has enough ports.
The FireWire
connection
does not
work.
The FireWire cable has
not been connected
correctly.
Connect the cable correctly.
The card is not
supported.
The bay only definitely works with the memory cards
and the capacities given in table 3.
The USB CardReader
cable has not been
connected or has not
been connected correctly.
Connect the cable correctly.
The memory card has not
been inserted correctly.
Make sure the memory card has been inserted into the
slot correctly and that it makes good contact.
The driver has not been
installed.
Install the driver. Use the driver included on the CD-
ROM or download the driver from the Internet.
The file format is not
supported.
See the instruction manual provided with the device in
which the card was used.
The card
reading
function
does not
work or does
not work
correctly.
The card has not been
formatted or has not been
formatted correctly.
Format the card using Windows Explorer or Finder
(Mac). All the data on the card will be deleted.
Note:
If you format a card on your computer and then
use it in your digital camera, the device may no longer
recognize the format of the card. It is, therefore,
recommended to always format the card using your
digital camera.
No data can
be written to
the card.
The memory card may be
write-protected.
Smart Media:
Remove the round sticker on the back
of the card.
MS/MSPro/SD:
Push the slider on the card to the
‘Unlock’ position.
The card
does not fit
into the card
reader.
The card has been
inserted incorrectly.
Insert the card into the card reader correctly (see the
illustration on the card reader).
The red LED
is not lit.
The power cable has not
been connected.
Connect the power cable.
The problem
is not listed
here.
The latest FAQs are
available on the Internet.
See www.trust.com/13511 for FAQs and other product
information.
If you still have problems after trying these solutions, please contact one of the Trust Customer Care
Centres (see the table in the bottom right-hand corner). Please have the following information available:
the item number (1351
1
-02), as well as a good description of what is not working and when the problem
occurs.
France
Lun – ven
9:00 à 17:00
+33-(0)825-083080
Deutschland
Mo – Fr
9:00 - 17:00
+49-(0)2821-58835
España
Lun – viernes
9:00 - 17:00
+34-(0)902-160937
Polska
Pon do pi
ą
9:00 - 17:00
+48-(0)22-8739812
Nederland
Ma – vr
9:00 - 17:00
+31 (0)78-6543387
Other countries
Mon – fri
9:00 - 17:00
+31-(0)78-6549999


