Tascam DR-05X, Reference Manual
The Tascam DR-05X is a portable audio recorder perfect for capturing high-quality audio on the go. For detailed instructions on how to use its features, download the Reference Manual for free from our website. Enhance your recording experience with the comprehensive manual available for download at manualshive.com.
Share
Download


Reviews:
No comments
Related manuals for DR-05X

SR100B
Brand: ABB Pages: 2
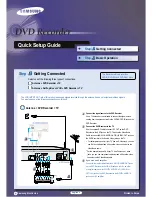
DVD-R100
Brand: Samsung Pages: 4

DVR16T1
Brand: Velleman Pages: 107

DMN-8600
Brand: LSI Pages: 434

DVD-R 4518
Brand: AEG Pages: 88

Voice Cue
Brand: Attainment Company Pages: 2

AL910
Brand: 1001Espions Pages: 49

STC-H476
Brand: Speech Technology Pages: 72

DS-75
Brand: Olympus Pages: 3

DS-5500
Brand: Olympus Pages: 63

333
Brand: Telectro Pages: 18

MR241
Brand: Telectro Pages: 25

PMD650
Brand: Marantz Pages: 24

DMII PRO
Brand: Amprobe Pages: 37

MDR868H
Brand: Magnavox Pages: 83

DVR4MQAEB
Brand: Velleman Pages: 36

RTR-574
Brand: T&D Pages: 2

DTH 8657
Brand: THOMSON Pages: 8


