

Quick-Start Guide
To view manuals, FAQs, videos, drivers, downloads, technical drawings, and more, visit www.startech.com/support.
Manual Revision: December 2, 2020
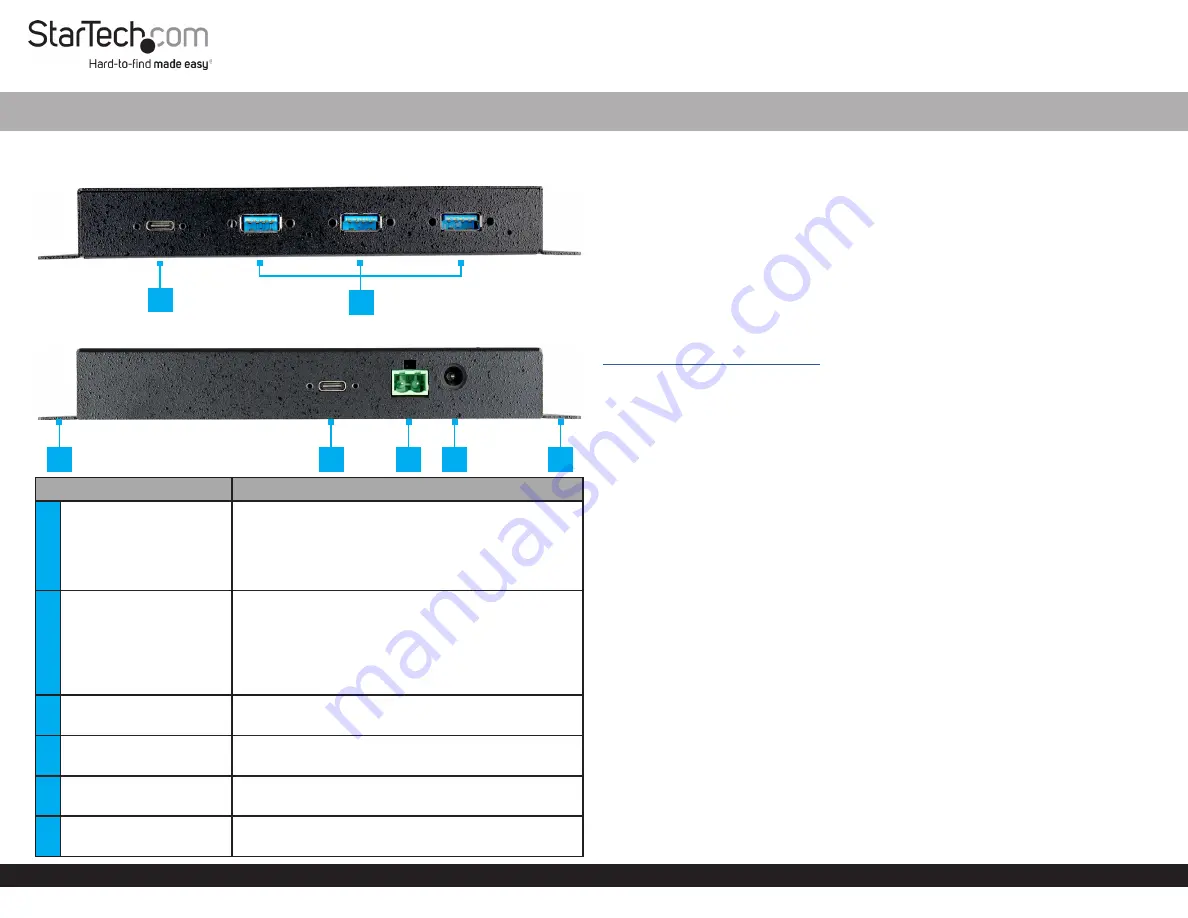
Product Diagram (HB31C3A1CME)
Front View
Rear View
Port
Function
1
USB-C Port
• SuperSpeed USB 10Gbps (USB 3.2 Gen 2)
• Supports USB BC 1.2 charging
• Supports surge and 15KV ESD (Electrostatic
Discharge) protection
• Connect
USB-C Peripheral Devices
to the
Hub
2
USB-A Ports (x 3)
• SuperSpeed USB 10Gbps (USB 3.2 Gen 2)
• Used to connect
USB-A Peripheral Devices
( x 3) to
the
Hub
.
• Supports USB BC 1.2 charging
• Supports surge and 15KV ESD (Electrostatic
Discharge) protection
3
Mounting Holes
• Wall mount the
Hub
• Mount the
Hub
to the side/underside of a
Desk
4
USB-C Host Port
• SuperSpeed USB 10Gbps (USB 3.2 Gen 2)
• Connect the
Hub
to a
Host Computer
5
2-Wire Terminal Block
• Connect an external
DC Power Source
(+7 - 24V DC
Input) to the
Hub
6
Power Input Port
• Connect a
DC 12V Power Source
to power the
Hub
4-Port Industrial USB-C™ 10Gbps Hub - 3x USB-A + 1 USB-C - ESD + Surge Protection
Package Contents
• USB Hub x 1
• Universal Power Adapter (NA, JP, UK, EU, ANZ) x 1
• Terminal Block Connector x 1
• USB Type-C to Type-C Cable x 1
• USB Type-C to Type-A Cable x 1
• Quick-Start Guide x 1
Requirements
For the latest requirements, please visit:
.
• Mounting Screws (x 2)
Tools
• Phillips or Flat Head Screwdriver
• Writing Utensil
• Level
Installation
Warning:
Connect the
Universal Power Adapter
after all the other installation steps
have been completed.
Notes:
There are two ways to power the
Hub
.
It is recommended to use an external
DC Power Source
or a
Terminal Block Power
Source (+7 - 24V DC)
connected to the
2-Wire Terminal Block
to ensure full and
stable function.
Connect the USB Ports
1. Connect a
USB Type-C to Type-C Cable
(included) to the
USB-C Host Port
on the
rear of the
Hub
and to a
USB-C Port
on the
Host Computer
.
2. The
Host Computer’s Operating System
should detect the
Hub
and automatically
install it.
3. Connect the
USB Peripheral Devices
to the
USB-C Port
and the
USB-A Ports
(x3)
on the front of the
Hub
.
Power the Hub
Power the Hub Using the 2-Wire Terminal Block
1. Remove the
Terminal Block Connector Housing
from the rear of the
Hub’s Casing
.
1
2
4
5
6
3
3


