

Quick Start Guide
– 1 –
– 2 –
– 3 –
GW2000
™
G-Series
™
2U Appliance
Step 1
It is
essential
that you register your appliance to activate your warranty. Technical
and warranty support are
not available
until the warranty is active.
NOTE: Registered Users can use the online technical support Dashboard to register new or
additional G-Series appliances. Go to
http://gwsupport.sphere3d.com
and use the Login link.
1.
Go to
http://gwsupport.sphere3d.com
and click
Register
.
2.
At the Registration page, enter the
requested
information
and the
Captcha
phrase
, and click
Next
.
3.
At the Validation page, enter the
license certificate
data, click
Validate
to verify
the data, and click
Next
.
•
If you don’t have the license yet, just click
Next
to register yourself at this time.
•
You can also generate an offline key if not connected to the Internet. The key
can be copied and used on the licensing page of the appliance.
4.
At the Status page, review the appliance and registration statuses, and click
Next
.
5.
At the Completion
page, click
Support Dashboard
.
6.
The registration process is complete and the
Dashboard
page is displayed.
Step 2
Attach Inner Rails
WARNING:
To reduce the risk of electric shock or damage to equipment, always
remove any power cords while working with the unit.
WARNUNG:
Um das Risiko eines elektrischen Schlags oder Schäden am Gerät zu
vermeiden, ziehen Sie stets den Netzstecker, bevor Sie an der Einheit arbeiten.
AVERTISSEMENT:
Pour réduire le risque de choc électrique ou endommagement de
l'équipement, retirez toujours les cordons électriques en travaillant avec l'appareil.
IMPORTANT: Two-post telco-style or other racks less than 29 inches in depth will NOT
support this unit.
The GW2000 appliance comes with a sliding rail rack kit for easy installation into a
19-inch (EIA-310) rack. The two rails are identical; install them with the end flanges
pointed away from the appliance.
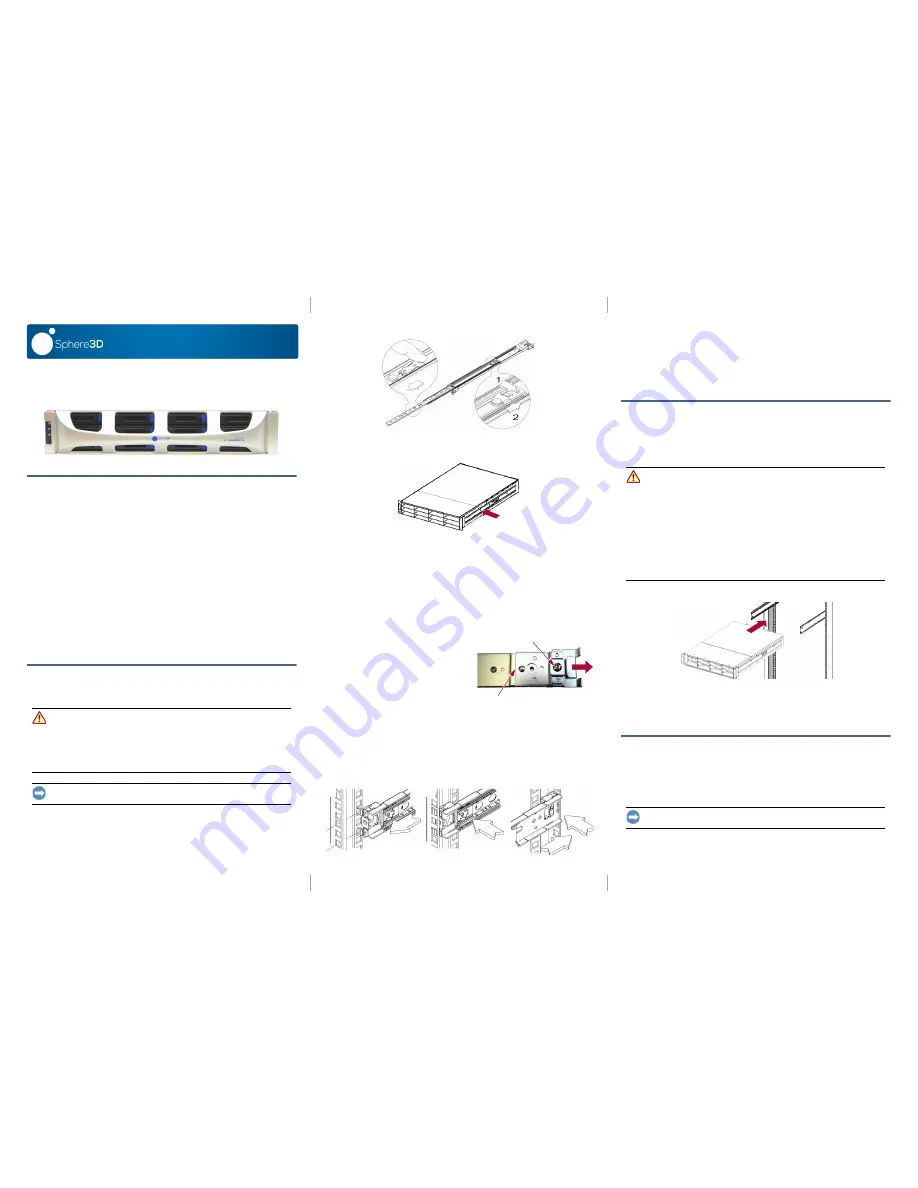
1.
Select a
rail assembly
and slide the inner rail out until it stops.
2.
Slide the inner rail
release latch
forward and remove the inner rail.
3.
To retract the
middle rail
, release the lock (1) and slide it into (2) the outer rail.
4.
Repeat
Steps 1–3
for the
other rail assembly
.
5.
Align the
inner rail
against the side of the chassis with the correct edge up.
6.
Using the supplied
screws
, secure the rail.
7.
Repeat
Steps 5–6
for the
other rail
.
Optional Steps for Thicker Rack Rails
NOTE: For standard rack rail sizes of 3mm or less, skip this procedure and proceed to
Attach
Outer Rails to Square-holed Rack
.
For rack rails that are
thicker than 3mm
, the sliding rail anchors cannot be seated
without exerting excessive force and potentially damaging the rail. The brackets need
to be removed from each end of the slide rails to make the anchors seat securely.
1.
Locate the
bracket
on the end of a slide
rail.
2.
Remove the
screw
securing the bracket
to the rail.
3.
Push the
bracket
toward the end of the
rail, prying the back of the
bracket
upward to unseat and remove it.
4.
Repeat
Steps 1–3
for each
end
of both
rails
.
Attach Outer Rails to Square-holed Rack
NOTE: If you have an older round-holed rack, contact Sphere 3D Support about our special
round-holed rack kit.
1.
Position the front of one of the
rails
in line with the front vertical rail mounting
holes (1) and move it forward until the
rail anchors
pass through the holes.
Center
Screw
Pry Here
1
2
Rear
a
b
3
View
2.
Push the rail toward the
outside of the rack
(2) so that the rail locks snap into
place.
3.
At the
rear
(3), slide the outer rail in or out to fit between the vertical rails (a) and
repeat
Steps 1–2
to secure it (b).
NOTE: Make sure the rear holes are the same height as the front holes so the rail is level.
4.
For the other
rail
, repeat
Steps 1–3
.
Step 3
Install in Rack
Once the rails are installed into the rack, the GW2000 chassis can be inserted.
1.
Using the mechanical lifter, position the
chassis
in front of the rack.
WARNING:
It is recommended that a mechanical lifter (or at least two people) be
used to raise and align the unit to prevent injury during installation. Use care when
inserting or removing a unit into or out of a rack to prevent the accidental tipping of
the rack, causing damage or personal injury.
WARNUNG:
Um Verletzungen zu vermeiden, empfehlen wir zur Rack-Installation oder
-Deinstallation die Nutzung einer mechanischen Hebehilfe (oder mindestens zwei
Personen).
AVERTISSEMENT:
Afin d’éviter des blessures pendant l’installation, il est recommande
d’utiliser un monte-charge (ou au moins deux personnes) pour élever ou aligner
l’appareil. Faites attention lorsque vous insérez ou retirez l’appareil d’un support, pour
empêcher le déversement accidentel de la crémaillère causant des dommages et des
blessures.
2.
Insert the
inner rails
into the
outer rails
and slide the chassis into the rack.
3.
Using
four
of the
provided screws
, secure the chassis to the front of the rack.
Additional Step for Thicker Rack Rails (3+mm) Only
4.
Using the
two provided screws
, secure the slide rails’
rear ends
to the rack.
Step 4
Install Drives
The GW2000 appliance comes with the top row of drive bays empty and the remaining
eight bays filled with blank drive carriers. The four drives used by the server are
packed in ESD bags in the top foam.
IMPORTANT: To maintain proper airflow and cooling, a drive assembly or a blank drive
carrier must be installed in
every
bay. No empty bays are allowed.
NOTE: Do not remove the disk drives from their carriers. Doing so voids the drive warranty.
*10400547-002*
10400547-002


