background image

Thank you for purchasing this SHARP product.
To obtain the best performance from this product, please read
this manual carefully. It will guide you in operating your SHARP
product.

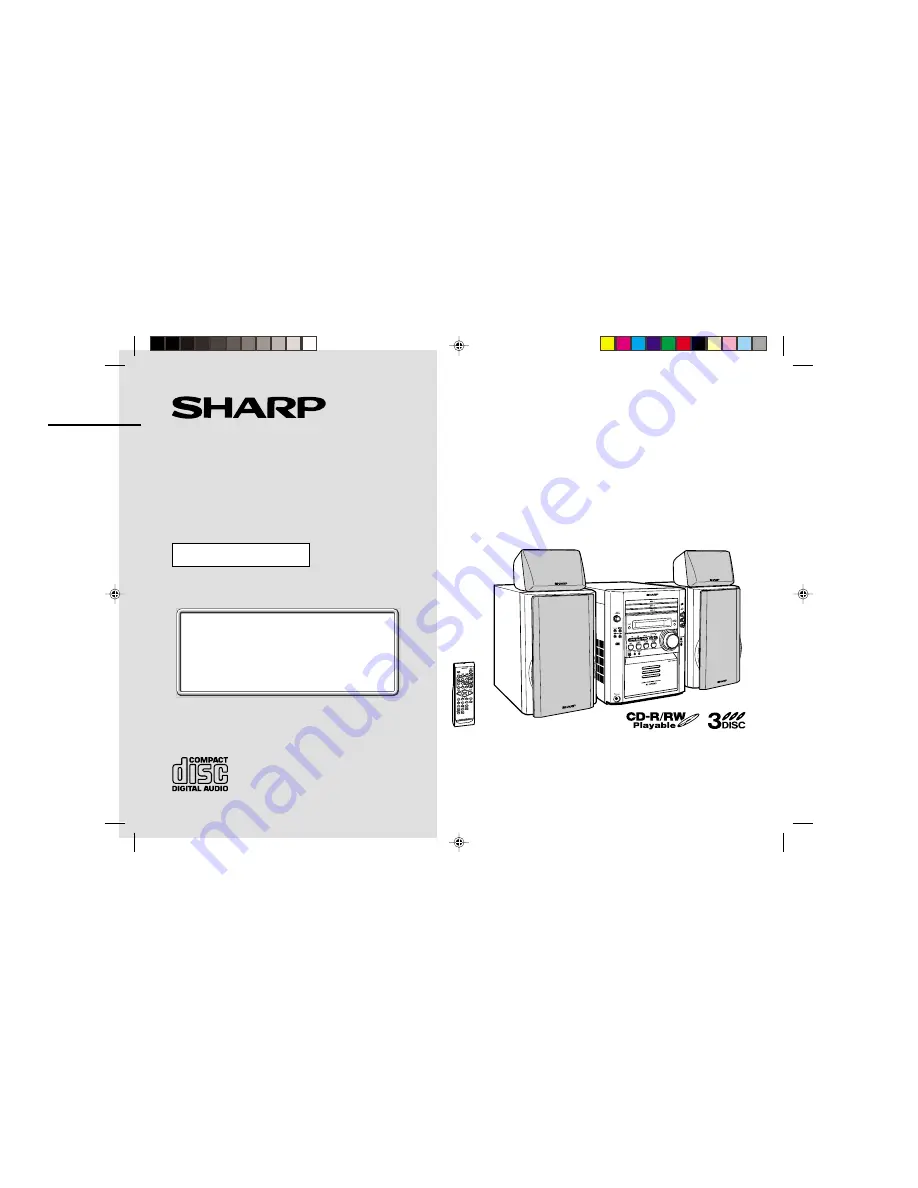
XL-HP550E Micro Component System consisting of XL-HP550E (main unit),
CP-HP550E (front speakers) and GBOXS0111AWM1 (surround speakers).

MICRO COMPONENT SYSTEM

MODEL

XL-HP550E

OPERATION MANUAL

If you require any advice or assistance regarding
your Sharp product, please visit our web-site
www.sharp.co.uk/support.
Customers without Internet access may telephone
08705 274277 during office hours (or (01) 676 0648
if telephoning from Ireland).

0101

XLHP550E(FRONT)

2002.08.07, 12:41

1

Summary of Contents for XL-HP550E

Page 1: ... of XL HP550E main unit CP HP550E front speakers and GBOXS0111AWM1 surround speakers MICRO COMPONENT SYSTEM MODEL XL HP550E OPERATION MANUAL If you require any advice or assistance regarding your Sharp product please visit our web site www sharp co uk support Customers without Internet access may telephone 08705 274277 during office hours or 01 676 0648 if telephoning from Ireland 0101 XLHP550E FR...

Page 2: ...i nals in your plug proceed as follows The wire which is coloured blue must be connected to the plug terminal which is marked N or coloured black The wire which is coloured brown must be connected to the plug terminal which is marked L or coloured red Ensure that neither the brown nor the blue wire is connected to the earth terminal in your three pin plug Before replacing the plug cover make sure ...

Page 3: ...ratus NOTES Recording and playback of any material may require consent which SHARP is unable to give Please refer particularly to the provisions of the Copyright Act 1956 the Dramatic and Musical Performers Protection Act 1958 the Performers Protection Acts 1963 and 1972 and to any subsequent statutory enactments and orders This equipment complies with the requirements of Directives 89 336 EEC and...

Page 4: ...ntrol 14 Basic Operation Sound control 15 Setting the clock 16 CD Playback Listening to a CD CDs 17 18 Advanced CD playback 19 20 Radio Listening to the radio 21 22 Tape Playback Listening to a cassette tape 23 Tape Recording Recording to a cassette tape 24 25 Advanced Features Timer and sleep operation 26 28 Enhancing your system 28 29 References Troubleshooting chart 29 30 Maintenance 31 Specifi...

Page 5: ...angerous and may result in a fire or other type of acci dent causing damage SHARP will not be held responsible for any damage resulting from use of this unit with a voltage other than that which is specified Volume control The sound level at a given volume setting depends on speaker effi ciency location and various other factors It is advisable to avoid exposure to high volume levels Do not turn t...

Page 6: ...ass Demo Mode Button 13 15 13 Volume Control 15 14 Cassette Compartment 23 15 Tape Reverse Play Button 23 16 CD or Tape Stop Button 17 23 17 CD Play or Repeat Tape Forward Play Button 17 19 23 18 CD Track Down or Fast Reverse Tape Fast Wind Tuner Preset Down Button 18 22 23 19 CD Track Up or Fast Forward Tape Fast Wind Tuner Preset Up Button 18 22 23 20 CD Button 17 21 Tape Record Pause Button 24 ...

Page 7: ...Timer Play Indicator 12 CD Pause Indicator 13 CD Repeat Play Indicator 14 Tape Record Indicator 15 Sleep Indicator Rear panel Reference page 1 Cooling Fan 2 Surround Speaker Terminals 10 11 3 AC Power Lead 10 13 4 FM 75 Ohms Aerial Socket 10 11 5 AM Loop Aerial Socket 10 11 6 Video Auxiliary Audio Signal Input Sockets 28 7 Front Speaker Terminals 10 11 Note This product is equipped with a cooling ...

Page 8: ... Woofer 3 Bass Reflex Duct 4 Speaker Terminals Front speaker grilles are removable Surround speaker 1 Full Range Speaker 2 Speaker Wire Note The speaker grilles on the surround speakers are not removable 3 4 1 2 2 1 Make sure nothing comes into contact with the speaker diaphragms when you remove the speaker grilles ...

Page 9: ...Button 28 12 CD Track Up or Fast Forward Tape Fast Wind Tuner Preset Up Button 18 22 23 13 Volume Up and Down Buttons 15 14 Disc Direct Search Buttons 19 15 CD Clear Button 20 16 CD Memory Button 20 17 CD Stop Button 17 18 CD Pause Button 17 19 Tape Reverse Mode Select Button 23 20 Tape Reverse Play Button 23 21 Tape Stop Button 23 22 CD Play or Repeat Button 17 19 23 Tape Record Pause Button 24 2...

Page 10: ... fm 10 XL HP550E Preparation for Use System connections Black Red Black Red AM loop aerial FM aerial Front speaker Left Front speaker Right Wall socket AC 230 V 50 Hz Black Grey Surround speaker Left Surround speaker Right ...

Page 11: ...r reception Consult your dealer Speaker connection Front speakers Connect the black wire to the FRONT SPEAKERS terminal and the red wire to the FRONT SPEAKERS terminal Surround speakers Connect the black wire to the SURROUND SPEAKERS terminal and the grey wire to the SURROUND SPEAKERS terminal Caution Connect the speaker wires to the speakers first then to the unit If you use other speakers with i...

Page 12: ... installed on the wall Example when installed vertically 60 90 cm 23 35 The design of the sur round speakers allows them to be hung on the wall Be sure to use the type and size of screw that is shown to the right 1 Make a hole in the wall using a drill 2 Drive a wall mount plug into the hole using a hammer Drive the wall mount plug in until it is flush with the wall surface 3 Drive one screw into ...

Page 13: ...the unit will not be in use for a prolonged period of time Demonstration mode To cancel the demonstration mode When the unit is in the power stand by mode demonstration mode press the X BASS DEMO button The demonstration mode will be cancelled and the display will disappear To return to the demonstration mode When the unit is in the power stand by mode press the X BASS DEMO button again Note When ...

Page 14: ...it with a soft cloth Exposing the sensor on the unit to strong light may interfere with operation Change the lighting or the direction of the unit Keep the remote control away from moisture heat shock and vibrations Test of the remote control Check the remote control after checking all connections have been made correctly See pages 10 13 Point the remote control directly at the remote sensor on th...

Page 15: ...ich emphasises the bass frequencies and X BASS will appear To cancel the extra bass mode press the X BASS DEMO X BASS button Equaliser When the EQUALIZER EQUALIZER MODE button is pressed the current mode setting will be displayed To change to a different mode press the EQUALIZER EQUALIZER MODE button repeat edly until the desired sound mode appears 1 2 29 30 MAXIMUM 0 X BASS indicator ROCK FLAT CL...

Page 16: ...ear 0 00 23 59 AM 12 00 The 12 hour display will appear AM 12 00 PM 11 59 AM 0 00 The 12 hour display will appear AM 0 00 PM 11 59 Note that this can only be set when the unit is first installed or it has been reset Refer to Clearing all the memory reset on page 31 for details 4 Press the TUNING TIME or button to adjust the hour and then press the MEMORY SET button Press the TUNING TIME or button ...

Page 17: ...D BY button to turn the power on 2 Press the CD button 3 Press the button to open the disc tray 1 4 Place the CD on the disc tray 1 label side up Be sure to place 8 cm 3 CD in the middle of the disc trays 12 cm 5 8 cm 3 5 Press the button to close the disc tray 1 Total number of tracks on the CD whose number is flashing Total playing time of the CD whose number is flashing 6 You can place discs on...

Page 18: ...n If this occurs press the ON STAND BY button to enter the power stand by mode and then turn the power on again If TV or radio interference occurs during CD operation move the unit away from the TV or radio If a disc is damaged dirty or loaded upside down the disc will skip To move to the beginning of the next track Press the button for less than 0 5 seconds during playback To restart the track be...

Page 19: ...played will be located In random play the CD player will select and play tracks automatically You cannot select the order of the tracks Caution After performing repeat or random play be sure to press the CD button Otherwise the disc s will play continuously Use the direct search buttons on the remote control to select the de sired track whilst playing the se lected disc Selected track number The d...

Page 20: ...r CD collec tion and player Do not write on either side of the disc particularly the non label side from which signals are read Do not mark this surface Keep your discs away from direct sunlight heat and excessive moisture Always hold the CDs by the edges Fingerprints dirt or water on the CDs can cause noise or mistracking If a CD is dirty or does not play properly clean it with a soft dry cloth w...

Page 21: ...tedly to select the desired frequency band FM or AM 3 Press the TUNING TIME or button to tune in to the de sired station Manual tuning Press the TUNING TIME button as many times as required to tune in to the desired station Auto tuning When the TUNING TIME button is pressed for more than 0 5 seconds scanning will start automatically and the tuner will stop at the first receivable broadcast station...

Page 22: ...ations in memory in order starting with preset channel 1 4 Within 30 seconds press the MEMORY SET button to store that station in memory If the MEMORY and preset number indicators go out before the station is memorised repeat the operation from step 2 5 Repeat steps 1 4 to set other stations or to change a pre set station When a new station is stored in memory the station previously memorised will...

Page 23: ...this case wait until the power is restored For playback use normal or low noise tapes for the best sound Metal or CrO tapes are not recom mended Do not use C 120 tapes or poor quality tapes as they may cause malfunctions Before loading a tape into the cassette compartment tighten the slack with a pen or a pencil 1 Press the ON STAND BY button to turn the power on 2 Press the TAPE button 3 Open the...

Page 24: ...ND BY button to turn the power on 2 Press the CD button and load the desired disc 3 Load a cassette into the cassette compartment with side A facing you Wind past the leader of the tape on which recording cannot be performed 4 Press the button to choose one side or both sides To record on both sides To record on only one side 5 Press the button Recording will be paused 6 Press one of the DISC SELE...

Page 25: ...ge 24 2 Press the button to record on side A or the button for side B 1 Programme discs and tracks See page 20 2 Press the button 3 Press the button to record on side A or the button for side B Erase prevention tab of cassette tapes When recording on a cassette tape make sure that the erase prevention tabs are not removed Cassettes have removable tabs that prevent accidental recording or erasing T...

Page 26: ...For timer play back Load a cassette or discs to be played For timer re cording Load a cassette for recording in the cassette compartment 1 Press the ON STAND BY button to turn the power on 2 Press the CD TUNER BAND or TAPE button to select the desired function To select the timer playback source CD TUNER BAND or TAPE To select the timer recording source TUNER BAND When you selected the TUNER BAND ...

Page 27: ...listening at before your system enters the timer stand by mode In timer playback If you select CD or TAPE the unit will enter the stand by mode after the playback If you select TUNER it will enter the stand by mode one hour after the timer playback starts In timer recording When the recording tape reaches its end the timer recording will end and the unit will enter the stand by mode Once the time ...

Page 28: ...e TIMER SLEEP button repeatedly until SLEEP is displayed To change the sleep time Whilst the sleep time is displayed press the TUNING TIME or button Maximum 3 hours Minimum 1 minute 3 hours 5 minutes 5 minute intervals 5 minutes 1 minute 1 minute intervals 3 Press the MEMORY SET button 4 Your system will enter the power stand by mode automat ically after the preset time has elapsed The volume will...

Page 29: ...he cassette compartment 2 Press the VIDEO AUX button 3 Press the button 4 Press the or button 5 Play the VCR DVD etc Symptom Possible cause The clock is not on time Did a power failure occur Reset the clock Refer to page 16 When a button is pressed the unit does not respond Set this unit to the power stand by mode and then turn it back on If the unit still malfunctions reset it Refer to page 31 No...

Page 30: ...placed near the TV or computer Is the FM aerial or AM loop aerial placed properly Move the aerial away from the AC power lead or the unit if located near Symptom Possible cause Cannot record Is the erase prevention tab re moved Cannot record tracks with proper sound quality Is it a normal tape You cannot record on a metal or CrO tape Cannot erase completely Sound skipping Is there any slack Is the...

Page 31: ...capstans or pinch rollers can cause poor sound and tape jams Clean these parts with a cotton swab moistened with commercial head pinch roller cleaner or isopropyl alcohol When cleaning the heads pinch rollers etc unplug the unit which contains high voltages After long use the deck s heads and capstans may become mag netised causing poor sound Demagnetise these parts once every 30 hours of playing ...

Page 32: ... 366 mm 14 7 16 Weight 6 2 kg 13 7 lbs Output power Front speakers RMS 70 W 35 W 35 W 10 T H D RMS 56 W 28 W 28 W 0 9 T H D Surround speakers RMS 30 W 15 W 15 W 10 T H D RMS 24 W 12 W 12 W 0 9 T H D Output terminals Front speakers 8 ohms Surround speakers 16 ohms Headphones 16 50 ohms recommended 32 ohms Input terminals Video Auxiliary audio signal 500 mV 47 k ohms Type 3 disc multi play compact d...

Page 33: ... input power 70 W Rated input power 35 W Impedance 8 ohms Dimensions Width 165 mm 6 1 2 Height 260 mm 10 1 4 Depth 241 mm 9 1 2 Weight 2 5 kg 5 5 lbs each Type 8 cm 3 1 8 full range speaker Maximum input power 30 W Rated input power 15 W Impedance 16 ohms Dimensions Width 160 mm 6 5 16 Height 110 mm 4 3 8 Depth 149 mm 5 7 8 Weight 0 6 kg 1 3 lbs each ...

Page 34: ...MEMO XLHP550E MEMO 2002 08 07 12 42 1 ...

Page 35: ...MEMO XLHP550E MEMO 2002 08 07 12 42 1 ...

Page 36: ...se must be provided 4 The guarantee does not cover carriage costs jewelled styli audio tapes compact discs or batter ies 5 In the unlikely event of this product requiring repair please contact the supplier from whom it was purchased Where this is not possible please contact the Sharp Customer Information Centre on the telephone number given below 6 No person has any authority to vary the terms or ...

Reviews: