background image

VL-Z300E/VL-Z100E-Cover; 04/2/23/18:00

OPERATION MANUAL

SHARP CORPORATION

VL-Z300E-S   VL-Z100E-S

ENGLISH

Printed on 100% post-consumer recycled paper.

Printed in Malaysia

TINSLA114WJN1
04P03-M-G

LIQUID CRYSTAL DISPLAY CAMCORDER

VL-Z300E

-S

VL-Z100E

-S

OPERATION MANUAL

Summary of Contents for ViewcamZ VL-Z100E-S

Page 1: ...OPERATION MANUAL ENGLISH LIQUID CRYSTAL DISPLAY CAMCORDER VL Z300E S VL Z100E S OPERATION MANUAL ...

Page 2: ...d works which must not be recorded without the authority of the owner of the copyright Please refer to relevant laws in your country Power supply This unit can be operated by connecting it to either the AC adapter or battery pack The AC adapter incorporates the AUTO VOLTAGE AC 110 240 V 50 60 Hz function NOTE The LCD panel of this camcorder is a very high technology product with more than 215 000 ...

Page 3: ...by Sharp Information for Australia New Zealand Only ENGLISH NOTE This Camcorder is a high technology product The LCD Panel comprises 215 280 TFT Transistors Due to the high density of transistors it is possible that some pixels may fail Important Copyright may exist in material you wish to record Copying such material without permission of the relevant licensees or owners of the copyright is prohi...

Page 4: ...Using the Grip 15 Detaching the Lens Hood 16 Using the Viewfinder 16 Using the LCD Monitor 18 Tips on Recording Positions 19 Camera Recording Easy Camera Recording in Full Auto Mode 20 Zooming 21 Power Standby Mode 22 Turning on off the Backlight 22 Auto Focus 23 Macro Shots 23 Remaining Recording Time Display 23 Remaining Battery Power Display 24 Information Display for Battery Usage 24 Playback ...

Page 5: ...Long Play Recording Mode 40 Selecting the 16 bit Audio Recording Mode 41 Playback Using the Remote Control Not supplied 42 Selecting the Date and Time of Recording Display 43 Picture Effect Playback 44 Rotate Playback 45 Stretch Playback 46 Advanced Features Camera Recording Manual Focus 47 Returning to Auto Focus 48 Displaying the Manual Setting Screen 48 Adjusting White Balance 49 Manual Iris 51...

Page 6: ...ooting 75 Specifications 79 On screen Display Index 80 Index 82 Note Before requesting service please read Troubleshooting carefully See pages 75 78 Contents Playback Using the Time Code 57 Audio Dubbing Feature 58 Selecting the Audio Playback Mode 60 Editing 61 Recording from an External Source VL Z300 only 62 Editing with the DV Terminal IEEE1394 64 Using the Camcorder as a Converter VL Z300 onl...

Page 7: ...e lithium battery for camcorder Lens cap Standard life battery pack BT L227 External battery with hand strap BT LCA1 Optional Accessories AC adapter Audio video S video cable Power cord Note Some of these accessories may not be available in selected areas ...

Page 8: ...he camcorder in close proximity to lighting equipment The heat from in candescent lights may deform the camcorder or cause it to malfunction Always respect prohibitions or restric tions on the use of electronic equipment on commercial flights or in other sensi tive areas Be aware of the temperature and humid ity You can use your camcorder at 0 C to L40 C and at 30 to 80 relative hu midity Do not s...

Page 9: ...uble When using the camcorder in a place where dew is likely to form allow the camcorder and the video tape to acclimatise to the surroundings for about one hour For example when bringing the camcorder indoors after skiing place it in a plastic bag 1Be sure to tightly seal the plastic bag containing the camcorder 2Remove the bag when the air tem perature inside it reaches the tempera ture of the r...

Page 10: ...rt soon after cleaning this might be caused by a damaged tape In this case stop using that cassette immediately 1 Insert a cleaning tape into the camcorder 2 Hold down the Lock button and set the Power switch to w The video head cleaning screen appears 3 Press m on the Operation button to begin video head cleaning NOW CLEANING flashes during cleaning After about 20 seconds video head cleaning auto...

Page 11: ...eferences Part Names For details on the use of each part refer to the page number indicated in parentheses Front view Zoom lens DISPLAY MODE SET button p 28 LCD LAMP button p 22 Operation button p 28 Monaural microphone MENU button p 29 ...

Page 12: ...socket Left view Dioptre adjustment dial p 17 Battery release pp 6 10 When attaching a tripod with a guide pin do not attach the pin to the bottom of the camcorder LCD monitor p 18 DV terminal pp 64 66 DC IN jack pp 7 8 AV terminal pp 27 61 62 66 Terminal cover pp 27 61 62 64 66 ...

Page 13: ...on p 20 PHOTO button p 35 Power switch v Camera Recording mode w Playback mode select switch pp 20 25 STANDBY button p 22 STANDBY indicator p 22 POWER CHARGE RED indicator pp 7 8 20 Cassette holder p 9 Cassette compartment door release p 9 Cassette compartment door p 9 Right view Hand strap p 15 Speaker Window cleaning cover p 73 ...

Page 14: ...slid to the record protect position preventing recording see page 71 The tape is about to end Prepare a new cassette see page 9 THE ENDS SOON TAPE DEW LAMP LAMP DEW The tape has reached the end Replace it with a new cassette see page 9 The battery is almost depleted Replace it with a fully charged battery pack see pages 5 and 6 Dew has formed inside the camcorder Wait a few hours for the dew to dr...

Page 15: ...Make sure that the Power switch is set to OFF 2 Open the LCD monitor to a 90 angle to the camcorder body 3 Slide the battery pack in the direction of the arrow with the m mark facing out 4 Push the battery pack in the direction of the arrow until it clicks Power switch m mark 90 ...

Page 16: ... battery pack from the camcorder if you will not use the camcorder for a long period of time Make sure that the battery pack is firmly attached during operation If it is not the battery pack may come off or camcorder operation may fail because of the poor contact pressure To prevent damage to the battery pack when removing be sure to firmly hold the battery pack while pressing the release Use only...

Page 17: ...alfunction Using the zoom see page 21 and other functions or turning the power on and off frequently will increase power consump tion This may result in a decrease in the actual recording time compared to the maximum continuous recording time listed above The charging time and recording time may vary depending on the ambient tempera ture and the condition of the battery pack See pages 72 and 73 fo...

Page 18: ...pter and insert the AC plug into a power outlet 3 Insert the DC plug into the DC IN jack of the camcorder 4 Hold down the Lock button and set the Power switch to v or w The POWER CHARGE RED indicator lights up green Notes BEFORE REMOVING THE DC PLUG ALWAYS STOP RECORDING OR PLAY BACK AND TURN THE POWER OFF Removing the DC plug while shooting or during playback may damage the tape by causing it to ...

Page 19: ... Be careful not to get your fingers caught in the cassette holder Do not apply force to the cassette holder except when pressing the PUSH mark to close it Do not tilt the camcorder or hold it upside down when you are inserting or removing a cassette It may damage the tape Remove the cassette if you will not use the camcorder for a long period of time If you do not correctly close the cassette hold...

Page 20: ... release in the direction of the arrow then take the battery pack out 4 Pull out the lithium battery cover in the direction of the arrow 5 Insert the CR1216 type lithium battery into the compartment with the H side of the battery facing out 6 Close the lithium battery cover firmly until it clicks into place Removing the Memory Battery Perform steps 1 to 4 above then lift out the battery by using a...

Page 21: ...thium Battery Do not short circuit recharge disassemble or heat the lithium battery Should the lithium battery leak wipe the battery compartment clean and then insert a new battery The lithium batteries will last about one year under normal usage CAUTION Danger of explosion if battery is incorrectly replaced For camcorder replace only with same or equivalent type CR1216 for remote control unit rep...

Page 22: ...to 2 June 2005 2 6 2005 and the time to 10 30 am 10 30 Note Before performing the steps below make sure that the CR1216 type lithium battery has been installed see page 10 The example screens shown are for Camera mode 1 Hold down the Lock button and set the Power switch to v or w 2 Press the MENU button to display the menu screen O T H E RS 2 DA T E D I S P RE TURN T I ME CODE OF F POWER SAV E OF ...

Page 23: ... menu screen automatically turns off if no settings are made within 5 minutes 12H 2 1 H 24H O T H E RS 2 1 2 H 2 4 H DA T E D I S P RE TURN T I ME POW E R S A VE CODE T C OUT S E T T I NG 1 2 H 2 4 H 8 Press m or l to select 30 minute then press the centre of the Operation button The internal clock now starts operating with the seconds display 9 Press the MENU button to turn off the menu screen No...

Page 24: ...own below When attaching or removing the lens cap grasp the indents on both sides of the cap When recording remove the lens cap and attach the lens cap cord to the fastener so that the cap will not get in the way Note Always attach the lens cap over the lens when not using the camcorder Indents Fastener ...

Page 25: ...Stop button and your index finger on the Power Zoom control Then pull the grip strap tight until it fits snugly 3 Seal the Velcro fasteners of the grip strap and the hand strap flap Using the Grip Rotate the grip 135 forward or 105 downward so that you can record images easily from high or low angle see page 19 Note The grip cannot rotate when a tripod is attached Grip strap Hand strap flap 135 10...

Page 26: ... the viewfinder 1 Pull out the viewfinder completely 2 Hold down the Lock button and set the Power switch to v or w Detaching the Lens Hood Before using a commercially available conversion lens detach the lens hood as shown below Note You cannot attach the supplied lens hood or lens cap to a conversion lens Power switch Viewfinder Lock button ...

Page 27: ...n adjust the settings on the MENU screen through the viewfinder by using the Operation button see page 28 for use of the Operation button Be sure to close the viewfinder after use Adjusting the dioptre Adjust the dioptre according to your eyesight when the picture in the viewfinder or the characters on the on screen display is not clear 1 Pull out the viewfinder completely 2 Hold down the Lock but...

Page 28: ... the LCD monitor is opened Use the viewfinder instead of the LCD monitor when you want to save the battery power Closing the LCD monitor Return the LCD monitor to the vertical 90 position with the screen facing in and fold it into the camcorder into place Notes Do not use excessive force when moving the LCD monitor When closing the LCD monitor do not tilt it otherwise the monitor may not close pro...

Page 29: ...atch during playback try to record with an upright posture and steady hands to prevent a shaky image Holding the camcorder Put your right hand through the hand strap and place your left hand under the camcorder for support Basic posture Place the viewfinder eyecup firmly against your eye Shooting from a low angle Shooting from a high angle Note Take care not to touch the microphone with your finge...

Page 30: ...m continuous recording and actual recording times The chart specifies the approximate times in minutes Note Using the zoom see page 21 and other functions or turning the power on and off frequently will increase power consump tion This may result in a decrease in the actual recording time compared to the maximum continuous recording time listed above Basic Operations Camera Recording Note Before r...

Page 31: ...ording after pressing the Record Start Stop button Zooming Zooming allows you to move visually closer to or further from a subject without physi cally changing your position When using the optical zoom you can enlarge the subject up to 10K Zooming in Push the Power Zoom control to the T telephoto side to get a close up view 1 Zooming out Push the Power Zoom control to the W wide angle side to get ...

Page 32: ...own the LCD LAMP button for more than 2 seconds Note The backlight off mode will cancel when you close the LCD monitor To resume operation Press the STANDBY button again to return to the Recording Standby mode It takes about 2 seconds to be able to start recording Notes Power Standby will cancel and the STANDBY indicator will turn off in these situations below When the camcorder remains in Power S...

Page 33: ... in on it Instead zoom out all the way by pushing the Power Zoom control to the W side and then move the camcorder closer to the subject until you obtain the desired angle of view The camcorder will automatically focus on the subject when the lens is set for the widest angle Note When you are recording a macro shot be sure that the subject receives sufficient illumination 3 0 min THE ENDS SOON TAP...

Page 34: ...tor appears Replace the battery pack Notes The remaining battery power indicator appears when the on screen indicators are turned on Use the remaining battery power indicator only as an approximate indication The remaining battery power indicator may change to either a higher or lower level if you set the Power switch to OFF and then back to v or w In cold environments the red remaining battery po...

Page 35: ...ng in stop mode without any operation for 5 or 10 minutes the camcorder will turn off automatically Watching the playback in the viewfinder You can also watch the playback in the viewfinder by closing the LCD monitor with the screen facing in You cannot monitor the sound through the speaker when watching the playback in the viewfinder Playback The LCD monitor screen functions as a handy playback m...

Page 36: ...d or rewind 3 Repeat steps 1 and 2 above until you find the scene 4 Press m to begin normal playback Notes The sound is off during search You may experience picture noise during search This is not a malfunction Still The still function allows you to pause playback During playback press m on the Operation button To return to normal playback press m again Notes The sound is off in Still mode To prot...

Page 37: ...ing a connection 3 Turn on the TV and set it to the AV or VIDEO channel See the operation manual of your TV When connecting to a TV via a VCR turn on the VCR and set it to the AV or LINE input channel Operate the TV as you normally do to view the signal from the VCR See the operation manuals of your TV and VCR 4 Set the Power switch on the camcorder to w and begin playback see page 25 Notes If you...

Page 38: ...ntil the mode screen appears 3 Press l or m on the Operation button to select the desired mode item SCENE MENU then press the centre of the Operation button 4 Press l or m to select the desired mode setting DUSK then press the centre of the Operation button To turn off the mode screen Press the DISPLAY MODE SET button Note Items that are not selectable are greyed out 30min AUTO 30min AUTO S E L E ...

Page 39: ...he centre of the Operation button 5 Press l or m to select the desired menu setting 40 then press the centre of the Operation button You can press j instead of the centre of the Operation button To adjust another menu item press l or m to select RETURN and press the centre of the Operation button then perform steps 3 to 5 To turn off the menu screen Press the MENU button Notes Certain menu items a...

Page 40: ...is in addition to the optical zoom giving a combined maximum zoom range of 1 500K As the image is enlarged digitally the picture quality decreases when higher digital zoom settings are used 1 In Camera mode press the MENU button to display the menu screen 2 Press l or m on the Operation button to select T then press the centre of the Operation button 3 Press l or m to select DGTL ZOOM then press t...

Page 41: ...ration button to select BLC GAIN then press the centre of the Operation button 3 Press l or m to select ON x then press the centre of the Operation button E X E CU T E B L C G A I N S E T MANU A L F OCUS AUTO F OCUS BLC GA I N ON AUTO AUTO 30min 30min PAUSE PAUSE 4 Press the DISPLAY MODE SET button to turn off the mode screen x appears when on screen indicators are turned on indicating that the ba...

Page 42: ... noise in Gain up mode which increases when the e appears When the e indicator appears you may get a shadow image behind a subject that is moving around a lot Fine brightness adjustments are possible when using manual iris see page 51 The e indicator will disappear and Gain up mode will cancel if you aim the camcorder in a bright location 2 Press l or m on the Operation button to select BLC GAIN t...

Page 43: ...by mode To cancel Fade mode Select OFF in step 3 above To use Fade Out only 1 During camera recording press the DISPLAY MODE SET button until the mode screen appears 2 Perform steps 2 and 3 in Using 3 Press the Record Start Stop button at the point where you wish to stop recording Note Fade mode automatically cancels after Fade Out Using 1 In Camera mode press the DISPLAY MODE SET button until the...

Page 44: ...CH flashes and the tape begins fast forwarding or rewinding to the end of the last recorded scene When the tape reaches the end of the last recorded scene FINISHED is displayed and the camcorder enters Recording Standby mode 5 Press the MENU button to turn off the menu screen Notes To cancel the quick return function while SEARCH is flashing press the centre of Operation button twice Quick return ...

Page 45: ...on will be slightly lower than normal pictures Edit Search The edit search function lets you search without switching from Camera mode to Playback mode for the point on the tape where you wish to start recording next 1 In Recording Standby mode press and hold down j reverse edit search or k forward edit search on the Operation button 2 When you find the point where you want to begin recording rele...

Page 46: ...ing does not occur e g when using the camcorder on a tripod turn off the DIS function The picture will appear more natural when the DIS function is off S E T T I NG 2 D I S ON OF F AUD I O MODE RE TURN W I ND PAUSE ON DIS Wide Mode The wide screen function lets you record scenes with the wide screen feel of a movie shown in a theater The top and bottom of the picture are masked with black bands to...

Page 47: ...recording or playing back It will also not turn off when inputting AV or DV for VL Z300 The camcorder will turn off prior to Power Standby mode OTH E RS 2 T I ME POW E R S A VE CODE T C 5 M I N 1 0 M I N OU T OF F DA T E D I S P RE TURN S E T T I NG 1 2 H 2 4 H POWE R SAVE 5 MI N Windbreak The windbreak function allows you to reduce annoying noise from strong winds when recording 1 In Camera mode ...

Page 48: ... you can record yourself in the scene by watching yourself on the LCD monitor 1 Pull out the viewfinder completely Open the LCD monitor to a 90 angle to the camcorder body 1 and then rotate it 180 vertically 2 2 Set the Power switch to v The subject is displayed in the viewfinder and a mirror image of the subject is displayed on the LCD monitor 3 Begin recording Note You can play back images while...

Page 49: ...of the manual settings are set to AUTO and some other settings will set to OFF in self recording with reversed grip You may experience image noise when using self recording To operate self recording with reversed grip correctly make sure to turn the grip and the lens section so that the Record Start Stop button and the tripod socket face upward and the lens faces toward you The I indicator will ap...

Page 50: ...ears when the on screen indicators are turned on To return to SP mode Select SP in step 4 above Notes on the use of LP mode To record in LP mode be sure to use a Mini DV cassette labelled for use with LP mode Frozen images mosaic pattern picture noise audio interruptions or audio loss may occur in the following cases When using a tape which is not designated for use with LP mode When a tape record...

Page 51: ...press the centre of the Operation button 4 Press l or m to select 16bit then press the centre of the Operation button 5 Press the MENU button to turn off the menu screen The 16 bit audio recording mode indicator only appears when the on screen indicators are turned on To return to 12 bit audio recording mode Select 12bit in step 4 above Note When using Audio Dubbing with 16 bit audio recordings bo...

Page 52: ...tton 5 Press the MENU button to turn off the menu screen Useful Features Playback Operating Aim the remote control at the remote sensor of the camcorder and press the control buttons to operate OTH E RS 1 B E E P REMO T E DE F AUL T S V I DE O I N RE TURN ON OF F REMOTE ON Notes Be careful not to expose the remote sensor to direct sunlight or strong interior lighting as this may prevent the remote...

Page 53: ...the Operation button 5 Press the MENU button until the date or date and time appears Notes The date or date and time appears when the on screen indicators are turned on Before recording make sure that the date and time have been correctly set If they have not been set the display will be left blank when playing back the recording The display will also be left blank for unrecorded or damaged portio...

Page 54: ...nd white SEPIA The picture is displayed in sepia colour similar to that of an old photograph SOLARI The contrast of the subject is enhanced creating an unique artistic image NEGA The blacks and whites of the image are reversed and colours of the image are inverted 1 During playback press the DISPLAY MODE SET button until the mode screen appears 2 Press l or m on the Operation button to select PIC ...

Page 55: ...rotate playback The image is rotated 180 upside down To cancel rotate playback Press the centre of the Operation button in step 4 above P L A Y B AC K AUD I O ANL G OF F DGT L RE T URN S E T EXECUTE ROTATE PB AUDIO ROT AT E PB 2 1 1 2 Notes When executing rotate playback during playback playback will stop Press m to begin rotate playback Even if the camcorder is in rotate playback mode the image o...

Page 56: ... The picture displays with black bands To cancel stretch playback Press the centre of the Operation button in step 3 above Notes Squeeze is an image compression technology A 16 9 image is compressed and recorded squeeze recorded as a 4 3 image In stretch playback mode you cannot perform picture effect playback When outputting the stretch playback image from the DV terminal the original image signa...

Page 57: ...f the scene at the same time Advanced Features Camera Recording 1 In Camera mode press the DISPLAY MODE SET button until the mode screen appears 2 Press l or m on the Operation button to select FOCUS then press the centre of the Operation button 3 Adjust the Power Zoom control to frame the subject as you desire 4 Press l or m to focus on the subject p To focus on a closer subject o To focus on a m...

Page 58: ... selected when a scene setting is selected Returning to Auto Focus You can set Manual Focus mode to Auto Focus mode with the operation below 1 In Camera mode press the DISPLAY MODE SET button until the mode screen appears 2 Press l or m on the Operation button to select AUTO FOCUS then press the centre of the Operation button The FOCUS setting returns to Auto Focus mode Note You can return to Auto...

Page 59: ...Fix the setting to the standard balance White Balance Lock OUTDOOR For recording outdoors on a sunny day INDOOR For recording indoors with halogen lamps or incandescent lighting 3 Press l or m to select WHITE BAL then press the centre of the Operation button 4 Press l or m to select a white balance setting then press the centre of the Operation button When selecting LOCK MODE perform the steps in ...

Page 60: ...ton LOCK flashes during the locking procedure and stops flashing after locking the white balance Note If you move the camcorder while LOCK is flashing LOCK may not stop flashing If this occurs repeat step 3 4 Press the DISPLAY MODE SET button to turn off the MANUAL SET screen To return to Auto White Balance mode Press j in step 4 in Selecting on the previous page or step 3 in Locking to display AU...

Page 61: ...he Operation button to select MANUAL SET then press the centre of the Operation button see page 48 3 Press l or m to select IRIS then press the centre of the Operation button 4 Press l or m to select the desired iris value then press the centre of the Operation button The number shown is the selected iris value The adjustment range is 15 steps from F1 8 most light to F19 least light 5 Press the DI...

Page 62: ...ars 2 Press l or m on the Operation button to select MANUAL SET then press the centre of the Operation button see page 48 3 Press l or m to select GAIN then press the centre of the Operation button 4 Press l or m to select the desired gain value then press the centre of the Operation button The number shown is the selected gain value The adjustment range is 7 steps from 0dB lowest sensitivity to L...

Page 63: ... Speed mode Press j in step 4 above to display AUTO To return to Full Auto mode Set the camcorder to Full Auto mode see page 54 WH I T E B A L I R I S AU T O GA I N F U L L AU T O RE TURN SHU T SP E E D WH I T E B A L I R I S GA I N F U L L AU T O 1 2 5 0 E X E CUT E AU T O AU T O AU T O RE TURN SHU T SP E E D Recommended Shutter Speeds The faster the shutter speed the darker the picture becomes S...

Page 64: ... faster than 1 50 sec tends to darken the picture Record in bright locations when you use a fast shutter speed Using a fast shutter speed under fluorescent lighting will cause flickering in the picture and possibly periodic colour shifts When selecting 1 25 sec or 1 12 sec shutter speed you may get a shadow image behind a subject that is moving around a lot The Manual Shutter Speed setting cannot ...

Page 65: ...ing displays on the mode screen 4 Press the DISPLAY MODE SET button to turn off the mode screen The selected scene setting indicator displays when the on screen indicators are turned on To cancel the scene setting Select OFF in step 3 above Note Scene settings cannot be used when using any manual setting except focus Also not selectable when e displays Types SPORT A When you want to record a fast ...

Page 66: ...n press the centre of the Operation button 4 Press the DISPLAY MODE SET button to turn off the mode screen To cancel the digital picture effect Select OFF in step 3 above Note Digital picture effects will not work when a still image is displayed Types B W To record in black and white SEPIA To record in sepia colour similar to that of an old photograph SOLARI To record with enhanced contrast creati...

Page 67: ...on screen indicators are turned on Minute Hour ON T IME CODE OTH E RS 2 T I ME POW E R S A VE CODE T C OU T OF F ON DA T E D I S P RE TURN S E T T I NG 1 2 H 2 4 H 0 1 0 2 0 T C AUDIO 2 1 Displaying the time code on a TV during playback 1 In Playback mode press the MENU button to display the menu screen 2 Press l or m on the Operation button to select then press the centre of the Operation button ...

Page 68: ...ded in monaural on two separate channels Audio 1 Monaural sound Audio 2 Monaural sound In Audio Dubbing mode 12 bit audio recording The dubbed audio is recorded on Audio 2 Audio 1 Original monaural sound Audio 2 Dubbed monaural sound 16 bit audio recording The dubbed audio is recorded on Audio 2 over the original monaural sound Audio 1 Original monaural sound Audio 2 Dubbed monaural sound Notes Yo...

Page 69: ...dub addi tional scenes 1 Press the DISPLAY MODE SET button to turn off the audio dubbing screen 2 Repeat steps 1 to 5 above Notes It is recommended that you use Audio Dubbing only with recordings made with this camcorder Use of recordings made with other digital video equipment may result in poor audio quality Audio dubbing will automatically pause if the original audio changes from 12 bit mode to...

Page 70: ...utton to select V then press the centre of the Operation button 4 Press l or m to select AUDIO then press the centre of the Operation button ANLGyDGTL does not appear with VL Z100 5 Press l or m to select the desired audio playback mode then press the centre of the Operation button 6 Press the MENU button to turn off the menu screen The selected audio playback mode indicator only appears when the ...

Page 71: ...of the portion that you wish to keep 2 Load a video cassette into the recording VCR 3 Press m on the camcorder to begin playback then press the Record button on the VCR to begin recording 4 Press the Pause Still button on the VCR to pause recording when the source tape reaches the beginning of the sequence to be cut 5 Press the Pause Still or Record button on the VCR to resume recording when the s...

Page 72: ...terminal cover If the source equipment has only one audio output jack use the white plug for the audio connection on the source equipment The input audio will only be recorded on the left channel of the tape Even if the source equipment has an S video output socket connect both the yellow video plug and S video plug VIDEO S VIDEO L AUDIO R MONO AV OUT Recording To AV terminal Audio video S video c...

Page 73: ...when you set the S VIDEO IN menu item to ON in step 4 above 6 Begin playback on the source equipment connected to the camcorder Check the camcorder screen to see if the picture is properly received 7 Press the Record Start Stop button on the camcorder then press m to begin recording OTH E RS 1 B E E P REMO T E DE F AUL T S V I DE O I N RE TURN OF F ON Notes To pause recording press m Press m again...

Page 74: ...ideo equipment with a DV terminal using a commercially available DV cable To Record to Video Equip ment See Cutting Unwanted Sequences on page 61 using the video equipment as the recording source Note Make sure that the video equipment to which you are recording can input dubbing signals via the DV terminal Note See page 2 for how to open the terminal cover To DV terminal To DV terminal DV cable c...

Page 75: ...ng signals via the DV terminal If the video equipment is not set to playback mode or the DV cable is not properly connected NO SIGNAL is displayed on the camcorder screen If no picture or sound is input to the camcorder even if the DV cable is properly connected and you are playing back the source media from the video equipment set the Power switch on the camcorder to OFF and then back to w or dis...

Page 76: ... the MENU button to turn off the menu screen 7 Press the Play button on the analog equipment Check the monitor on the digital equipment to see if the picture is being properly received 8 Press the Record button on the digital equipment Notes This function cannot be used with VL Z100 The camcorder is not guaranteed to work with all digital analog equipment Contact the manufacturer of your equipment...

Page 77: ...r VF BRIGHT then press the centre of the Operation button The viewfinder turns on if you select VF BRIGHT VL Z300 only 4 Press j or k to adjust the item to the desired setting then press the centre of the Operation button VF BRIGHT does not appear with VL Z100 L C D S E T BACKL IGHT L C D BR I GHT L C D C OL OUR RE T URN NORMAL V F BR I GHT Adjusting the Backlight 1 Press the MENU button to displa...

Page 78: ...ON in step 4 above OTH E RS 1 B E E P REMO T E DE F AUL T RE TURN ON OF F DEMO MODE OFF BEEP Setting the Camcorder to Factory Presettings You can set the camcorder to the factory presettings in one operation The example screens shown are for Camera mode 1 Press the MENU button to display the menu screen 2 Press l or m on the Operation button to select Z then press the centre of the Operation butto...

Page 79: ... the Operation button 5 Press l or m to select ON then press the centre of the Operation button 6 Set the Power switch to OFF then hold down the Lock button and set the Power switch to v The demonstration begins Cancelling 1 During the demonstration press the centre of the Operation button to pause the demonstration 2 Perform step 2 to 4 in Watching then select OFF in step 5 Notes The demonstratio...

Page 80: ...pensation or correct the iris value to improve the picture see pages 31 and 51 Before zooming think about how to best frame the shot Frequent zooming produces unattractive pictures It also runs down the battery more quickly When image shaking is noticeable during zoomed in telephoto shooting use a tripod or push the Power Zoom control to the W side to zoom out Light from behind Backlighting Horizo...

Page 81: ...Mini DV cassette near magnetic sources such as electric clocks or magnetic devices as this may adversely affect recorded material When a previously recorded Mini DV cassette is used again for recording the previously recorded material will be automatically erased The Mini DV cassette will not operate if inserted in the wrong direction Do not repeatedly insert and eject the Mini DV cassette without...

Page 82: ...y SHARP BT L227 battery packs These are designed specifically for use with this camcorder Storage Store the battery pack in a fully dis charged state Store the battery pack in a dry cool place When storing the battery pack put it in the original protective plastic bag Notes Improper handling of the battery pack may present a risk of fire or explosion Pay close attention to the following Do not all...

Page 83: ...uted neutral detergent Then wipe it again with a soft dry cloth Use a soft cloth to wipe finger marks and other smudges off the LCD screen Use a soft cloth or compressed air and lens paper designed for photographic lenses to clean the lens Pull out the viewfinder and open the window cleaning cover as shown below so that you can clean up the inside of the viewfinder with a camera blower Extending b...

Page 84: ...tection The digital VCR has far superior recording and playback ability than the traditional analog VCR and in order to protect digital video software copyrights a system for managing copyrights has been established Some digital video recording with prere corded copyright protection signals can still be played back on this camcorder If you play a digital video recording that has a copyright protec...

Page 85: ...all battery pack and turn on power pp 5 6 Close tab or use a new cassette p 71 Set the POWER SAVE menu item to OFF p 37 Set to Auto Focus mode p 48 Zoom out from subject p 21 Focus manually p 47 Set the DEMO MODE menu item to OFF p 69 Possible cause Power source is not properly con nected Battery pack is not charged Dew in camcorder Safety function is in effect Erasure protect tab on video cas set...

Page 86: ...video heads Old or worn tape Using a 12 bit recording tape with AUDIO menu item set to AUDIO 2 Battery pack is depleted Improper self recording Suggested solution Select video input channel or TV channel properly p 27 Connect audio video S video cable properly p 27 Connect DV cable or audio video S video cable properly pp 62 64 66 Set the S VIDEO IN menu item to ON for S video connection or OFF fo...

Page 87: ...ght has been turned off Fluorescent lamp has burned out Viewfinder dioptre is not properly adjusted Inappropriate picture adjustments Inappropriate picture adjustments AC adapter or battery pack may have malfunctioned Audio video S video cable is not properly connected Suggested solution Warm up battery pack for example in your pocket just before using it Charge battery pack sufficiently p 7 Insta...

Page 88: ...ation If the characters displayed in the viewfinder or on the LCD monitor screen appear to malfunc tion disconnect the power source and remove the lithium battery then reconnect the power source insert the lithium battery and turn the power on again The characters on the monitor should be normal Set the date and time then resume operation Symptom E007 is displayed on the screen and unable to opera...

Page 89: ...1 8 DV terminal 4 pin connector i LINK Power Requirement DC 7 4 V Power Consumption 3 4 W during camera recording in Camera mode using the viewfinder in Full Auto mode with the DIS function on 4 0 W during camera recording in Camera mode using the LCD monitor in Full Auto mode with the DIS function on and backlight in normal mode Operating Temperature 0 C to L40 C Operating Humidity 30 to 80 Stora...

Page 90: ...F BR I GHT RE TURN B E E P REMO T E DE F AUL T RE TURN T I ME CODE T C POW E R S A VE OUT S E T T I NG 1 2 H 2 4 H B L C GA I N P I C E F F E C T DEMO MODE DA T E D I S P E X E CUT E BLC GA I N S E T MANUAL F OCUS AUTO F OCUS SC EN E ME NU 5 0 0 2 6 2 0 3 0 1 p 34 p 36 p 30 p 40 Camera mode p 36 p 41 p 37 p 68 p 42 p 68 p 69 p 37 p 57 p 57 p 13 p 43 p 12 p 67 p 67 p 67 p 67 p 48 p 47 p 48 pp 31 32...

Page 91: ... E P B AUDIO 2 1 AUDIO 2 1 F F REW S T OP P L A Y AUD I O DUB STRE TCH P B P I C E FFECT AUD I O DUB S T R E T C H P B P I C E F F E C T S V I DE O I N DA T E D I S P S E T T I NG 1 2 H 2 4 H 5 0 0 2 6 2 0 3 0 1 p 45 p 60 p 66 Playback mode p 68 p 42 p 68 p 63 p 37 p 57 p 57 p 13 p 43 p 12 p 67 p 67 p 67 p 67 p 44 p 59 p 46 p 24 p 60 Menu screens Mode screens DISPLAY MODE SET button MENU button VL...

Page 92: ...2 73 Beep 68 C Charging 7 Conversion lens 16 D Date and time 43 Default 68 Demo mode 69 Digital zoom 30 Dioptre adjustment dial 17 DIS 36 DISPLAY MODE SET button 28 DV terminal 64 66 E Edit search 35 Erasure protect tab 71 F Fade 33 Full Auto 54 G Gain 52 Gain up 32 H Hand grip 15 Hand strap 15 I Information display 28 Iris 51 L LCD bright 67 LCD colour 67 LCD LAMP button 22 LCD monitor 18 Lens ca...

Page 93: ...r switch 20 25 Power Zoom control 21 Q Quick Return 34 R Record Start Stop button 20 Recording Standby mode 20 21 Recording time 20 Remote control 42 Rotate playback 45 S Scene menu 55 Self recording 38 39 Shutter speed 53 54 SP mode 40 STANDBY button 22 Still recording 35 Stretch playback 46 T Tape speed 40 Terminal cover 2 Time Code 57 V VF bright 67 Video search 26 Viewfinder 16 17 Volume contr...

Page 94: ...Note ...
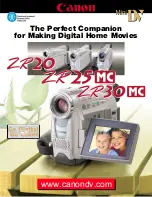
Page 95: ...OPERATION MANUAL SHARP CORPORATION VL Z300E S VL Z100E S Printed on 100 post consumer recycled paper Printed in Malaysia TINSLA114WJN1 04P03 M G ...

Reviews: