Sea&Sea MDX-D600, Instruction Manual
The Sea&Sea MDX-D600 is a high-quality underwater camera housing specifically designed for the Nikon D600 DSLR. Capture breathtaking underwater images effortlessly with this durable and reliable housing. Access the detailed Instruction Manual for free download on our website to maximize your shooting experience and elevate your underwater photography skills.
Share
Download


Reviews:
No comments
Related manuals for MDX-D600

ACS 800 Series
Brand: ABB Pages: 14

475
Brand: Manfrotto Pages: 2

SX Series
Brand: Waycon Pages: 8

IPV58P2P
Brand: Ebode Pages: 76

Comfort Pro
Brand: T-Home Pages: 52

SESSION
Brand: M-Audio Pages: 14

Smartech II
Brand: Viking Pages: 5

Energy Hub EH128L
Brand: TBB power Pages: 24

00183354
Brand: Hama Pages: 38

02106
Brand: Compass Pages: 16

E39/2
Brand: BMW Pages: 21

MBar EX
Brand: JETI model Pages: 7

SR-A260
Brand: AA Products Pages: 4

Wireless Rain Sensor
Brand: R&D Pages: 8

BT002001
Brand: J-3 International Holding Co. Pages: 5

H4550
Brand: Fab Fours Pages: 13

juice pack plus
Brand: Mophie Pages: 2
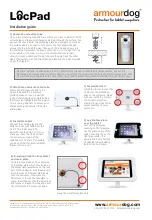
Armourdog LocPad ADLOC102W
Brand: Lente Designs Pages: 6


