

S
TN-SF
40 Installation Guide
S
TN-SF
40 Installation Guide
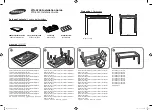
Package Contents
/ Contenu de l’emballage
Assembly
/
조립하기
Dimension /
Dimensions
Place a soft blanket between the ground and the display for
protection. Next, start attaching the legs.
Place a soft blanket between the ground and the display for
protection. Next, start attaching the legs.
Place a soft blanket between the ground and the display for
protection. Next, start attaching the legs.
Place a soft blanket between the ground and the display for
protection. Next, start attaching the legs.
Place a soft blanket between the ground and the display for
protection. Next, start attaching the legs.
Place a soft blanket between the ground and the display for
protection. Next, start attaching the legs.
Place a soft blanket between the ground and the display for
protection. Next, start attaching the legs.
Place a soft blanket between the ground and the display for
protection. Next, start attaching the legs.
Place a soft blanket between the ground and the display for
protection. Next, start attaching the legs.
제품 보호를 위해 바닥에 부드러운 천을 깔고 다리조립을 시작하세요.
Fasten the screws into the 4 grooves on each of the sides as
shown in the image.
Fasten the screws into the 4 grooves on each of the sides as
shown in the image.
Fasten the screws into the 4 grooves on each of the sides as
shown in the image.
Fasten the screws into the 4 grooves on each of the sides as
shown in the image.
Fasten the screws into the 4 grooves on each of the sides as
shown in the image.
Fasten the screws into the 4 grooves on each of the sides as
shown in the image.
Fasten the screws into the 4 grooves on each of the sides as
shown in the image.
Fasten the screws into the 4 grooves on each of the sides as
shown in the image.
Fasten the screws into the 4 grooves on each of the sides as
shown in the image.
Fasten the screws into the 4 grooves on each of the sides as
shown in the image.
그림과 같이 좌,우 4개의 홈에 나사를 고정하세요.
Fasten the screws into the 4 grooves on each of the sides as
shown in the image.
Fasten the screws into the 4 grooves on each of the sides as
shown in the image.
Fasten the screws into the 4 grooves on each of the sides as
shown in the image.
Fasten the screws into the 4 grooves on each of the sides as
shown in the image.
Fasten the screws into the 4 grooves on each of the sides as
shown in the image.
Fasten the screws into the 4 grooves on each of the sides as
shown in the image.
Fasten the screws into the 4 grooves on each of the sides as
shown in the image.
Fasten the screws into the 4 grooves on each of the sides as
shown in the image.
Fasten the screws into the 4 grooves on each of the sides as
shown in the image.
Fasten the screws into the 4 grooves on each of the sides as
shown in the image.
그림과 같이 좌,우 4개의 홈에 나사를 고정하세요.
The assembly is complete.
The assembly is complete.
The assembly is complete.
The assembly is complete.
The assembly is complete.
The assembly is complete.
The assembly is complete.
The assembly is complete.
The assembly is complete.
The assembly is complete.
조립을 완료합니다.
Table legs
Pieds de table
Rubber-Bottom
Rubber-Bottom
Screw (M4 X L16) 25EA
Vis (M4 X L16) 25EA
SUR40 Installation Guide
SUR40 Installation Guide
1091.0
736.6
74.7
707.4
642.2
68.7
BN68-03155D-00.indd 1
2011-11-30 오후 7:18:03
- Weight : 13.6 Kg


