

•
Dual 2.5" drive RAID housing
• Choice of USB 2.0, FireWire 800, or
eSATA interface
• Convenient, low-profile desktop
form factor
• Supported modes: JBOD, RAID 0
(striping), RAID 1 (mirroring), and
Span (large)
• RAID Master software for easy
RAID setup
• Time Machine compatible
PC
• 266 MHz or faster CPU
• 64 MB RAM
• Microsoft Windows 2000, XP, Vista, 7, or higher
• One available USB 2.0, eSATA, or IEEE 1394b port
MAC
• Macintosh P
owerPC or Intel processor
•
64 MB RAM
•
Mac OS X 10.4 (Intel) or higher
• One available USB 2.0, eSATA, or IEE1394b port
Turn over the RAID case,
remove the four Phillips screws
on the bottom, then turn the
RAID case right-side up.
Turn the hard drive over (label side down),
line up the screw holes on the HDD holder
with the screw holes on the drive (the end
opposite the connectors), then secure it
with two HDD screws. Repeat Steps 3 and 4
for the other HDD.
Disk 1 connector
HDD holders
Disk 2
connector
7
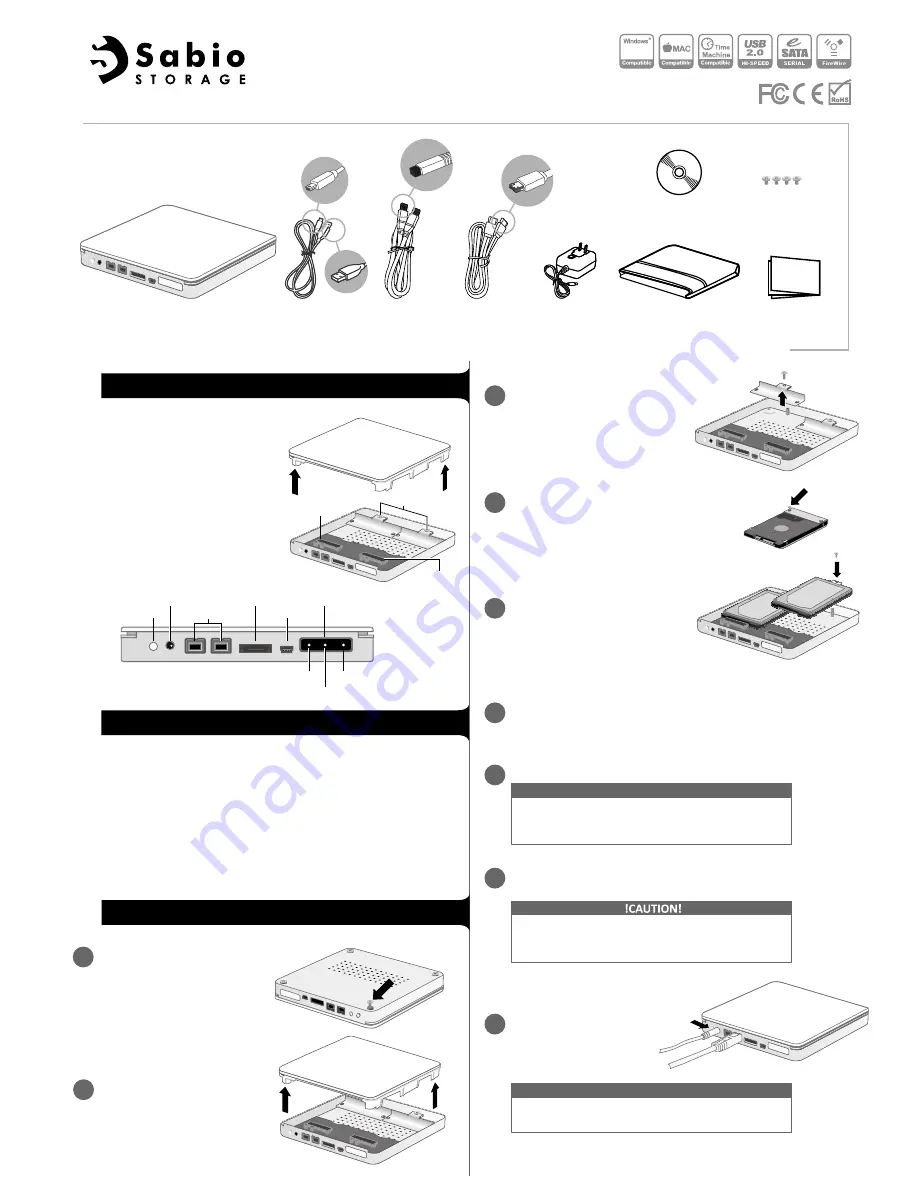
Package contents
Quick Start Guide
2-Bay RAID System for 2.5" SATA HDD
Quick Start
Guide
Storage Bag
Installation CD
RAID system
AC power
adapter
Mini-USB -
USB-A cable
eSATA cable
HDD mounting
screws
FireWire 800
cable
Features
System Requirements
FireWire 800
DC IN
Power button
eSATA
Mini-
USB
LED panel
Power
HDD 1
HDD 2
Installing hard drives into the RAID case
1
Lift the cover off the RAID case,
exposing the drive connectors
inside the unit.
2
Remove the screw for one HDD
holder, then remove the holder
from the RAID case.
3
4
Carefully insert each HDD’s SATA
connectors into the SATA connec-
tor in the RAID case, then secure
each HDD’s holder to the RAID
case using the screw you removed
in Step 3.
5
Place the cover back on the RAID case, then turn it over and secure
it to the case using the four screws you removed in Step 1.
6
The RAID system should be connected to the host
computer by using only one interface cable. Using
multiple interface cables can lead to data corruption.
Connect the USB, eSATA, or FireWire 800 cable to the appropriate
ports on the RAID system and the host computer.
8
Connect the AC power adapter to the RAID system.
7
If you connect the RAID system to your computer
with the FireWire 800 interface cable, you don’t
need to connect the power adapter.
NOTE
Turn on the RAID system by
pressing the power button.
9
To turn off the RAID system, press and hold the
power button for at least three seconds.
NOTE


