1
MINI YAGI
HD ANTENNA
User’s Guide
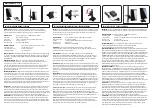
What’s in the box?
(1) Main
antenna
boom
(1) U-bolt
(1) Mast clamp
(1) Balun housing and
middle element
(1) Rear element
(12) Element
end caps
(3) Screws
(2) Wingnuts
(2) Boom end
caps
Assemble the antenna
1. Attach the balun housing and middle element to the antenna boom.
Line up the holes in balun housing/middle element with the holes near the middle of the boom.
Place 2 screws through the balun housing/middle element and boom as shown. Tighten the screws
so that the balun housing/middle element is securely in place.
Holes
Antenna
boom
Balun housing /
middle element
Screws
ANT721E US IB 01