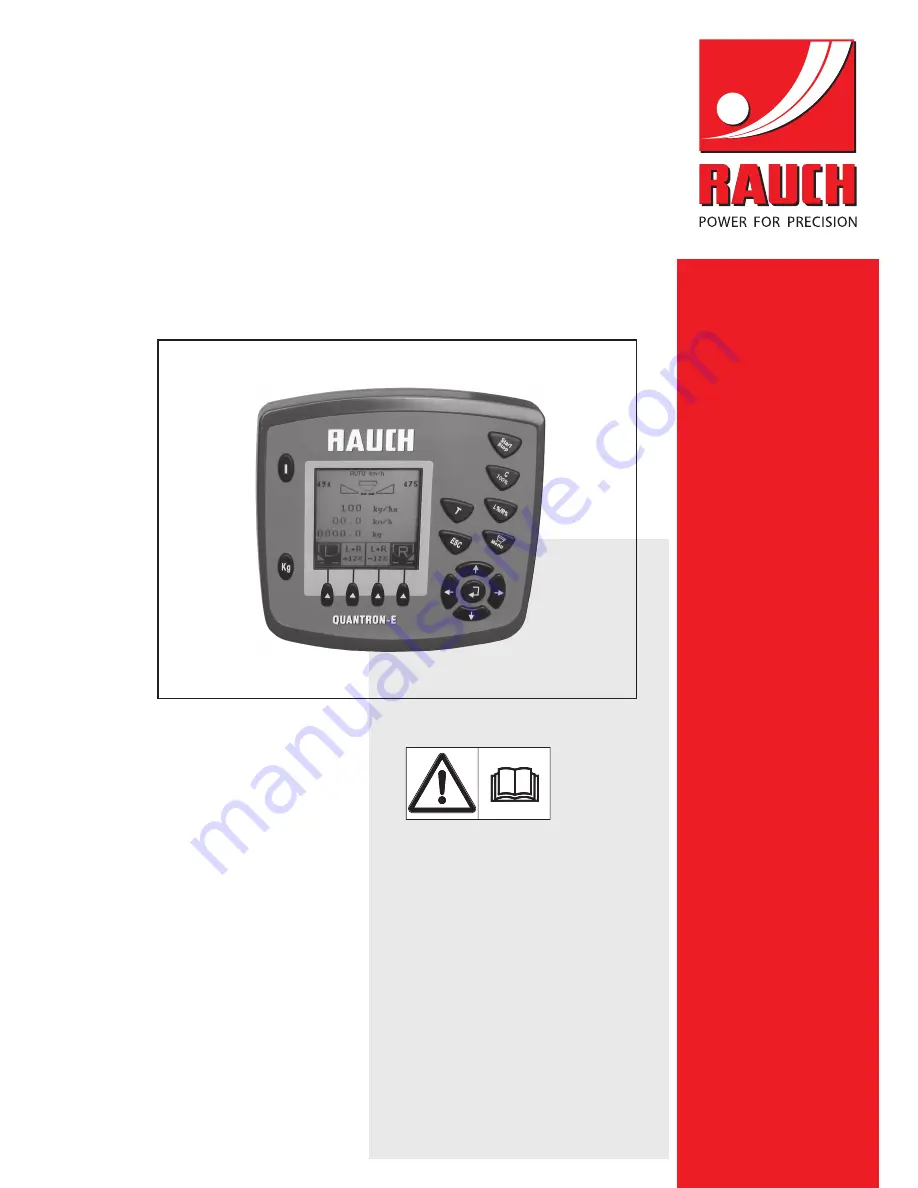
background image

5900660-

e

-en-0909

QUANTRON-E

OPERATOR MANUAL

Please read carefully

before using the machine!

Store carefully for future 

use!

This Operator Manual should be consi-

dered as part of the machine. Suppliers

of new and second-hand machines are

obliged to indicate in writing that the

Operator Manual has been delivered

with the machine.

Translation of the original 

operating manual

Summary of Contents for quantron e

Page 1: ...chine Store carefully for future use This Operator Manual should be consi dered as part of the machine Suppliers of new and second hand machines are obliged to indicate in writing that the Operator Ma...

Page 2: ...cal improvements We are continuously improving our products For this reason we reserve the right to make any improvements and changes to our machine that we consider necessary without notice We do not...

Page 3: ...Connections sockets 13 3 2 1 Power supply 13 3 2 2 7 pin plug connector 14 3 3 Connecting the control unit 14 3 4 Preparation of metering slide 19 4 Operation Quantron E 21 4 1 Switching on the contro...

Page 4: ...4 8 2 Display config 68 4 8 3 Test Diagnosis 69 4 8 4 Data transmission 71 4 8 5 Service 74 4 9 Special functions 75 4 9 1 Text input 75 4 9 2 Input of values using the cursor keys 76 5 Alarm messages...

Page 5: ...onal responsibil ity as the owner and operator of the control units Quantron E Brief instructions are supplied with the control unit Quantron E If these are not included in the scope of supply please...

Page 6: ...nger n WARNING Type of danger This note warns of a potentially dangerous situation for personal health Ignoring this warning will result in serious injury Always observe the measures described to prev...

Page 7: ...on for action step 2 Instructions that only have one step are not numbered The same applies for ac tion steps that do not have a specific sequence A bullet is placed in front on these instructions Han...

Page 8: ...User instructions 1 6...

Page 9: ...2 1 Overview of the AXIS versions supported Function Options AXIS Q AXIS W Ground speed dependent spreading AXIS 20 1 Q AXIS 30 1 Q AXIS 40 1 Q Weighing spreader AXIS 30 1 W AXIS 40 1 W AXIS 50 1 W El...

Page 10: ...igned for connection of an RS232 Y cable for connecting to a remote terminal 3 8 pin plug connec tor Plug connection DIN 9684 1 ISO 11786 for con necting the 7 way to 8 way cable for the speed sen sor...

Page 11: ...d stops spreading 2 Clear Reset Clear an input in an input field reset the excess quantity to 100 Acknowledge alarm messages 3 Preselect partial width setting Preselect partial widths for changing the...

Page 12: ...splay or to highlight an input field Enter key to confirm an input 8 Function keys F1 to F4 Selection of the functions displayed by the function button 9 Weighing Trip counter Dsplay of the remaining...

Page 13: ...the right hand metering slide 4 Weight change right Weight change in percent Display of quantity changes Range of values 1 99 possible 5 Application rate Preset application rate 6 Display fields Conf...

Page 14: ...ontrast Languages Display config Create new file Erase file Erase all files AUTO MAN mode appl rate Curve correction Working width m Flow factor Calibration start Telimat border Telimat quantity Date...

Page 15: ...786 The control unit receives the impulse for the current ground speed through this socket 3 2 Connections sockets 3 2 1 Power supply The control unit is supplied with power from the tractor via the 3...

Page 16: ...unit to the fertiliser spreader For schematic terminal diagrams see below for the standard connection on page 16 for the connection with wheel sensor onpage 17 for the connection with wheel sensor and...

Page 17: ...ll the control unit with the bracket in the tractor cabin Connect the control unit to the 7 pin socket or to the ground speed sensor de pending on the equipment package see Figure 3 3 to Figure 3 5 Co...

Page 18: ...3 pin plug connector as per DIN 9680 ISO 12369 6 8 pin plug connector 7 7 pin plug connector conforming to DIN 9684 9 Option Telimat sensor top bottom 10 Weigh cell left right only on AXIS 30 1 W 40...

Page 19: ...r left right 5 3 pin plug connector as per DIN 9680 ISO 12369 6 8 pin plug connector 8 Ground speed sensor 9 Option Telimat sensor top bottom 10 Weigh cell left right only on AXIS 30 1 W 40 1 W 50 1 W...

Page 20: ...ISO 12369 6 8 pin plug connector 7 7 pin plug connector conforming to DIN 9684 8 Ground speed sensor 9 Option Telimat sensor top bottom 10 Weighing cell left right only on AXIS 30 1 W 40 1 W 50 1 W 11...

Page 21: ...ntrol for adjusting the spreading volume Figure 3 6 Preparation of the metering slide example n CAUTION Observe the position of the metering slide The operation of the actuators by the Quantron E can...

Page 22: ...Attachment and installation 3 20...

Page 23: ...ions of the control unit Quantron E as of software version 3 30 00 n CAUTION Risk of injury from discharged fertiliser Only for mineral fertiliser broadcasters equipped with electronic control units I...

Page 24: ...itch on Press the ON OFF switch After a few seconds the start interface appears on the control unit Then the boot menu is displayed for a few seconds Then the operating screen appears Figure 4 1 Start...

Page 25: ...with the arrow keys 2 Open the highlighted submenu with the Enter key Submenu Meaning Description Trip counter Display of the spread volume area spread and spread distance page 24 kg rest kg ha m Disp...

Page 26: ...ad area and the spread distance since the last deletion appear in the display 2 To clear the trip counter The Del trip counter field is highlighted in the dis play Confirm with the Enter button All va...

Page 27: ...ader only the display field of the actual remaining fertiliser volume 2 Application rate display field from fertiliser settings 3 Working width display field from fertiliser settings 4 Display of area...

Page 28: ...spread distance 4 Press the kg key once This returns you to the operating screen Calling up the remaining fertiliser volume during spreading During the spreading work the remaining fertiliser volume i...

Page 29: ...r This volume de pends on the following values Menu item Weigh quantity Menu item Machine tare NOTICE The Weigh Quantity function can only be requested if the fertiliser spreader being used is an AXIS...

Page 30: ...ing fertiliser vo lume 2 Highlight the type of filling carried out on the display Refill Continue spreading with the same fertiliser New fertiliser Flow factor set to 1 0 and a new flow factor regulat...

Page 31: ...4 2 3 Weigh quantity page 27 5 Start the work If the hopper is empty refill it To do so repeat steps 2 to 5 NOTICE If the hopper is empty and is filled with less than 200 kg of fertiliser the flow fa...

Page 32: ...pcounter menu to the Machine Tare menu The Machine tare menu appears on the display 2 Confirm with the Enter button The weighing value for the empty scales is now set to 0 kg 3 Press the ESC key to re...

Page 33: ...an be moved up and down with the arrow keys 2 Open the highlighted submenu with the Enter key Submenu Meaning Description Fertiliser settings Settings for fertiliser and spreader opera tion page 32 Ho...

Page 34: ...values Description Name of fertiliser Selected fertiliser from private table page 44 Way to spread Selection list Normal Normal border Normal boundary Late Late border Late boundary Selection using ar...

Page 35: ...the dis play is only for information If the right hand side is changed the left hand side changes to the same value au tomatically For AXIS 50 1 W electrical setting of the drop point Telimat border S...

Page 36: ...te menu The display shows the currently specified application rate 2 Input the new value in the input field with the arrow keys Arrow up Value increases Arrow down Value decreases Arrow to the left ri...

Page 37: ...nu The working width currently set appears on the display 2 Input the new value in the input field with the arrow keys Arrow up Value increases Arrow down Value decreases Arrow to the left right Curso...

Page 38: ...ion of the flow factor is performed through dynamic weighing However the data can also be entered manually Input flow factor 1 Switch from the Fertiliser settings menu to the Flow Factor menu The disp...

Page 39: ...lay Figure 4 13 Flow factor error message Resolving the fault See 5 2 Clear fault alarm page 79 NOTICE If your fertiliser is not listed in the fertiliser chart input flow factor 1 00 In the AUTO km h...

Page 40: ...nter the average working speed This value is required for calculating the slide position during the calibration test 3 Input the new value in the input field with the arrow keys Arrow up Value increas...

Page 41: ...t screen 1 Icon above function key F4 to select right spreading side 2 Icon above function key F1 to select left spreading side 3 Display of part width Select part width 1 Set the spreading side on wh...

Page 42: ...The opening slide is closed The Input collected weight menu is displayed n WARNING Risk of injury when performing the calibration Rotating machine components and discharged fertiliser may cause injury...

Page 43: ...jury from rotating machine components Contact with rotating machine components shafts hubs may cause bruises abrasions and crushing injuries Body parts or objects may be caught or pulled in Disengage...

Page 44: ...flow factor To accept the newly calculated flow factor press the Enter key To confirm the previously saved flow factor press the ESC key The flow factor is saved The Fertiliser Settings menu is displa...

Page 45: ...w drop point L and R If the drop point is blocked Alarm 17 appears See 5 1 Meaning of alarm mes sages page 77 NOTICE Entering the drop point with the AXIS 20 1 AXIS 30 1 or AXIS 40 1 is merely informa...

Page 46: ...ate table 5 Delete the displayed private table 2 Push the F4 button working table A new table with an empty name is created In the display the number of existing tables increases 3 Highlight the empty...

Page 47: ...the name field You can move up and down the list of existing fertiliser charts with the arrow keys 4 Confirm the selection of a fertiliser chart by pressing the Enter key The Fertiliser Settings menu...

Page 48: ...The highlight bar can be moved up and down with the arrow keys 2 Open the highlighted submenu with the Enter key Submenu Meaning Description Tractor km h Determination or calibration of the speed sign...

Page 49: ...0 m reference distance as accurately as possible Engage four wheel drive No more than half fill the fertiliser spreader Opening speed settings In the control unit Quantron E up to 4 different profiles...

Page 50: ...tor name field 2 Display origin of speed signal 3 Display of number of impulses over 100 m 4 Automatic calibration submenu 5 Radar impulse transducer 6 Wheel impulse transducer 4 Highlight the tractor...

Page 51: ...to The calibration run operating screen is shown in the display Figure 4 23 Calibration run speed signal operating screen 1 Impulse display 2 Stop recording impulses 3 Start recording impulses 10 At t...

Page 52: ...utomatic mode with automatic weighing Automatic mode with automatic weighing AUTO km h Auto kg The AUTO km h Auto kg operating mode allows for continuous weighing of the fertiliser volume in the hoppe...

Page 53: ...er key to return to the operating screen b Procedure when spreading with Auto km h Auto kg 1 Each time you switch on the Quantron E use the kg button to switch to the Weigh Quantity menu and weigh the...

Page 54: ...TICE If after confirming the Weigh Quantity window the fertiliser settings are chan ged before starting spreading then these changes to the settings should be car ried out with the spreader stopped an...

Page 55: ...lect Auto km h Stat kg 1 Switch on the control unit Quantron E 2 Fill the hopper with fertiliser 3 Switch from the Hopper configuration menu to the AUTO MAN operation menu 4 Highlight the AUTO km h St...

Page 56: ...If necessary you can enter the re quired flow factor value later on ESC Quit 6 Press the Enter key 7 Refer to the fertiliser chart or empirical values for the flow factor and enter it manually 8 Press...

Page 57: ...N Danger of injury caused by automatic adjustment of the drop point On the AXIS 50 1 W the alarm move to drop point intervenes After actuating the Start Stop button the drop point is automati cally ap...

Page 58: ...idth m 2 Pour the fertiliser in 3 Carry out a calibration test to determine the flow factor or Take the flow factor from the fertiliser chart and enter it manually 4 Press the Start Stop button The sp...

Page 59: ...enu 2 Highlight the MAN scale selection field The slide opening menu is displayed 3 Input the scale value for the metering side opening Confirm the input by pres sing the Enter key Input of values int...

Page 60: ...ring slides are open activation with the Start Stop key In the MAN Scale operating screen the symbols for the part widths are filled in black Figure 4 25 MAN scale operating screen 5 To change the met...

Page 61: ...of values using the cursor keys page 76 3 Press the Enter key 4 5 4 Curve correction The fully enclosing spreading disc protector creates a vacuum effect when the spreading disc rotates which leads to...

Page 62: ...idth in this case selected NOTICE Before starting fast emptying make sure that all requirements have been met Observe the operating instructions for the fertiliser spreader fast emptying n CAUTION Dan...

Page 63: ...again 4 Press the ESC key to return to the main menu n CAUTION Danger of injury caused by automatic adjustment of the drop point On the AXIS 50 1 W the alarm move to drop point intervenes After actua...

Page 64: ...h the new values 1 In the Field Data menu select the Select New File entry and press the Enter key The display shows the already saved operating data sorted alphabetically 2 Select the desired field a...

Page 65: ...he display shows the first page of the current field data You can change the name of the field data by marking the second line 4 7 3 Starting recording 1 Switch from the Field data menu to the current...

Page 66: ...the Enter key Recording starts The Field data start display changes to Field data stop The operating screen displays the recording icon Figure 4 30 Recording symbol 3 Press the ESC key to return to th...

Page 67: ...ess the Enter key The recording is stopped The Field data stop display changes to Field data start 3 Press the ESC key to return to the previous menu or Press the Menu key to return to the Operating S...

Page 68: ...g Determination of the displays on the operating screen page 68 Test Diagnosis Check of actuators and sensors page 69 Date Setting the current date Time Setting the current time Data transmission Menu...

Page 69: ...ed languages The language package for your country is preloaded in the factory 1 Switch from the System Test menu to the Languages submenu The display shows the first page of the Language selection su...

Page 70: ...field 1 2 Display field 2 Select display example display field 1 1 Switch from the System Test menu to the Display config submenu 2 Highlight the display field 1 and press the Enter key The possible...

Page 71: ...E This menu serves only for information purposes The list of the sensors depends upon the equipment level of the machine Submenu Meaning Description Slide test points Test for engaging the various pos...

Page 72: ...in left hand hopper 2 Fill level left in percent 3 Fill level right in percent Figure 4 36 Test Diagnosis Example Voltage 1 Current operating voltage 2 Functional range of the sensor Figure 4 37 Test...

Page 73: ...a stick on the directory operating data_Import 1 Switch from the System Test menu to the Data transmission submenu 2 Switch to the Operating data submenu 3 Highlight the Import field Submenu Meaning D...

Page 74: ...perating data 4 Press the Enter key A message appears indicating that the current data will be deleted Figure 4 40 Message prior to deletion of the files 5 Press the Start Stop button The bar indicate...

Page 75: ...supplied Do not alter the directory structure on the data stick 1 Switch from the System Test menu to the Data transmission submenu 2 Switch to the Operating data submenu 3 Highlight the Export field...

Page 76: ...TICE An input code is required for settings in the Service menu These settings can only be modified by authorised service personnel As a general rule we recommend that all settings in this menu are ca...

Page 77: ...ay of available characters language dependent Input text 1 Switch from the higher level menu to the Text input menu 2 Move the cursor by using the arrow keys to the position of the first letter to be...

Page 78: ...the selection by pressing the Enter key The complete input is deleted 4 9 2 Input of values using the cursor keys In some menus numerical values can be entered Figure 4 44 Numerical value entry exampl...

Page 79: ...factor must be in the range 0 40 1 90 The new calculated or entered flow fac tor is outside the range 4 Left hopper empty The level sensor on the left reports empty Left hand hopper is empty 5 Right...

Page 80: ...actuator cannot reach the target value to be started Blockade No position message 15 Memory is full Deletion of a private table required A maximum of 30 private tables can be saved No additional savin...

Page 81: ...the cause of the alarm message Observe the operating manual of the fertiliser spreader and section 5 1 Meaning of alarm messages page 77 2 Press the C 100 key The alarm message is cleared 5 2 2 Resol...

Page 82: ...and the remaining fertiliser volume in the hopper is weighed 6 Press the ESC key to return to the previous menu or Press the Menu key to return to the Operating Screen 7 Switch to the Operating Scree...

Page 83: ...pecial equipment options No Illustration Name 1 Empty message sensor for AXIS 2 Ground speed sensor for Quantron E 3 Y cable RS232 for data exchange e g GPS N sensor etc 4 System tractor cable set for...

Page 84: ...Special equipment options 6 82 5 GSP cable and receiver 6 Telimat Sensor 7 Suction cup bracket for Quantron E No Illustration Name...

Page 85: ...in the operator s manual In all cases of doubt contact our fac tory representatives or the factory directly Warranty claims must be submit ted to the factory by 30 days at the latest after occurrence...

Reviews: