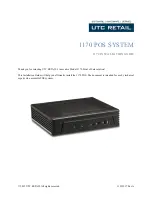
background image


WORK STATION 


Rev.  :    Original 


MANUFACTURED BY:


POSIFLEX TECHNOLOGIES, INC.


       AN 

ISO-9001

 AND 

ISO-14001 

CERTIFIED MANUFACTURER 

6,WU-CHUAN RD., HSIN-CHUANG TEL: 886-2-2991599 (REP.)  FAX: 886-2-2991819, 2991808 

(WU-KU INDUSTRIAL ZONE) 

http://www.posiflex.com 

http://www.posiflex.com.tw 

TAIPEI HSIEN, TAIWAN 

http://www.posiflexusa.com  EMAIL: [email protected] 

Jiva


(TP-5815 Pro) 

SERIES 

TECHNICAL MANUAL


Summary of Contents for Jiva TP-5815 Pro series

Page 1: ... 14001 CERTIFIED MANUFACTURER 6 WU CHUAN RD HSIN CHUANG TEL 886 2 2991599 REP FAX 886 2 2991819 2991808 WU KU INDUSTRIAL ZONE http www posiflex com http www posiflex com tw TAIPEI HSIEN TAIWAN http www posiflexusa com EMAIL posiflex posiflex com tw Jiva TP 5815 Pro SERIES TECHNICAL MANUAL ...

Page 2: ...egrated point of sale terminal product family The Jiva TP 5815 Pro is a compact point of sale system that gives the most user friendly application interface by providing a touch control LCD panel and combines the performance and affordability of personal computers with the elegance and reliability of business machine The Jiva TP 5815 Pro also provides the built in networking capability for easy co...

Page 3: ...ption 2 2 12VDC POWER SUPPLY INTO SYSTEM 2 2 OVERALL POWER OUTPUT LIMIT 2 2 INPUT OUTPUT PORTS 2 2 HDD IN BASE 2 3 TOUCH PANEL 2 3 PRELOAD OS 2 3 OPERATOR DISPLAY 2 3 LED COLOR 2 3 AUDIO PORT 2 4 EXTERIOR 2 4 ENVIRONMENTAL 2 5 ACCESSORIES 2 5 COMPLIANCE APPROVALS 2 5 OPTIONS 2 6 SECOND DISPLAY ON REAR BASE 2 6 CUSTOMER DISPLAY 2 6 DRAM EXPANSION 2 7 SIDE MOUNT UPGRADE KIT BC100 2 7 ...

Page 4: ...T UPGRADE KIT SD200 2 8 Optical fingerprint sensor 2 8 Magnetic stripe reader 2 9 UPS BATTERY 2 9 INTERNAL CD ROM DRIVE 2 9 EXTERNAL CD ROM DRIVE 2 9 CASH DRAWER CONTROL CABLE 2 9 WIRELESS LAN 2 9 WALL MOUNT KITS 2 10 PRINTER 2 10 PP 2000 2 10 PP 5600 2 10 PP 5700 2 10 PP 7000II 2 11 PP 7000L 2 11 PP 7000U 2 11 PP 7700 2 11 RELIABILITY SPECIFICATION 3 1 SYSTEM DEFINITIONS 4 1 BLOCK DIAGRAM 4 1 12 ...

Page 5: ...IC IN 4 7 CASH DRAWER CONTROLLER 4 8 APPLICATION GUIDES 5 1 POWER SUPPLY TO I O PORTS 5 1 COM1 APPLICATION COMMENT 5 1 SOFTWARE SYSTEM BACKUP 5 2 CASH DRAWER 5 2 PS 2 INTERFACE DEVICE 5 2 EXTENDED DUAL DISPLAY MODE 5 3 CUSTOMER DISPLAY 5 3 ATA IDE POWER CONNECTORS 5 3 POWER ON OFF CONTROL 5 4 EXTERNAL POWER SWITCH 5 4 SOFTWARE SWITCH OFF 5 4 FORCED POWER OFF 5 5 UPS BATTERY 5 6 UPS BATTERY HEALTH ...

Page 6: ...NABLE MSR TRACK 3 5 12 MSR WILL SEND THE LEADING CODE 5 13 MSR TRACK 1 LEADING CODE 5 13 MSR TRACK 2 LEADING CODE 5 13 MSR TRACK 3 LEADING CODE 5 13 MSR ENDING CODE 5 13 INTERCHARACTER TRANSMISSION DELAY 5 13 SEND LRC 5 14 ADDITIONAL CR 5 14 RESET TO ENGLISH DEFAULTS 5 14 RESET TO NON ENGLISH DEFAULTS 5 14 PROGRAMMABLE KEYPAD 5 14 THE COMMAND MENU 5 15 SPECIAL CONTENTS 5 15 POSIFLEX USB TOUCH MANA...

Page 7: ...disable 6 5 CMOS data control 6 5 COM1 COM2 DC supply select 6 5 VGA port DC power enable disable 6 5 Software awareness of UPS status 6 6 Audio output control 6 6 Touch signal setting 6 6 PS 2 mouse signal loopback 6 6 RISER CARD LT 057 for NO TOUCH 6 7 COMPONENT SIDE 6 7 SOLDER SIDE 6 7 CONNECTORS 6 7 On solder side 6 7 RISER CARD TP 058 for RS232 TOUCH 6 8 COMPONENT SIDE 6 8 SOLDER SIDE 6 8 CON...

Page 8: ...t 6 12 USB MSR CONTROL BOARD SD100 6 13 COMPONENT SIDE 6 13 JUMPER SETTINGS 6 13 USB MSR CONTROL BOARD SD200 6 14 COMPONENT SIDE 6 14 JUMPER SETTINGS 6 14 SERVICE AND SPARE PARTS 7 1 SERVICE GUIDE 7 1 SIDE MOUNT UPGRADE KIT 7 1 REAR TOP MOUNT UPGRADE KIT 7 2 BASE MOUNT UPGRADE KIT 7 3 BASE INSTALLED DEVICES 7 4 REPLACE BASE INSTALLED 3 5 HDD 7 5 BASE INSTALLED 2 5 HDD option 7 5 To remove the earl...

Page 9: ...rsal base 7 9 WALL MOUNT KITS 7 10 Wall mount kit types 7 10 Mounting the kit and main unit to wall 7 10 Device installation in bracket 7 12 BASE WALL MOUNT CONVERSION 7 16 OPEN THE MAIN UNIT 7 19 SEPARATE LCD PANEL ASSEMBLY 7 20 OPEN COVER PLATE 7 21 REPLACE LPC ADAPTOR CARD 7 21 REPLACE MAINBOARD 7 22 SPARE PARTS LIST 7 23 ASSEMBLY DRAWING 7 28 ...

Page 10: ......

Page 11: ...rts 2nd LCD display or pole mount customer display on rear base 3 5 HDD housing power adaptor housing optional UPS battery storage in base or even wall mount without base In short this series engages modular design for numerous advanced hi tech applications in robust integrated construction FEATURES l CPU VIA C7 1G or above HDD 40 GB or above l Support WinCE WinXP Pro WEPOS and Linux environment l...

Page 12: ...s can be changed through CMOS setting l Preprogrammed timer wake up function l COM port MODEM ring up function l LAN wake up function l Built in UPS function with battery health check and alarm to support the system from intermittent power failure battery itself is an option l Accidental power off protection The power switch is safely located at one side and this power switch can be defined as a O...

Page 13: ...00 iButton reader MSR Smart card reader 3 SD 200 Optical fingerprint sensor MSR 4 BC 100 Bar code card reader c Integrated rear top mount LCD customer display PD 302 d Pole mount 2 by 20 VFD customer display through USB or COM port or base mount 12 or 15 2nd LCD monitor e Preload WinXP Pro WEPOS or WinCE f UPS battery g Internal CD ROM DVD drive in base for universal base model only h USB interfac...

Page 14: ......

Page 15: ...t 12 V DC Output current 6 6 A System Total Power Consumption Display used Normal Maximum 15 TFT LCD 60 W 80 W SYSTEM POWER ON OFF CONTROL l One main power ON OFF slide switch at side this switch can be programmed as ON only l System can be waked up after each power off by any of the preset timer or a remote COM port MODEM call or LAN wakeup packet l System can be switched off by software command ...

Page 16: ...DC 1 A INPUT OUTPUT PORTS l 1 X mini DIN 6 pin female PS 2 KB jack l 1 X mini DIN 6 pin female PS 2 mouse jack l 1 X VGA display port for external or 2nd display l 1 X parallel port l 1 X LAN port Ethernet 10 base T and 100 base T l 5 X USB ports USB 2 0 standard l 4 X serial communication ports for resistive type touch panel model 3 X serial communication ports for IR type model All serial commun...

Page 17: ...only no re calibration required for day to day power on off l Driver support Win XP PRELOAD OS l Option among Win CE Win XP Pro and WEPOS OPERATOR DISPLAY Display Type COLOR TFT 15 LCD View area 304 1 X 228 1 mm Internal Interface LVDS Luminance 200 cd m2 min Contrast Ratio 500 1 Resolution 1024 X 768 Color 262 144 RGB 6 bits Memory size 16 MB MB share memory Tilt angle 15 72 5 LED COLOR l Type bl...

Page 18: ...al speaker EXTERIOR l SLIM BASE MODEL DIMENSIONS LCD 15 376 mm W x 321 mm D x 372 mm H or 14 8 x 12 6 x 14 6 LCD 72 5 376 mm W x 306 mm D x 294 mm H or 14 8 x 12 0 x 11 6 PACKING 498 mm W x 438 mm D x 345 mm H or 19 6 x 12 0 x 13 6 l UNIVERSAL BASE MODEL DIMENSIONS LCD 15 376 mm W x 321 mm D x 402 mm H or 14 8 x 17 2 x 15 8 LCD 72 5 376 mm W x 306 mm D x 325 mm H or 14 8 x 12 0 x 12 8 PACKING 498 ...

Page 19: ...NGE Operating 20 RH 80 RH non condensing max wet bulb 26 C 78 8 F Non operating 10 RH 80 RH non condensing max wet bulb 28 9 C 84 0 F ACCESSORIES l User s manual 1 copy l Mechanical key for opening cable cover 1 pc l COM1 terminator l Power adapter 12 V DC 6 6 A max plus power cord l Product Information CD or DVD or Recovery CD of preloaded OS COMPLIANCE APPROVALS l Whole system meet CE FCC class ...

Page 20: ...X 768 XGA Color depth 18 bits true color 262 144 18 bits FRC data 16 2 M Tilt angle Stand straight as 0 to backward till touching main unit Swivel angle Left 45 and right 45 N A Power Source DC 12 V in VGA AC 100 240 V CUSTOMER DISPLAY MODEL Number PD 2501 PD 2602 PD 302 PD 305 Display Media VFD LCD Number of rows 2 Characters per row 20 Character width mm 7 2 5 25 6 Character height mm 11 25 9 03...

Page 21: ...A Horizontal rotation 330º 270º N A 45º Inclined viewing angle 15º 30º 45º N A 0º 90º Power source 5 V DC in DB9 5 V DC in DB9 or USB 5 V DC in DB9 DRAM EXPANSION l DDR2 SDRAM DIMM in 2 sockets up to total 2 GB max SIDE MOUNT UPGRADE KIT BC 100U l To be installed to right side of TP series main unit l Function bar code card reader l Configuration parameters can be set via use of separately purchas...

Page 22: ...level I SIDE MOUNT UPGRADE KIT SD 100 l To be installed to right side of TP series main unit l Functions include MSR smart card reader iButton reader l USB interface l MAGNETIC STRIPE READER 1 Reader head options Reader head options ISO 2 tracks track 1 track 2 ISO 3 tracks track 1 track 2 track 3 2 Characteristic parameters of ISO readers can be set via software 3 AAMVA CA DMV format supported in...

Page 23: ...ders can be set via software 3 AAMVA CA DMV format supported in ISO 3 tracks model UPS BATTERY l 2 3 AH 12V lead acid battery INTERNAL CD ROM DRIVE l To be installed in universal base only l 24 x speed l IDE interface l Set as primary IDE slave device EXTERNAL CD ROM DRIVE l 24 x speed l USB interface l Slim type CASH DRAWER CONTROL CABLE l 2 in 1 cash drawer control cable 20863023800 for independ...

Page 24: ...Auto cutter provides full cut and partial cut 5 Auto detect between RS232 and EPP interface l PP 5600 1 Dot matrix 9 pin 2 Bi directional printing with logic seeking 3 Friction type 4 40 columns for 16 9 CPI 5 Accepts paper width 3 inches 76 mm 6 Prints on ordinary or up to 3 fold carbonless copy paper l PP 5700 1 Dot matrix impact 9 pin receipt printer 2 Bi directional printing 3 Sprocket feed ty...

Page 25: ...o guillotine type cutter provides single point left partial cut 7 Thermal sensitive paper roll at width 80 mm or 58 mm 8 Supports UPC A EAN JAN 13 8 ITF CODE39 CODABAR printing 9 Supports printing on label with marker on the other side l PP 7000L 1 LAN interface 2 All other features same as PP7000II l PP 7000U 1 USB interface 2 All other features same as PP7000II l PP 7700 1 Posiflex wireless conn...

Page 26: ......

Page 27: ...HES AT SAME SPOT l LCD BACK LIGHT LIFE EXPECTANCY 40 000 HRS l HDD MTBF 50 000 HRS l 2ND DISPLAY LCD BACK LIGHT LIFE EXPECTANCY LM6101 10 000 HRS LM6301 30 000 HRS l CUSTOMER DISPLAY LIFE EXPECTANCY PD2501 30 000 HRS PD2602 30 000 HRS PD302 PD305 100 000 HRS for BACKLIGHT l BCCR LIFE EXPECTANCY 300 000 PASSES l MSR LIFE EXPECTANCY 500 000 PASSES ...

Page 28: ...TP 5815 Pro series Technical Manual 3 2 l MOTHER BOARD MTBF 50 000 HOURS l POWER SWITCH LIFE EXPECTANCY 10 000 STROKES ...

Page 29: ... Port PS 2 KB Port KB Touch Panel CCFL LCD Panel Touch Controller LCD Signal Riser Card CCFL Inverter Audio CODEC Booster Speaker Audio Line out Mic Mic In VT8237R SB Ethernet 10 100 MB LAN Chip 40 p IDE Socket CDROM Drive HDD in Base universal base only USB 0 4 USB Device CR3 4 6 X00 BIOS CR LPC I O Chip W83627HG Parallel Printer LPT COM1 RS232 Device 5V COM2 RS232 Device 5V LPC I O F81216D RS232...

Page 30: ...GNMENT OF 4 PIN SOCKET PIN DEFINITION 1 12 V 2 12 V 3 GND 4 GND LAN PORT PIN ASSIGNMENT OF 8 PIN TELEPHONE JACK PIN DEFINITION 1 TD 2 TD 3 RD 4 NC 5 NC 6 RD 7 NC 8 NC This port is defined as 100 base T or 10 base T LAN port This port is utilized by the system in pnp Plug N Play way IRQ assigned is not fixed for this port Most usual observation is IRQ 11 1 3 CASE 2 4 PIN 1 PIN 1 ...

Page 31: ...PIN DEFINITION ALTERNATIVE DEFAULT SETTING 1 DCD BATTWK BATTWK 2 RX 3 TX 4 DTR 5 GND 6 DSR 7 RTS 8 CTS 9 RI CR OPEN 5 VDC RI IRQ 4 is assigned to this port Can be changed in CMOS setup under Integrated Peripherals à SuperIO Device à Onboard Serial Port 1 Please refer to section UPS DETECTION FUNCTION in APPLICATION GUIDE for BATTWK signal Please refer to COM1 APPLICATION COMMENT in same chapter fo...

Page 32: ...owever after use of the conversion cable supplied the pin assignment in DB9 connector of the conversion cable complies to RS232 standard IRQ 3 is assigned for COM2 IRQ10 is assigned for COM3 IRQ5 is assigned for COM4 All can be changed in CMOS setup under Integrated Peripherals à SuperIO Device à Onboard Serial Port 2 or Integrated Peripherals à Serial Port 3 Use IRQ or Integrated Peripherals à Se...

Page 33: ...6 D4 D4 D4 7 D5 D5 D5 8 D6 D6 D6 9 D7 D7 D7 10 ACK INTR ACK 11 BUSY WAIT BUSY PeriphAck 12 PE NU Perror AckReverse 13 SLCT NU SLCT 14 AUTO FEED Datastb AutoFeed HostAck 15 ERROR NU Fault PeriphRequest 16 INIT NU Init ReverseRequest 17 SLCT IN NU SLCT IN 18 GND GND GND 19 GND GND GND 20 GND GND GND 21 GND GND GND 22 GND GND GND 23 GND GND GND 24 GND GND GND 25 GND GND GND IRQ 7 is assigned for this...

Page 34: ...MINI DIN FEMALE CONNECTOR PIN DEFINITION 1 KBDAT 2 NC 3 GND 4 VCC 5 KBCLK 6 NC PS 2 MOUSE PIN ASSIGNMENT OF 6 PIN MINI DIN JACK PIN DEFINITION 1 PMDAT 2 NC 3 GND 4 VCC 5 PMCLK 6 NC USB0 USB1 USB 2 USB 3 USB 4 PIN ASSIGNMENT OF EACH 4 PIN JACK PIN DEFINITION 1 VCC 2 DATA 3 DATA 4 GND PIN 1 ...

Page 35: ...e for option CDROM drive in universal base device in base HDD POWER CONNECTOR l This connector is a small 4 pin connector with housing PIN ASSIGNMENT OF 4 PIN CONTACTS PIN DEFINITION 1 GND 2 12 V DC 3 5 VDC 4 GND AUDIO OUT PIN ASSIGNMENT OF 3 5 Ø STEREO JACK CONTACT ON PLUG DEFINITION TIP R RING L OUTER GND MIC IN PIN ASSIGNMENT OF 3 5 Ø MONO JACK CONTACT ON PLUG DEFINITION TIP IN OUTER GND PIN 1 ...

Page 36: ... l Each cash drawer solenoid input is a 150 msec grounding signal l The power to cash drawer solenoid is DC 12 V nominal l The command to open cash drawers is decoded through COM 1 l The drawer open indication can be detected by software through status check on RI signal of COM 1 l Should any difficulty occur in using the cash drawer controller please try either to arrange a serial printer to be c...

Page 37: ...VGA port after jumper setting change is limited to be within 1 Ampere No matter what the ventilation of the environment should be much improved to compensate the heat accumulation due to such excessive load COM1 APPLICATION COMMENT Before using the port COM 1 the COM1 terminator should be removed and stored for future use when there will be no regular RS232 device to be connected to this port It i...

Page 38: ...his Ctrl Alt F5 combination is pressed earlier settings will be renewed to the latest settings CASH DRAWER The software command to open the cash drawer or the first cash drawer with the optional 2 in 1 cash drawer control cable is a hexadecimal code of 07 sent to COM1 port under the protocol of 9600bps none parity 8 data bits 1 stop bit The software command to open the second cash drawer with the ...

Page 39: ...ver for Windows XP Please enable the power supply to this port per Hardware Details in later chapter when LM6101 is to be connected CUSTOMER DISPLAY The RS232 model customer display selectable from top mount PD 302 upgrade kit and the base mount upgrade kit PD 2501 or PD 2602 or PD 305 can be connected to any available COM port with an internally supplied power set per instruction in Hardware Deta...

Page 40: ...been changed from the default status the switch function will remain after power off However if the AC power has been disconnected during the power off stage such change will be discarded Therefore it is advisable for the application program to reinstate the switch function every time the system is rebooted or every time the program is executed to ensure the proper action of the power switch This ...

Page 41: ...rammer to allow forced power off after changing the switch to be ON only The enhance forced power off command string is 1B 00 00 00 00 00 18 18 and it has to be sent in same way like the ON only switch command This enhanced forced power off requires the user to keep the switch pressed for a longer period between 10 to 20 seconds to function In case the system halt situation is so serious that some...

Page 42: ...e storage temperature is lower than 30 C The battery should be recharged for 1 2 hours every month if the storage temperature exceeds 30 C However the user shall avoid the situation with storage temperature over 30 C to protect the life of the battery Do not connect any other battery to this UPS battery because mixed use of batteries of different capacity history or manufacturers may cause damages...

Page 43: ...d of time if the battery detect capability of the system is operating Ÿ Check Battery Condition command string is 1B 00 00 00 00 18 18 18 in hexadecimal format And the DCD of COM1 will be set for a period of time if the battery responds correctly to the battery detect The period of time in last 2 responses starts after several machine cycles since receival of the query command and stops about 15 s...

Page 44: ...CMOS setup by pressing Del key at system boot up choose for IRQ Event Activity Detect in Power Management Setup and make the RTC Alarm Resume enabled and set the alarm to required time Save the configuration and exit the CMOS setup program The Preset Power On Control will then be ready MODEM RING UP To utilize Modem Ring Up function the user should enter the CMOS setup by pressing Del key at syste...

Page 45: ...e automatically powered up FINGERPRINT SENSOR When the system is delivered with SD 200 with fingerprint sensor and when the system has preloaded OS the driver for the optical fingerprint sensor will be installed for separated demonstration on use of the fingerprint sensor For software developers to use all functions of the sensor in their AP proper SDK software development kits should be purchased...

Page 46: ... machine can be defined here When ON OFF function for this switch is selected the power switch turns the system on when the system is off and turns the system off when the system is on When ON Only function for this switch is selected the power switch always turns the system on regardless of the status whether the system is On or Off In this way accidental switching off of the system is avoided Ho...

Page 47: ...USB MSR MANAGER For systems with USB MSR on side mount upgrade kit the USB MSR manager helps defining several characteristics in output format control for reading the magnetic stripe card Please find the subfolder Drivers SD Series USBMSR_xxx in Posiflex product information CD and execute the SETUP EXE to install the USB MSR Manager The screen shot of the program is similar to the above picture at...

Page 48: ...for the country The keyboard layouts could cause some confusion among some European countries For example the location for A in US keyboard is that for Q in a French keyboard The location for Z in US keyboard is that for Y in a German keyboard One way to deal with such problem is to use the Alt num approach This means that for example when A is read the scan codes for pressing and holding Alt key ...

Page 49: ... right button selects each code The default track 1 leading code is the default track 2 and track 3 leading code is the default ending code is TRANSMISSION INTERCHARACTER DELAY Usually the processing algorithm and the keyboard data input buffer in an operating system are arranged in such a way that the system resources are preserved as much as possible while data input from the USB keyboard port p...

Page 50: ...ld RESET TO ENGLISH DEFAULTS RESET TO NON ENGLISH DEFAULTS These two options provide users to reset all the MSR maneuver functions to the proper defaults according to the system language the user uses This consideration involves mostly of the Alt Num emulation and the intercharacter delay PROGRAMMABLE KEYPAD When a upgrade kit PS 2 interface KP 100 or USB interface KP 100U is preinstalled in this ...

Page 51: ... content in the programmable keypad to be edited in this utility or to write the edited result into the programmable keypad The Edit menu helps the editing operation like copy paste or clear the programmed content of a programmable key Please ignore any gray command relating to Page that is applicable only to other models of Posiflex programmable keyboard and remains here only for consistency cons...

Page 52: ... program group with Posiflex USB Touch Manager being the main program POSIFLEX USB TOUCH MANAGER Most items in this utility should be easily understandable to average user Followings are just some reminders on some items l Calibrate This button engages the Posiflex USB Touch Calibrator l Edge Acceleration This function engages the Posiflex USB Touch Edge Acceleration Tool and helps to find the hid...

Page 53: ...clicking the right button of mouse at that point When it is unchecked each touch will work as clicking the left button of mouse Ref to the right hand version of mouse l Mouse Emulation Click on Touch Click on Release Only one of the three radio buttons can be selected The mouse emulation refers to the drag and drop function l OK This button accepts all parameters set and closes the utility window ...

Page 54: ... as Right Button Click check box in the USB touch manager When executed there will be a small window of One Shot Right Button appearing on desktop Any touch on the panel right after touching this small window will work like clicking the right button of a right handed mouse at that point However the next touch will resume the left button of mouse unless the small window is touched again REMARKS FOR...

Page 55: ...osiflex Product Information CD and study the readme file before executing the setup program should there be any need for a driver re installation Make sure you select COM2 for the port of the touch driver in the process All control parameters of this driver can be reviewed through an item Elo Touchscreen in the Control Panel after driver installation Some sample screen shots of this driver are exh...

Page 56: ... would become very difficult because the 2 touches would be considered at 2 different spots The port selection for Touchscreen on must be set to COM5 for the touch panel over the LCD panel in this product series In case a Posiflex touch monitor is connected to the VGA port for 2nd display the touch function of the second display monitor has to be connected to one of the ports from COM2 to COM4 Ple...

Page 57: ...Drawer Main switch ON only 5 4 Application Guide Power On Off Control External Power Switch Main switch ON OFF 5 4 Application Guide Power On Off Control External Power Switch Software power off 5 4 Application Guide Power On Off Control Software Switch Off Enhance forced power off 5 5 Application Guide Forced Power Off Enable UPS function 5 7 Application Guide UPS Function Enabling Disable UPS fu...

Page 58: ......

Page 59: ...umber 2 marked near a corner of a jumper with 2 rows of pins is used to indicate the position of pin number 2 for identification of all pins BAT 2 CN7 LAN1 KBMS1 CN1 D I M M 1 D I M M 2 IDE2 SW1 L C D 1 B2 A1 JP3 U9 AUDIO1 COM1 U7 U8 CN3 LPT1 CN10 LED1 VGA1 IDE1 SATA1 BZ1 CN8 U16 U13 U24 CN5 U20 U12 JP8 Y1 Y2 Y4 X1 X2 F6 JP12 F1 JP11 JP13 JP14 JP22 JP21 F8 F7 F2 F5 F4 F3 CN2 CN4 CN12 JP7 JP6 JP5 2...

Page 60: ...tation Remarks 1 A small black block A or a small number 1 in the drawing for a jumper or an IC is used to indicate the position of pin number 1 2 A small number 2 marked near a corner of a jumper with 2 rows of pins is used to indicate the position of pin number 2 for identification of all pins ...

Page 61: ...tor COM1 2x D Sub 9M COM1 COM2 Connector DIMM1 DDR2 DIMM Socket DDR2 533 SDRAM DIMM Socket DIMM2 DDR2 DIMM Socket DDR2 533 SDRAM DIMM Socket F1 SMD FUSE Fuse for 5V Power in USB Ports F2 POLYFUSE Fuse for 12V Power in VGA Port F3 SMD FUSE Fuse for 5V Power in USB Ports F4 SMD FUSE Fuse for 5V Power in USB Ports F5 SMD FUSE Fuse for 5V Power in PS 2 KB Mouse Ports F6 POLYFUSE Fuse for UPS Charge Pr...

Page 62: ...BGA IC NB Chip U8 nanoBGA2 IC CPU U9 microFCBGA IC SB Chip U12 IC CLKGEN U13 IC LAN Chip U16 IC BIOS Winbond W39V040FAPZ U20 IC Power Manager U24 IC LPCIO Chip VGA1 3x5 D F VGA Port X1 XTAL Crystal X2 XTAL Crystal Y1 XTAL Crystal Y2 XTAL Crystal Y4 XTAL Crystal ON SOLDER SIDE Position Part Spec Usage BAT1 Batt Socket CMOS Battery Socket F9 SMD FUSE Fuse for 5 V Power in COM1 2 Ports JP9 Mini HDR 1...

Page 63: ...s RI 2 4 short COM2 Pin9 connected to 5 V DC 4 6 short COM2 Pin9 connected as RI Please note that the 5 V DC supply should be selected only for supporting the Posiflex serial devices that are designed to be powered from this source Whenever such Posiflex device is to be removed from this port the 5 V DC supply must be deselected VGA PORT DC POWER ENABLE DISABLE STATUS OF JP12 ON SOLDER SIDE VGA PO...

Page 64: ...the DCD bit of COM1 is set the AC power is present The user has to change this jumper if he she wants to detect the standard DCD signal on COM1 AUDIO OUTPUT CONTROL STATUS OF JP5 JP6 JP7 AUDIO OUTPUT PORT JP5 1 2 JP6 1 2 JP7 1 2 Short Stereo Line Out JP5 2 JP6 2 JP5 2 JP6 2 JP7 2 3 Short Mono Amplifier Out TOUCH SIGNAL SETTING STATUS OF JP2 TOUCH SIGNAL 1 3 2 4 Short COM2 Port 3 5 4 6 Short USB PS...

Page 65: ... Technical Manual 6 7 RISER CARD LT 057 for no touch COMPONENT SIDE SOLDER SIDE CONNECTORS ON SOLDER SIDE Position Part Spec Usage J1 RT HDR 1x4 W H To Inverter JP1 HDR 2x10 W H To LVDS LCD Panel Y1 U2 Q11 P2 P1 JP1 U10 ...

Page 66: ...P 058 for RS 232 touch COMPONENT SIDE SOLDER SIDE CONNECTORS ON SOLDER SIDE Position Part Spec Usage J1 RT HDR 1x4 W H To Inverter J2 CONN 50 pin FPC To IR touch Frame JP1 HDR 2x10 W H To LVDS LCD Panel U16 Q11 L21 Y1 U17 JP1 U10 U11 U1 J1 1 U3 U7 J2 1 2 ...

Page 67: ...OMPONENT SIDE Position Part Spec Usage CN1 HDR 1x4 Reserved Debug CN2 RT HDR 1x7 To Touch Panel CN3 HDR 1x6 w H mini Reserved F W download JP2 HDR 2x4 USB Touch Setup ON SOLDER SIDE Position Part Spec Usage J1 RT HDR 1x4 W H To Inverter JP1 HDR 2x10 W H To LVDS LCD Panel JP1 U10 U11 U1 J1 1 U3 CN1 U2 Q11 L21 BZ1 CN2 JP2 2 CN3 ...

Page 68: ...ICABLE OS 1 2 short 5 6 open Windows Win98 Win2000 WinXP 1 2 open 5 6 open Linux or WinCE 1 2 short 5 6 short MS DOS 3 4 short Touch panel type E 3 4 open Touch panel type F Please note for MS DOS application of the USB touch the USB Mouse Support within Integrated Peripherals in BIOS must be Enabled and the driver UTCHDRV COM should be included in Autoexec bat ...

Page 69: ...PONENT SIDE SOLDER SIDE JUMPERS AND CONNECTORS ON COMPONENT SIDE Position Part Spec Usage COM1 RJ45 JACK COM3 Port COM2 RJ45 JACK COM4 Port F1 SMD FUSE Fuse for 5 V Power in COM3 4 Ports JP1 HDR 2x3 COM3 4 DC Supply Select U1 U2 BKT2 JP1 2 U3 F1 BKT1 COM 2 COM 1 CN1 1 2 ...

Page 70: ...Y SELECT STATUS OF JP1 PIN 9 STATUS 1 3 short COM3 Pin9 connected to 5 V DC 3 5 short COM3 Pin9 connected as RI 2 4 short COM4 Pin9 connected to 5 V DC 4 6 short COM4 Pin9 connected as RI Please note that the 5 V DC supply should be selected only for supporting the Posiflex serial devices that are designed to be powered from this source Whenever such Posiflex device is to be removed from this port...

Page 71: ...k 1 Track 1 Track 1 ISO JIS Lead End Code When open Disable Disable Disable ISO Enable When short Enable Enable Enable JIS I II Always short Disable JP2 for U3 USB MCU JP2 pin pair 1 2 3 4 5 6 7 8 Function Alt Num NumLock BaudRate OS When open Enable Enable 19200 Linux When short Disable Disable 9600 Windows CN3 U5 CN2 CN1 U1 AT43301 U3 2 1 12 11 JP1 UMSRCPU F 2 1 JP1 8 7 ...

Page 72: ...k 1 Track 1 Track 1 ISO JIS Lead End Code When open Disable Disable Disable ISO Enable When short Enable Enable Enable JIS I II Always short Disable JP2 for U3 USB MCU JP2 pin pair 1 2 3 4 5 6 7 8 Function Alt Num NumLock BaudRate OS When open Enable Enable 19200 Linux When short Disable Disable 9600 Windows CN3 U5 CN2 CN1 U1 AT43301 U3 2 1 12 11 JP1 UMSRCPU F 2 1 JP1 8 7 ...

Page 73: ...B interface V MSR USB interface V V V Optical F P sensor USB interface V SC reader USB interface V V V I B Dallas Key reader V If a side mount unit BC 100U SD 100 SD 200 is ordered together with the Jiva TP system this side mount unit will be attached on the Jiva TP system main unit when delivered However if the side mount unit is KP 100 KP 100U or if BC 100U SD 100 SD 200 is ordered separately fr...

Page 74: ... hooks at rear of the PD302 series toward the suitable ventilation openings on top rear of the main unit Please use a phillips head driver to fasten the screws on the metal hook but not to overdo it so that the metal hooks hold the ribs of the ventilation holes from inside 2 Plug the DB9 female connector to the COM port with power DC supply from the TP series If the COM1 terminator is found on COM...

Page 75: ...hook plate of the rear connect cover from inside behind the UPS battery The rear connect cover of universal base can be removed by pushing the plastic hook plate of it from inside as marked by white arrow in the right picture However this picture is an up side down inside view of the stand assembly with base box removed for illustration purpose only Please push the plastic hook plate with finger t...

Page 76: ...lude a 3 5 or 2 5 system HDD and UPS battery while the installable devices to a universal base include 3 5 or 2 5 system HDD UPS battery system power adaptor and an internal slim type CD ROM CD RW COMBO CD RW DVD ROM drive However please note that the never ending quest for excellence of the manufacturer may result in discrepancy from the above statement and sample pictures yet the basic concepts ...

Page 77: ...uence Slide rubber sleeves into screw holes in bracket to have the bracket clips into the middle groove of rubber sleeve Put HDD in place then Fix shoulder screws BASE INSTALLED 2 5 HDD option The bottom view of slim base models and universal models for 2 5 HDD look different from those for 3 5 HDD and there are 2 versions each with minor variations All versions are exhibited below with each numbe...

Page 78: ...ket cover TO REMOVE THE EARLIER VERSION 2 5 HDD 1 Remove HDD bracket cover fixing screw 2 Lift the steel wire handle 3 With one hand holding gently the connector end the end far away from the 2 5 HDD bracket fixing screw of the 2 5 HDD bracket cover use the other hand to pull the steel wire handle away from the connector end with force The 2 5 HDD inside the bracket cover will be disconnected from...

Page 79: ...le from top of the bracket cover 6 Reopen the bracket cover and reposition the 2 5 HDD if the screw holes are not well aligned Proceed to next step if the positioning is OK 7 Pull the steel wire handle toward the connector end with force till the connectors are well inserted 8 Fit the steel wire handle F to the rubber handle seat G on HDD bracket cover 9 Fix back the HDD bracket cover fixing screw...

Page 80: ... from top of the bracket cover 6 Reopen the bracket cover and reposition the 2 5 HDD if the screw holes are not well aligned Proceed to next step if the positioning is OK 7 Push the 2 5 HDD bracket cover in the direction of the red arrow in the right picture to have the HDD connector well inserted 8 Fix back the HDD bracket cover fixing screw TO REMOVE THE 2 5 HDD BRACKET ASSEMBLY In case the remo...

Page 81: ...he red arrowed slit in the right picture above Please use the upper hole of the 2 screw holes on CDROM bracket rectangular marked in the left picture above Connect the red arrowed connectors of IDE data and power cable as in these lower pictures to the CDROM drive Please notice the difference in cables used for the CDROM drive when type of HDD changes POWER ADAPTOR for universal base Remove the 2 ...

Page 82: ...ully selected to hold the bracket kit with the main unit to the wall The plastic cotters and the screws supplied with the kit are applicable solutions for holding the bracket kit with main unit to a concrete wall Before using the plastic cotters 3 or 4 holes for fixing back cover to wall must be drilled in the wall in specific manner Hole diameter should be 1 4 or 6 35 mm each Hole depth should be...

Page 83: ...nto the back cover on wall as indicated in the side view pictures above And then apply the screw on top of the wall mount kit to hold the complete wall mount kit on wall as indicated in top view pictures below WB 6300 Top View WB 6600 Top View WB 6800 Top View It is then all right to hang the main unit with 4 matching pegs to go into the winding grooves on WB 6000 WB 6300 WB 6600 or WB 6800 and al...

Page 84: ...alled devices go out of the bracket through the indicated opening in lower part of the bracket for connection to the main unit Interpretation on each device in each kit follows for WB 6800 for WB 6300 for WB 6600 For installing the UPS battery in WB 6300 and WB 6600 a Velcro strap is required to pass through the 2 slits in the bracket as shown in the 2 left pictures above For WB 6800 a UPS battery...

Page 85: ...d of the HDD bracket as in the middle picture above and insert the IDE HDD cable and the HDD power cable in the connectors on conversion board as in the rightmost picture above Please make sure the cables are inserted in correct orientation Leave the pull strap end of IDE HDD cable for connection to main unit Then please remove the screw fixing the HDD bracket cover on the other end of the bracket...

Page 86: ...DE HDD cable HDD power cable and a bracket fixing screw as in the left picture above are required Slide rubber sleeves into screw holes in bracket to have the bracket clips into the middle groove of rubber sleeve as arrowed in left picture above Put HDD in place inside the bracket with the HDD control board facing the bracket and the HDD connectors then fix shoulder screws as in the middle picture...

Page 87: ...e right picture above CDROM Kit in WB 6800 To install the CDROM COMBO drive in WB 6800 a CDROM bracket 4 small CDROM drive fixing screws 1 CDROM bracket fixing screw a 3 connector IDE cable and a 3 connector HDD power cable as in the left picture above are required in addition to the CDROM COMBO drive itself It is advisable to install the CDROM COMBO drive before the HDD assembly for easier operat...

Page 88: ...le for those models with base stand for 2 5 HDD and the rear top mount upgrade kit and the base mount upgrade kit are not applicable in wall mount application Select a flat surface on wall of adequate strength and with proper ventilation and space condition Please use the right material to hold this terminal according to the wall material Drywall concrete solid wood etc Consult with your contracto...

Page 89: ... is given in the left for better view of the base box screw locations Turn the base box 90 degrees to the right Release the cable tie save the screw for later use and reroute all cables to main unit to go through the lower opening as in these 2 pictures Now the base box turns into the wall mount bracket with all devices in There is one remark on the universal base model though Should there be a CD...

Page 90: ...p view pictures left for slim base and right for universal base Align the four matching pegs on the back of the main unit with the four matching holes in the bracket as marked in squares in pictures below left for slim base and right for universal base and allow the main unit to slide down the winding grooves in the wall mount backpack originally the base box The stand assembly is not engaged in w...

Page 91: ...ver unhooked from the back cover A push pull on the edge of the inner opening of the front cover could be engaged to help unhooking the front cover But please keep cautious not to get scratch damage on the touch panel The unhooking sequence advisable from the experience suggests to release one hook on the side either left or right then the hook on top or bottom nearest the same corner to release o...

Page 92: ... and meantime push this cover plate to the right 4 to show the riser card Now please disconnect the three cables LCD display cable touch controller cable and inverter cable from the riser card and separate the LCD touch panel assembly from the main unit The riser card replacement can be done at this stage For further disassembly please refer to the right picture and disconnect the red arrowed back...

Page 93: ... the LPC adaptor card in the back cover assembly after removing the complete LCD assembly for the snap on structure the operation is quite simple Remove the only screw as indicated in the right picture and pull the cover plate down to remove it REPLACE LPC ADAPTOR CARD The inside of back cover assembly with main board and the red arrowed LPC card after removal of cover plate looks like the left pi...

Page 94: ... panel I O plate to release it if necessary No further disassembly on the back cover assembly is allowed except releasing the exhaust fan from the metal box Any further disassembly operation by any non well trained people will almost doomed to cause damage without awareness of the occurrence Such damage is strictly the responsibility of the person who intended to disassemble and is not covered by ...

Page 95: ...or replacement shall call for replacement of other items related to that selection to another Please follow the separately issued list if it is renewed later Pos S Part Number Description 1 36274008102 Front Cover For 15 W Blue Led Cable For Touch Source E Charcoal 2 36274008103 Front Cover For 15 W Blue Led Cable For Touch Source E Black 3 36294254002 Front Cover for 15 w Blue LED cable for Infra...

Page 96: ...010 Chassis Cover 111 1 16200120090 Riser Card Cover 112 1 16320301013 Fan Partition Black 1 MTP6P 003C Cable Cover Charcoal 113 2 16200303013 Cable Cover Black 1 MTP3P 020 C Plastic Key Charcoal 114 2 16100320013 Plastic Key Black 115 1 21972080125 AC Power Adaptor 12V 80W 1 36305001000 3 5 HDD IDE Power Cable Set for Universal Base 116 2 36025001000 2 5 HDD IDE Power Cable Set for Universal Base...

Page 97: ...Base Stand Assembly w 2 5 IDE HDD Bracket Stopper Charcoal 117 8 36026010003 Universal Base Stand Assembly w 2 5 IDE HDD Bracket Stopper Black 1 16200312002 MTP6P 008C Plastic Stopper for Base Stand Charcoal 118 2 16280302013 Plastic Stopper for Base Stand Black 119 1 46011602300 IDE 2 5 HDD Adaptor Board for 2 5 HDD in Base 1 36295000000 3 5 HDD IDE Power Cable Set for Slim Base 120 2 36015000000...

Page 98: ...VDS LCD 125 1 36324003000 TP LT 58Pro Series M B w IO Plate 126 1 10684038062 Binding Head Screw 6 32NC 6L 127 1 36305000000 Speaker x 2 w Audio Cable 1 set 128 1 16320100020 I O Connector Plate for TP LT 5800 Pro series 129 1 10554038042 Binding Head Screw 6 32 4L 130 1 MHXCSCRW 4 8 8 2 Hexagon Head Screw 4 8 8 2 for I O Connectors 131 1 10501030052 Pan Head Screw M3 5L Ni 132 1 36324005000 COM3 ...

Page 99: ...Japan for TP LT 58 Pro Series 4 21868400500 Power Cord for S A for TP LT 58 Pro Series 5 21868500500 Power Cord for U K for TP LT 58 Pro Series 6 21868600500 Power Cord for U S A for TP LT 58 Pro Series 7 21868900500 Power Cord for Argentina for TP LT 58 Pro Series 1 16010510130 TP LT 58 Pro Packing Carton 1 16010540040 TP LT 5800 Pro PE Foam per Pair 1 CPEBAG64 70 PE Bag 64 70 CM Thick 0 05 2 103...

Page 100: ...TP 5815 Pro series Technical Manual 7 28 ASSEMBLY DRAWING 120 117 121 118 122 118 123 103 105 108 112 119 110 102 109 116 114 113 111 124 115 104 106 101 126 127 129 117 130 107 125 128 131 132 134 ...

Reviews: