background image


Package Contents 


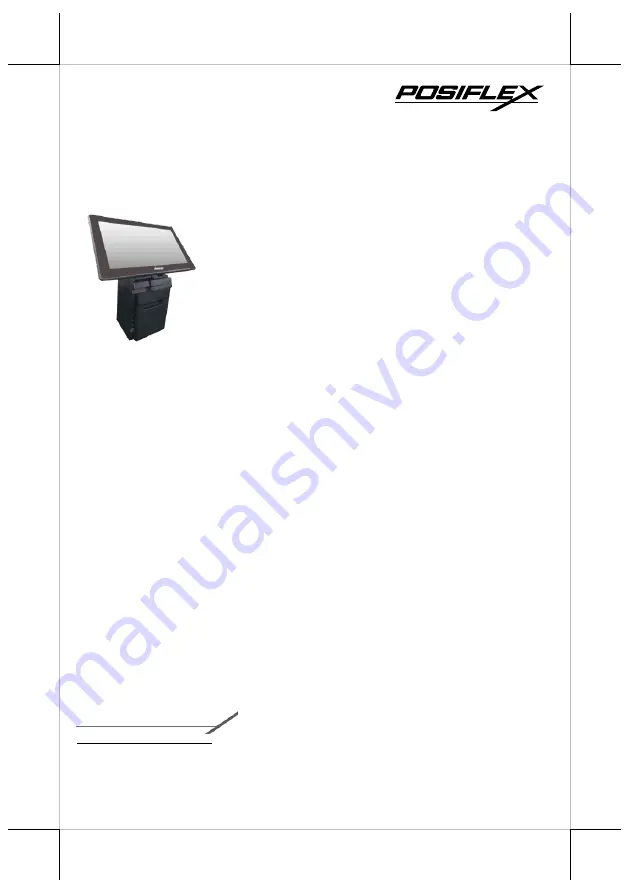
HS-3310A/3314A desktop POS  (x 1) 


24V/60W Power Adaptor  (x 1) 


Power cord  (x 1) 


3-inch wide thermal paper roll (x 1) 


Paper separator for 2” thermal paper roll (x 1) 


Desktop mounting kit pack for HS-3310A (x 1) 
(including 1 desktop mounting bracket,  
4 fixing screws, and 4 plastic anchors) 


Desktop mounting kit pack for HS-3314A (x 1) 
(including 1 bottom plate, 1 desktop mounting 
bracket, 4 fixing screws, and 4 plastic anchors) 


User manual (x 1) 


15670902010 Ver. A0


http://www.posiflex.com


HS-3310A/3314A 

JIVA Desktop POS 

User Manual 

Summary of Contents for HS3314M1D31

Page 1: ...r roll x 1 Desktop mounting kit pack for HS 3310A x 1 including 1 desktop mounting bracket 4 fixing screws and 4 plastic anchors Desktop mounting kit pack for HS 3314A x 1 including 1 bottom plate 1 desktop mounting bracket 4 fixing screws and 4 plastic anchors User manual x 1 15670902010 Ver A0 http www posiflex com HS 3310A 3314A JIVA Desktop POS User Manual ...

Page 2: ...asures to correct the interference This device complies with part 15 of the FCC Rules Operation is subject to the following two conditions 1 This device may not cause harmful interference and 2 this device must accept any interference received including interference that may cause undesired operation CE CLASS A WARNING This equipment is compliant with Class A of CISPR 32 In a residential environme...

Page 3: ...or the leakage of flammable liquid or gas BATTERIE ATTENTION NOTES Jetez les piles usagées conformément aux instructions Remplacement d une batterie avec un type incorrect qui peut annuler une sauvegarde par exemple dans le cas de certains types de batterie au lithium Mise au rebut d une batterie dans le feu ou dans un four chaud ou écrasement ou coupure mécanique d une batterie pouvant entraî ner...

Page 4: ...tor Printer Paper Out LED Indicator 3 Track Magnetic Stripe Reader Optional Printed Paper Exit HS 3310A 3314A P CAP Touch LCD Panel Fingerprint or iButton Sensors Optional Posiflex 2D Scanner Optional Paper Jam Rescue Compartment Top I O Interface Cable Cover Bottom I O Interface Cable Cover Feed Button ...

Page 5: ...5 Left Side View Right Side View Power Button Paper Roll Cover Release Lever RFID Card Reader Optional ...

Page 6: ...om I O Interface Bottom I O Interface Rubber Pad HDMI Port Rubber Pad Mounting holes USB 3 0 Port 24V DC IN Power Jack Micro SD Card Slot RJ 10 Cash Drawer Port USB 2 0 Port Micro USB OTG Reset Button Line Out Port USB 2 0 Port DB 9 COM Ports RJ 45 LAN Port 12V DC OUT Power Jack ...

Page 7: ...figure 2 Hold the bottom I O interface cover with your thumb and forefinger and then gently pull the cover outwards to remove the cover 3 Connect power adapter and I O cables to the bottom I O interface 4 Have the cover join to the wedge portions of the bottom I O interface 5 Before pushing the cover back into place neatly thread the cables through the cable exit 6 Press down the cover to close th...

Page 8: ...r place paper separator in the paper roll compartment by following the instructions below If you are using 3 paper roll for the printer please skip to next step 2 1 Hold the separator with the sharp pointed side down 2 2 Push the sharp pointed part of paper separator into the slot on the bottom of the paper roll compartment 2 3 Slide another side of paper separator into the slot on the top of the ...

Page 9: ...ds towards the paper cutter 5 Make sure the loose end sticks out of the opening of the paper roll compartment Then close the paper roll cover by pushing it back at the center of the top side of the cover with a click sound 6 Make sure the paper roll is well loaded with the end of the paper sticking out as shown in the figure To avoid paper jam or other printing errors do NOT press the paper roll c...

Page 10: ... 2 In the paper jams rescue compartment find the adjustment wheel which mainly allows you to manually adjust the cutting position of the cutter blade 3 Keep rotating the wheel until the cutter blade is completely retracted 4 Observe the cutter position through the paper exit slot to ensure the cutter blade moves upward to the retracted position 5 Gently push down paper roll cover release lever to ...

Page 11: ...om facing towards you remove the screw shown by the arrow 2 Position the terminal with its screen facing toward you and then push down the paper roll cover release lever to open the paper roll cover 3 Inside the paper roll compartment remove the two screws indicated by the arrows 4 While supporting the terminal with one hand grab the right hand side of the terminal and then pull the front cover to...

Page 12: ...llowing figures 7 1 Connect the CR cable to CR port on the control board 7 2 Insert the cable to the port for printer signal on the control board 7 3 Attach the USB cable to Type B USB port on the control board 7 4 Plug the cable to DC IN power jack on the control board 8 Carefully support the printer module with both of your hands and then push it back into the rear case of HS series terminals ...

Page 13: ...o a table in preventing your POS system from being rocked tipped or tilted accidentally Using bottom plate Please follow the steps below to install the bottom plate for HS 3114A 1 Take the bottom plate with the mounting bracket out of the package and place it with its screw holes on the top in your preferred position 2 Support your POS terminal with its screen facing towards you Then align the two...

Page 14: ...he mounting bracket in your preferred mounting position use the screw holes of the mounting bracket to drill two holes on the surface Each hole has to be at least 4 1 or 6 25 mm diameter and 8 3 1 or 35mm in depth 3 Insert two plastic anchors into the holes you drilled in step 2 and use a hammer to tap the plastic anchors into the drilled holes 4 After well attaching two screw holes of the mountin...

Page 15: ...OS onto the table please follow the steps below 7 1 Use the two mouting holes located on the rear of the POS to drill another two holes on the same surface Each hole also has to be at least 4 1 or 6 25 mm diameter and 8 3 1 or 35mm in depth 7 2 Push the POS in the direction shown by the arrow to reomve it from the mouting bracket 7 3 After pushing two plastic anchors into the drilled holes tap the...

Page 16: ...A To power on the POS gently press and hold down the power button for at least 1 second till the Power LED indicator turns solid blue and then release the button Power OFF HS 3310A 3314A To initiate a system shutdown on Android operating system you are expected to follow the following procedures to turn off your system 1 Press down the power button for a few seconds until a pop up window appears 2...

Page 17: ...ts hand free design it offers a more convenient solution for users to read 1D 2D barcodes and then transmitted scanned data to the terminal for further processing which greatly increases your working efficiency By default the scanner is set to Auto Trigger operational mode Also to adjust the scanning angle of the scanner you may tilt the scanner up and down as indicated in the figure below Using F...

Page 18: ...essing In this case you may either choose to reboot your printer or keep pressing Feed button to further create the hex dump and Ethernet info print outs until the indicator stops blinking red Software Switch Reset Software Switch Reset is the specially designed function aimed to facilitate the factory reset process Please go through the following instructions to reset your printer to factory sett...

Page 19: ...icators anytime to ensure your system functions normally More importantly knowing how to interpret the status indicators enables you to perform basic troubleshooting more efficiently The below chart is thus provided to enumerate all the possible indicator lights with their meanings for your reference LED Status Description POWER LED Solid orange System standby Solid blue System ON Error LED Solid ...

Page 20: ... 1 x 5 pin for HUB board 1 x 5 pin reserved Audio Port 1 x 2W speaker internal wafer 1 x audio jack DC In Jack 1 x 24V DC In 3 pin on the bottom I O plate 1 x 12V DC Output jack 2 pin on the top I O plate Ethernet Port 1 x 10 100 1000 Mb on the bottom I O plate Power Button 1 x power button Reset Button 1 x reset button on the top I O plate Wireless Connectivity WiFi via mini PCIe expansion slot o...

Page 21: ...gine View Angel Diagonal approx 46 4 Horizontal approx 38 0 Vertical approx 26 4 Supported Symbology UPC EAN Code 39 Codabar Interleaved 2 of 5 Matrix 2 of 5 POSTNET MSI Plessey UK Plessey Code 128 GS1 Databar GS1 Databar Limited GS1 Databar Expanded QR Code PDF417 The product information and specifications are subject to change without prior notice To get the detailed information on HS 3310A 3314...

Page 22: ...22 MEMO ...

Page 23: ...23 MEMO ...

Page 24: ...24 MEMO ...

Reviews: